
Wheel arch liner - front
- Make
- Land Rover
- Model
- Freelander Workshop Manual
- Year
- 1998–2000
- Section
- Exterior fittings › Wheel arch liner - front
BodyWheel arch liner - front
Refit
- Position front wing to body.
- Connect repeater lamp multiplug.
- Align front wing to body.
- Fit, but do not tighten, the following: Torx screws and bolt securing rear of wing to ’A’ post Bolts securing wing bracket to ’A’ post. Bolts securing top of wing. Bolts securing front of wing.
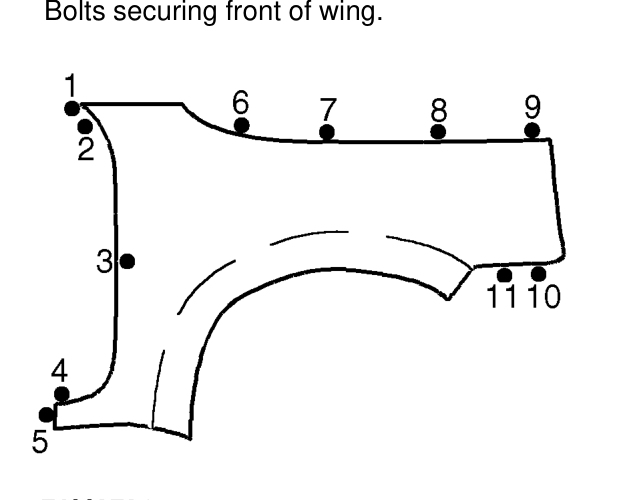
- Align wing and tighten bolts and Torx screws, in sequence shown above, to 5 Nm.
- Align wheel arch liner to rear of wing.
- Fit screw securing wheelarch liner to under side of wing.
- Fit lower sill finisher. See this section.
- Fit front mud flap. See this section.
WHEEL ARCH LINER - FRONT
Service repair no - 76.10.48
Remove
- Raise front of vehicle, one side.
WARNING: Support on safety stands.
- Remove road wheel(s).
- Remove front mud flap. See this section.
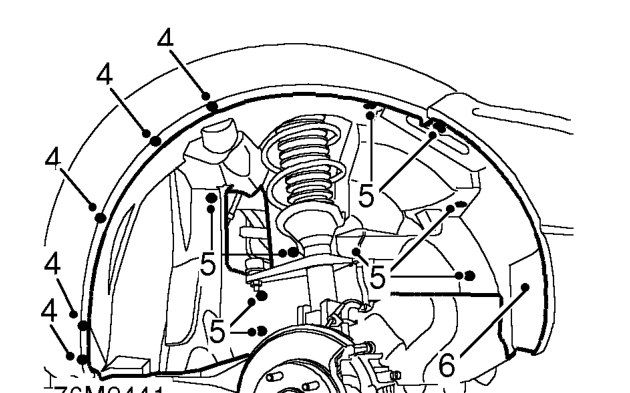
- Remove 5 screws securing wheel arch to front wing.
- Remove 8 scrivets securing wheel arch to inner wing.
- Remove wheel arch liner from inner wing.
Refit
- Position wheel arch liner to inner wing, locate behind wheel arch cladding.
- Fit scrivets securing wheel arch liner to inner wing.
- Fit screws securing wheel arch liner to front wing.
- Fit mud flap. See this section.
- Fit road wheel(s) and tighten nuts to correct torque. See INFORMATION, Torque wrench settings.
- Remove stand(s) and lower vehicle.
Parts & tools for this job For 1998 Land Rover Freelander
- TOOLTrim removal tool kitSearch: trim removal tool kit
- PARTTouch-up paintSearch: Land Rover touch up paint
- PARTPanel clip assortmentSearch: Land Rover panel clips assortment
Links open Amazon search results in a new tab. As an Amazon Associate I earn from qualifying purchases.