
Viscous coupling assembly
- Make
- Land Rover
- Model
- Freelander Workshop Manual
- Year
- 1998–2000
- Section
- Repairs › Viscous coupling assembly
Drive shaftsViscous coupling assembly · page 1 of 2
VISCOUS COUPLING ASSEMBLY
Service repair no - 47.20.01
Remove
- Remove front propeller shaft. See this section.
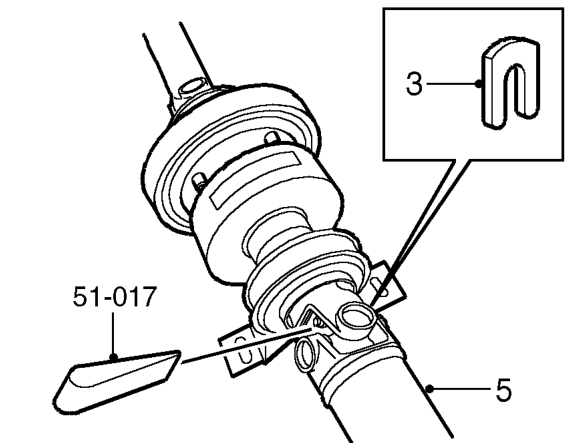
- Knock back tab washer from bolt securing rear propeller shaft to viscous coupling.
- Loosen bolt securing propeller shaft to viscous coupling and slide out ’U’ washer.
- To disengage the spline, insert wedge 51-017 between the bolt head and the universal joint yoke. Screw the bolt in or out to correctly position the wedge between the yoke and the bolt head. Drive the wedge in squarely to separate the components. Adjust the bolt engagement as necessary to maintain contact between the wedge and bolt head.
CAUTION: Take care that the universal joint seals are not damaged during this operation.
NOTE: A force is required to remove the splined component due to a helix on the male spline.
- Remove bolt and tab washer, pull rear propeller shaft from viscous coupling unit, discard tab washer and bolt if damaged.
CAUTION: It is important that the viscous coupling is fully supported whilst pressing off the support bearing.
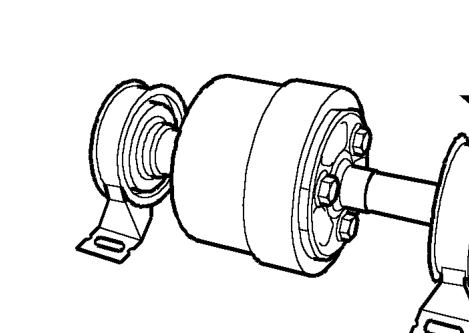
- Note the orientation of the support bearings on the viscous coupling unit.
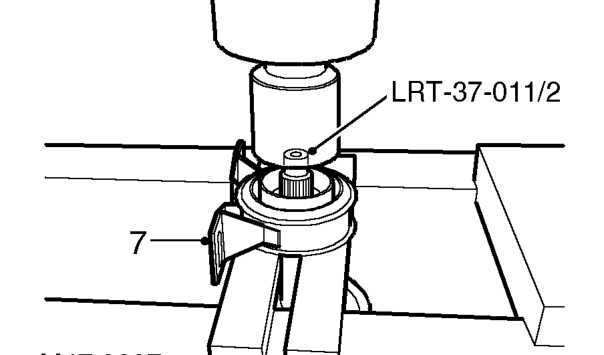
- With assistance, position viscous coupling unit onto press bed, with suitable press bars located on he support bearing as shown. Take care that the press bars are not positioned on the steel flinger.
- Position LRT-37-011/2 thrust button onto viscous coupling unit splines.
- With assistance, press the splined end of the viscous coupling unit through the bearing.Take care that the viscous coupling unit does not drop when free of support bearing.
Parts & tools for this job For 1998 Land Rover Freelander
- PARTWheel bearingSearch: Land Rover Freelander 1998 wheel bearing
- TOOLBearing puller kitSearch: wheel bearing puller kit
- PARTCV boot kitSearch: Land Rover Freelander 1998 cv boot kit
Links open Amazon search results in a new tab. As an Amazon Associate I earn from qualifying purchases.