
Viscous coupling assembly (page 2 of 2)
- Make
- Land Rover
- Model
- Freelander Workshop Manual
- Year
- 1998–2000
- Section
- Repairs
Drive shaftsViscous coupling assembly · page 2 of 2
- Repeat the procedure and remove the front support bearing from the viscous coupling unit.
- Remove 3 bolts securing torsional vibration absorber to the viscous coupling unit.
- Note orientation of torsional vibration absorber on viscous coupling unit.
Refit
NOTE: Replace support bearings if worn or damaged.
- Ensure mating face of torsional vibration absorber and viscous coupling are clean and free from burrs.
- Position torsional vibration absorber to viscous coupling, fit and tighten bolts to 80 Nm.
- Clean flinger, bearing journal, splines and support bearings.
- Ensure that the cavities between the bearing and outer shrouds are packed with Texaco Novatex EP2 grease.
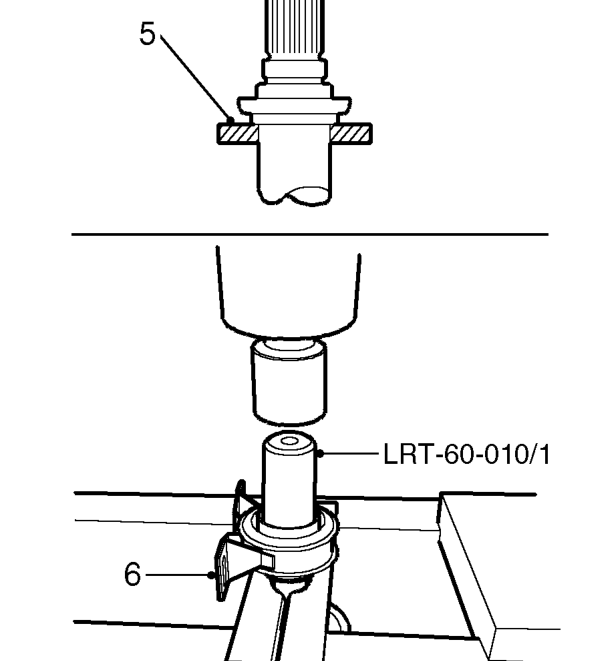
- With assistance, position viscous coupling unit onto press bed and locate the press bars onto collar as shown.
- Position front support bearing onto viscous coupling unit.
- Position LRT-60-010/1 onto bearing inner race, and with assistance, press support bearing onto viscous coupling unit.
- Repeat procedure to fit rear support bearing to viscous coupling unit.
- Spin support bearings and check for true running.
- Clean mating faces and splines on rear propeller shaft and viscous coupling.
- Engage splines between propeller shaft and viscous coupling unit shaft and push home propeller shaft as far as possible.
- Partially fit bolt and new tab washer, position ’U’ spacer between tab washer and spline yoke.
- Tighten bolt to to 65 Nm to fully seat splines and secure with tab washer.
- Fit front propeller shaft. See this section.
Parts & tools for this job For 1998 Land Rover Freelander
- PARTWheel bearingSearch: Land Rover Freelander 1998 wheel bearing
- TOOLBearing puller kitSearch: wheel bearing puller kit
- PARTCV boot kitSearch: Land Rover Freelander 1998 cv boot kit
Links open Amazon search results in a new tab. As an Amazon Associate I earn from qualifying purchases.