
Exhaust pipe - front - ’l’ series
- Make
- Land Rover
- Model
- Freelander Workshop Manual
- Year
- 1998–2000
- Section
- Repairs › Exhaust pipe - front - ’l’ series
Manifold & exhaust systemsExhaust pipe - front - ’l’ series
EXHAUST PIPE - FRONT - ’L’ SERIES
Service repair no - 30.10.09
Remove
- Remove engine acoustic cover. See ENGINE - ’L’ SERIES, Repairs.
- Remove underbelly panel. See BODY, Exterior fittings.
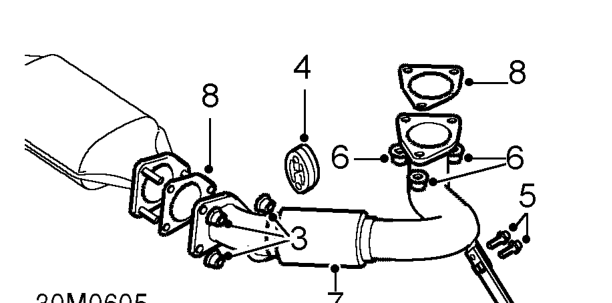
- Remove 3 flange nuts securing front pipe to catalytic converter.
- Release mounting rubber from pipe bracket.
- Remove 2 bolts securing front pipe to support bracket on gearbox.
- Remove 3 flange nuts securing front pipe to manifold.
- Release front pipe from manifold and remove from catalytic converter.
- Remove and discard flange gaskets.
Refit
- Clean pipe flanges.
- Fit new gasket to catalytic converter flange.
- Fit front pipe to catalytic converter, fit nuts but DO NOT tighten at this stage.
- Fit new gasket to manifold flange.
- Raise front pipe and engage flange.
- Fit nuts securing front pipe to manifold and tighten to 45 Nm.
- Fit and tighten bolts securing front pipe to gearbox support bracket to 25 Nm.
- Fit flange nuts securing front pipe to catalytic converter and tighten to 60 Nm.
- Connect rubber mounting to front pipe bracket.
- Fit underbelly panel. See BODY, Exterior fittings.
- Fit engine acoustic cover. See ENGINE - ’L’ SERIES, Repairs.
Parts & tools for this job For 1998 Land Rover Freelander
- PARTExhaust gasketSearch: Land Rover Freelander 1998 exhaust gasket
- TOOLPenetrating oilSearch: penetrating oil
- TOOLOBD2 scannerSearch: OBD2 scanner
Links open Amazon search results in a new tab. As an Amazon Associate I earn from qualifying purchases.