
Disassembly and assembly of the input shaft
- Make
- SEAT
- Model
- Leon Mk1
- Section
- 02R, 5-speed › Gearbox,mechanics,gears,shafts,internal operation › Disassembly and assembly of the input shaft
Power transmissionDisassembly and assembly of the input shaft
| Input shaft - Installation overview |
 Note
| t | When new gears are being fitted, the technical data must be consulted → Chapter, Identification letters, group allocation, ratios, filling quantities |
| t | The input shaft must be always adjusted whenever elements have been replaced which could affect the position of the roller bearings. Refer to Adjustment chart → Chapter |
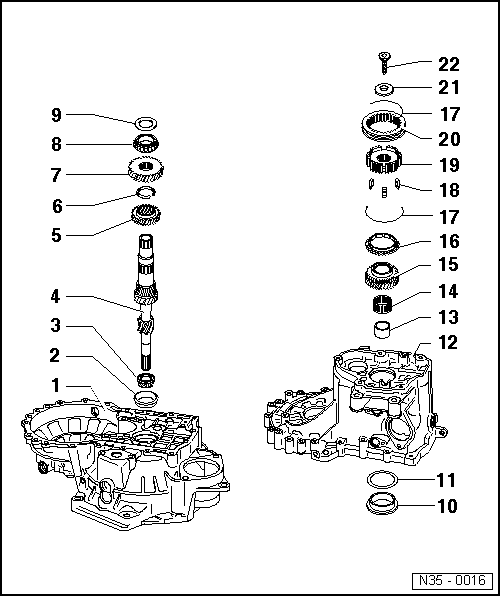
| 1 - | clutch housing |
| q | Repairing → Chapter |
| 2 - | Outer track, roller bearing |
| q | removing → Fig. |
| q | Installing → Fig.. |
| 3 - | Conical roller bearings |
| q | removing → Fig. |
| q | Installing → Fig.. |
| 4 - | Input shaft: |
| q | Adjustment → Chapter |
| 5 - | 3rd gear pinion |
| q | removing → Fig. |
| q | Installing → Fig.. |
| q | Installation position: the collar must be facing the 4th gear pinion |
| 6 - | Circlip |
| q | Use pliers -A 81124- to remove the safety ring. |
| q | Always replace. |
| 7 - | 4th gear wheel |
| q | removing → Fig. |
| q | Installing → Fig.. |
| q | Installation position: the collar must be facing the 3rd gear pinion |
| 8 - | Conical roller bearings |
| q | removing → Fig. |
| q | Installing → Fig.. |
| 9 - | Attack washer |
| q | removing → Fig. |
| q | Installing → Fig.. |
| 10 - | Outer track, roller bearing |
| q | removing → Fig. |
| q | Installing → Fig.. |
| 11 - | Shim |
| q | For the input shaft. |
| q | Determine thickness → |
| 12 - | Gearbox |
| q | Repairing → Chapter |
| 13 - | Needle bearing bush |
| q | removing → Fig. |
| q | Before installing, insert the attack washer → Item |
| q | Installing → Fig.. |
| 14 - | Needle roller bearing |
| 15 - | Mobile gear of the 5thª gear |
| q | Remove with synchromesh assembly of 5th gear → Chapter |
| 16 - | Synchromesh ring of 5th gear: |
| q | Check for wear → Chapter |
| 17 - | Spring |
| q | Installing → Fig.. |
| 18 - | Locking keyways |
| q | Installing → Fig.. |
| 19 - | Synchromesh hub |
| q | Installing → Fig.. |
| 20 - | Mobile sleeve of 5th gear |
| q | Installing → Fig.. |
| 21 - | Plate spring |
| q | Installation position: The concave side should point toward the 5th ª gear → wheel |
| 22 - | Attachment bolt of 5th gear mesh |
| q | 80 Nm |
| q | The screw head incorporates a housing for the plate spring → Item |
| q | Installing → Anchor. |
The same page in: Leon Mk2.
Parts & tools for this job For SEAT Leon
- TOOLTorque wrenchSearch: 3/8 inch torque wrench
- TOOLSocket setSearch: socket set metric
- BOOKHaynes manualSearch: Haynes manual SEAT Leon
Links open Amazon search results in a new tab. As an Amazon Associate I earn from qualifying purchases.