
Interior Trim (01.05)
- Make
- Aston Martin
- Model
- DB9 Factory Workshop Manual
- Year
- Issue 2, 2005
- Section
- Interior Trim › Interior Trim (01.05)
Interior Trim (01.05)
This section covers removal and installation of the interior mouldings and trim panels. In many instances, one component overlaps another component. If this condition is found, it will be necessary to loosen or remove the overlapping component before removal, to prevent damage to either component.
Specifications
| Torque Figures | ||
|---|---|---|
| Description | Nm | lb. / ft. |
| Door Handle | 9 | 6.5 |
| Seat Belt Mounts | 35 | 26 |
Maintenance
IP Trim
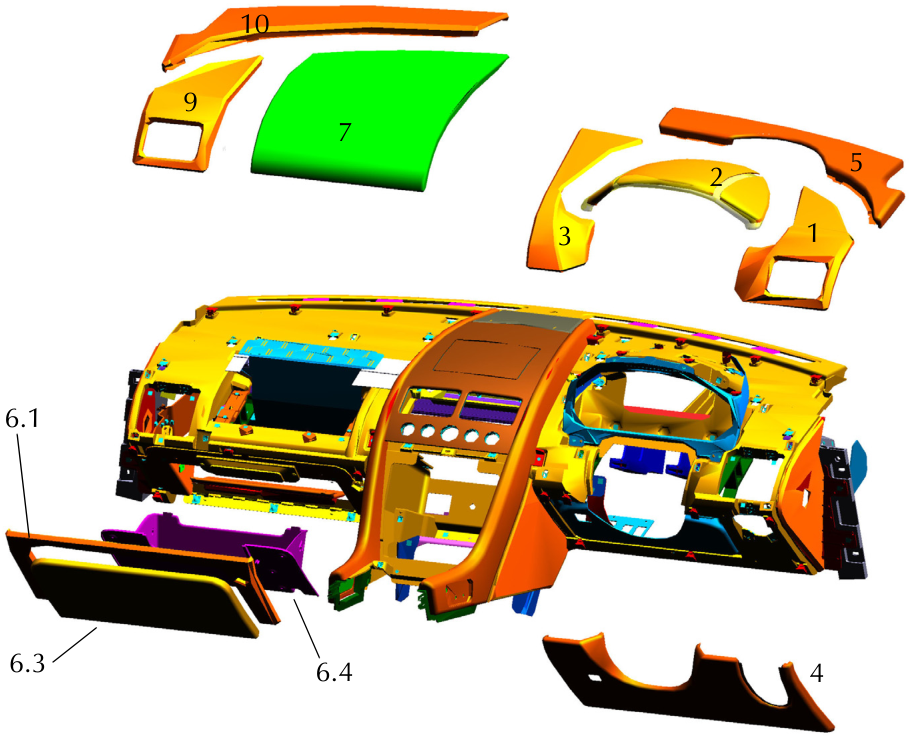
If required, removal of the IP trim can be achieved while the IP is in the vehicle.
Remove
- Panel (1)- Pull off.
- Hood (2) - Pull off.
- Panel (3) - Pull off.
- Panel (4) - Pull off. Disconnect the air temperature pipe.
- Panel (5) - Front, screws (x3)
- Glove box.
- Pull of the outer trim panel. Disconnect the glovebox release switch wiring harness plug.
- Release the damper cord.
- Remove screws (x3) from the glovebox door hinge. Remove door.
- Remove screws (x4) from the sight shield. Remove the sight shield and glovebox.
- Panel, Airbag (7).
- Remove screws (x3).
- Lift from the front edge. Withdraw out of clips (x3).
- Remove the airbag.
- Disconnect the wiring harness plugs (x2).
- Remove bolts (x4). Withdraw the airbag.
- Panel (9) - Screws (x2), then pull off.
- Panel (10) - Screws (x4).
- If required, remove the center stack.
- Pull off the veneer panel (Service tool No. TBA). Disconnect the wiring harness plugs.
- Remove the speaker grill - Screws (x2).
- Remove the center panel (Radio etc.) - Screws (x4)
- Remove the center stack - Screws (x6).
- Remove the media player - Screws (x2). Disconnect the wiring harness plugs.
Caution
Withdraw the airbag panel carefully. The airbag panel can crease if forced out.
Warning
When removed, place the airbag in a sercure container to prevent personal injuries if the airbag activates.
Installation Notes
The panels, etc., are best replaced in the order they were removed. Note the following:
- When installing the glovebox shield ensure that the tab in the top centre locates into the slot in the substrate.
Parts & tools for this job For 2005 Aston Martin DB9
- TOOLTrim removal tool kitSearch: trim removal tool kit
- PARTTouch-up paintSearch: Aston Martin touch up paint
- PARTPanel clip assortmentSearch: Aston Martin panel clips assortment
Links open Amazon search results in a new tab. As an Amazon Associate I earn from qualifying purchases.