
Install
- Make
- Aston Martin
- Model
- V8 Vantage Factory Workshop Manual
- Year
- 2005–2010
- Section
- Manual Transmission › Install
07 TransmissionInstall
- Remove and discard clips (x2) securing hoses into shifter assembly and disconnect hoses (see Figure 6).
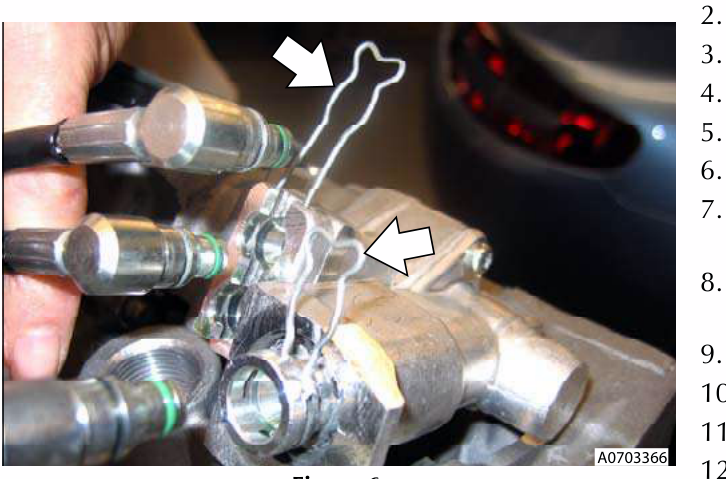
Figure 6
WARNING
TRANSAXLE OIL CAN BE HARMFUL.
OBEY ALL TRANSAXLE OIL MANUFACTURER'S SAFETY INSTRUCTIONS WHEN YOU HANDLE COMPONENTS THAT HAVE TOUCHED TRANSAXLE OIL.
- Remove and discard clips (x3) securing hoses into valve block and disconnect hoses (see Figure 7).
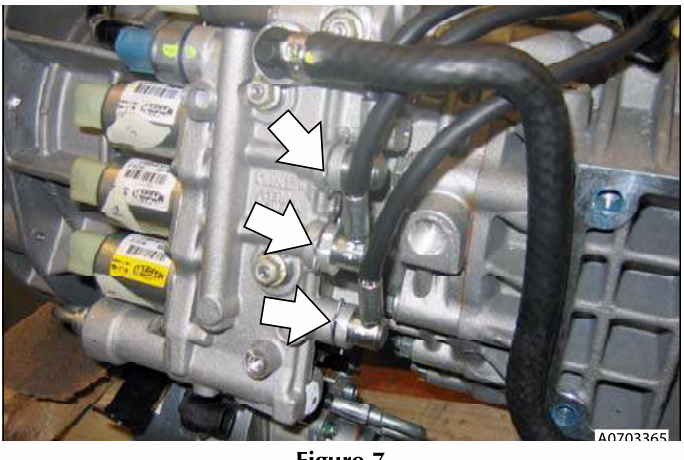
Figure 7
- Release hoses from support clips (x3) (see Figure 8).
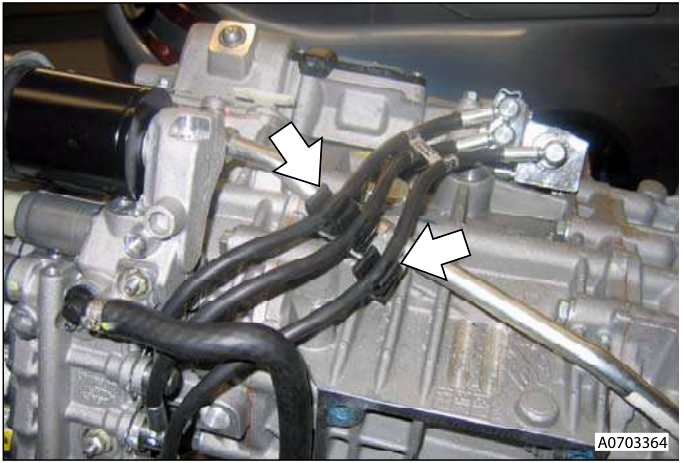
Figure 8
Install
- Install hoses to support clips.
- Install hoses into shifter unit and install clips.
- Install hoses to valve block and install new clips.
- Raise transaxle, install harness clip to subframe.
- Connect transaxle breather pipe.
- Raise transaxle to fitted position.
- Install transaxle mounting brackets and hydramounts, install and torque tighten new bolts (x8).
- Align hydramounts to subframe, lower lifter, install and torque nuts. Remove lifter.
- Position reservoir to bracket and fit clamp (bolt x1).
- Position reservoir hose and secure clips.
- Remove plugs, connect and torque oil cooler unions.
- Apply thread lock to new Allen bolts.
- Align drive shafts to transaxle flanges, clean and install plates (x6), install and torque tighten Allen bolts (x12).
- Position earth lead to transaxle, install and torque tighten bolt.
- Install shear plate, install bolts (x8), tighten bolts to correct torque.
- Install tunnel heatshield, install bolts/washers (x4), tighten bolts to correct torque.
- Install centre and rear exhaust pipe assembly, align to both catalysts. tighten clamp nuts to correct torque.
- Install bolts (x4) into centre mounting.
- Install subframe cross brace, install bolts (x4) and torque.
- Install rear exhaust silencer assembly (see Workshop Manual procedure 09.00.KA Muffler & Bypass Valve Assembly - Remove for Access & Refit).
- Install centre undertray (see Workshop Manual procedure 01.02.MB Undertray - Centre - Renew).
- Install road wheel(s).
- Lower vehicle on ramp, remove securing straps.
- Connect vehicle battery.
WARNING
ALWAYS CONNECT THE BATTERY EARTH (+VE) TERMINAL FIRST.
- Test drive vehicle.
- Raise vehicle on ramp; check transaxle and Sportshift fluid.
- Lower vehicle on ramp.
Parts & tools for this job For 2005 Aston Martin V8 Vantage
- PARTClutch kitSearch: Aston Martin V8 Vantage 2005 clutch kit
- TOOLClutch alignment toolSearch: clutch alignment tool
- FLUIDGear oilSearch: Aston Martin V8 Vantage manual gearbox oil
Links open Amazon search results in a new tab. As an Amazon Associate I earn from qualifying purchases.