
Independent heater unit - r r
- Make
- Fiat
- Model
- Croma Factory Service Manual
- Year
- 2005–2010
- Section
- Heater › Independent heater unit - r r
INDEPENDENT HEATER UNIT - R R
Refitting
With the engine cold, open the engine coolant expansion tank by undoing the cap to compensate for the difference in pressure in the system.
- Have suitable containers ready to collect the residual engine coolant and fuel.
Removing
- Turn the ignition key to the OFF position.
- Disconnect the negative battery terminal.
| Description | Connector | |
|---|---|---|
| BATTERY | See A001 BATTERY |
Op. 7055B54 UNDER ENGINE PROTECTION/GUARD - R.R.
Op. 0010T20 ENGINE COOLANT - CHANGE
Op. 1016A10 SOUND-PROOFING COVER - R.R
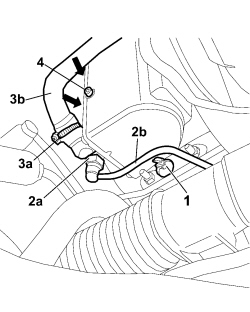
Working underneath the vehicle:
1. Release the flexible fuel supply pipe from the securing clip.
2. Working on the retaining clips, disconnect the rapid connector (2a) for the flexible fuel inlet pipe (2b) on the heater unit and remove it from the vehicle.
3 Loosen the retaining band (3a) and disconnect the flexible coolant inlet pipe (3b) on the additional indenpendent heater unit.
4. Undo the bolt fixing the additional heater unit and, using a suitable size screwdriver in the area shown by the arrow, release the support mountings.
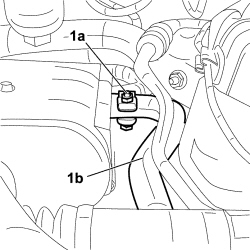
Working from the engine compartment:
1. Undo the fixing bolt (1a), loosen the collar securing the exhaust pipe (1b) and disconnect it from the additional independent heater.
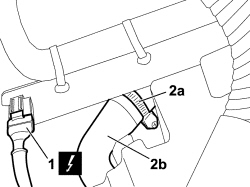
1. Disconnect the electrical connection for the independent heater.
| Description | Connector | |
|---|---|---|
| 1 | ADDITIONAL HEATER CONTROL UNIT | See M075 ADDITIONAL HEATER CONTROL UNIT |
2. Loosen the retaining band (2a) and disconnect the flexible coolant outlet pipe (3b) from the additional indenpendent heater unit.
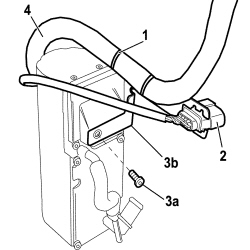
- Working appropriately, release the additional heater unit, complete with air intake hose, from the suport and remove it from the vehicle releasing it upwards.
1. Remove the bands securing the air intake hose to the bracket.
2. Release the connector from the bracket.
3. Undo the fixing bolt (3a) and remove the air intake hose mounting bracket (3b) from the independent heater unit.
4. Loosen the securing collar and remove the air intake hose from the independent heater unit.
Refitting
- Place the air intke hose mounting bracket on the independent heater unit and tighten the fixing bolt.
- Connect the air intake hose to the independent heater unit and tighten the collar.
- Renew the retaining bands.
- Fit the connector to the bracket.
Working from the engine compartment:
- Position the additional heater unit on the support, attach the support mountings and tighten the fixing bolt.
- Connect the flexible coolant outlet pipe from the additional heater unit and tighten the securing band.
- Connect the electrical connection for the independent heater.
| Description | Connector | |
|---|---|---|
| ADDITIONAL HEATER CONTROL UNIT | See M075 ADDITIONAL HEATER CONTROL UNIT |
- Place the air intake hose in its original routing.
Working underneath the vehicle:
- Connect the flexible coolant inlet pipe to the additional heater unit and tighten the securing band.
- Connect the flexible fuel inlet pipe to the heater unit and attach it to the retaining clip.
- Position the exhaust pipe, connect it to the independent heater and tighten the securing collar.
Op. 7055B54 UNDER ENGINE PROTECTION/GUARD - R.R.
Working from the engine compartment:
Op. 1016A10 SOUND-PROOFING COVER - R.R
- Connect the negative battery terminal.
| Description | Connector | |
|---|---|---|
| BATTERY | See A001 BATTERY |
Parts & tools for this job For 2005 Fiat Croma
- TOOLA/C manifold gauge setSearch: AC manifold gauge set
- TOOLUV leak detection kitSearch: AC UV leak detection kit
- PARTCabin filterSearch: Fiat Croma 2005 cabin filter
Links open Amazon search results in a new tab. As an Amazon Associate I earn from qualifying purchases.