
Oil pressure switch (page 3 of 3)
- Make
- Rover
- Model
- 400 Workshop Manual Supplement
- Year
- 1999
- Section
- Repairs
Engine - K SeriesOil pressure switch · page 3 of 3
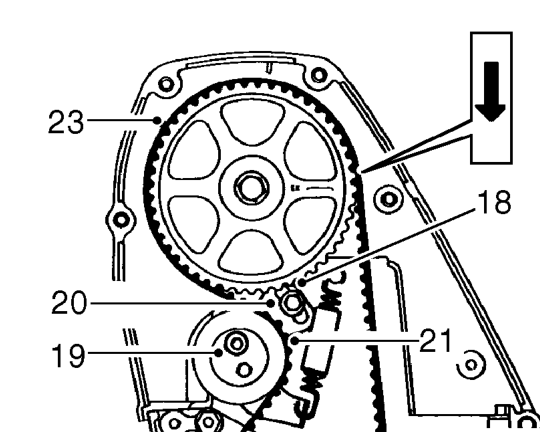
- If camshaft timing belt is to be re-used, mark position of tensioner backplate to cylinder head for belt tensioning reference. Mark direction of rotation of belt using chalk.1
- Loosen tensioner pulley Allen bolt1/2 turn.
- Loosen tensioner backplate screw /2 turn.
- Push tensioner pulley down to fully OFF position.
- Tighten backplate bolt to 10 Nm.
- Ease timing belt from gears and remove.
CAUTION: Ease timing belt off gears using fingers only. Metal levers may damage the belt and gears.
- Loosen tensioner backplate bolt and ensure tensioner moves freely through its adjustment range and returns under spring tension.
- Push tensioner down to OFF position and tighten backplate bolt to 10 Nm.
Refit
- Clean timing gears and pulleys.
CAUTION: If the sintered gears have been subjected to prolonged oil contamination, they must be soaked in a solvent bath and then thoroughly washed in clean solvent before refitting. Because of the porous construction of sintered material, oil impregnated in the gear will emerge and contaminate a new belt.
- Check correct alignment of timing marks for 90° BTDC.
NOTE: Ensure dots on crankshaft gear are aligned with flange on oil pump and camshaft gear aligns with mark on rear cover.
- Fit timing belt over crankshaft gear and then over camshaft gear, keeping belt taut from crankshaft to camshaft gears.
CAUTION: Existing timing belts - ensure direction of rotation mark is facing correct way.
- Using fingers only, ease timing belt over tensioner pulley and coolant pump drive gear, ensuring belt is positioned centrally around gears and pulley.
- Fit timing belt lower cover, ensuring correct position of seal.
- Fit bolts securing lower cover and tighten to 10 Nm.
Parts & tools for this job For 1999 Rover 400
- TOOLOBD2 scannerSearch: OBD2 scanner
- TOOLDigital multimeterSearch: automotive digital multimeter
- TOOLBack-probe test leadsSearch: back probe test leads
Links open Amazon search results in a new tab. As an Amazon Associate I earn from qualifying purchases.