
Crimped over the insulation (Wiring diagrams)
- Make
- Rover
- Model
- 600 620 Diesel Repair Manual Supplement
- Year
- 1995–1999
- Section
- General information › Crimped over the insulation
Crimped over the insulation
Symptom
Incorrect circuit operation, possibly more than one circuit affected.
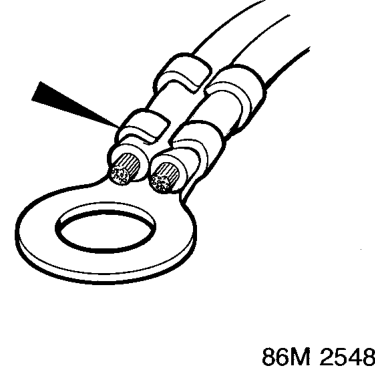
Wire insulation under the crimp
Cause
The earth terminal/header does not make proper contact with the wire because the crimp is over the insulation.
Action
Replace wiring terminal. Be careful not to make the wire too short, if necessary add a length of wire and join using a "Duraseal" heatshrink connector. See Repair Techniques.
WIRING CONNECTOR PROBING TECHNIQUES
Introduction
Over recent years many different styles, shapes and colours of wiring connectors have been utilised on Rover vehicles as ever increasing reliability and integrity is sought. Probing each of the different types of connector with test equipment requires differing techniques. The following steps must always be remembered when tackling electrical fault diagnosis and repair.
1. Verify the complaint
Turn on all the components in the problem circuit to verify and check the accuracy of the customer complaint. Note the symptoms. Do not begin disassembly or testing until you have narrowed down the problem area.
2. Analyse the wiring diagram
Refer to the relevant wiring diagram of the problem circuit. Familiarise yourself with the circuit and determine how the circuit is supposed to work by tracing the current path from the power source, through the circuit components to earth.
The problem circuit may be fed from or feed a number of other circuits, and these will be identified on the wiring diagram. Try operating these circuits. If the other circuits work OK then the fault lies in the wiring of the problem circuit only. If several of the other circuits do not work then the fault lies in the wiring shared by those circuits, i.e. a fuse or earth path is a likely cause.
Based on the symptoms and your understanding of the circuits operation, identify possible areas where the cause of the problem may be found.
3. Isolate the problem by testing the circuit
Make circuit tests to check the diagnosis you made in step 2. Keep in mind that a logical, simple procedure is the key to efficient fault finding. Test for the most likely cause first. Try to make tests at points that are easily accessible.
Parts & tools for this job For 1995 Rover 600
- TOOLDigital multimeterSearch: automotive digital multimeter
- PARTAssorted fuse kitSearch: car fuse assortment kit
- TOOLWire crimper and connector kitSearch: wire crimper connector kit
Links open Amazon search results in a new tab. As an Amazon Associate I earn from qualifying purchases.