
Checking the engine flywheel
- Make
- Alfa Romeo
- Model
- 145/146 Engines, 146 Bodywork and Engine Overhaul Manual
- Year
- 1994–2001
- Section
- Overhauling › Checking the engine flywheel
‹ Prev Checking the clearance between main bearing journals and the corresponding half bearingsNext › Reassembling the pistons and connecting rods
Engine overhaul: 1.7 16V Boxer (AR33401)Checking the engine flywheel
Checking the engine flywheel
- Check that the ring gear teeth are not cracked or show signs of seizure; if they do, proceed as follows to change them:
- remove the old ring gears;
- accurately clean the contact surfaces of the new ring gears and of the flywheel;
- evenly heat the new ring gears to 120° + 140°C and fit them on the flywheel;
- leave to cool naturally, do not force cool.
- Check that the surface of the flywheel on which the clutch driven plate works has no nicks, material removal or signs of overheating. If not, check that dimension "B" shown in the diagram is above the specified limit and that the machining allowance enables refacing.
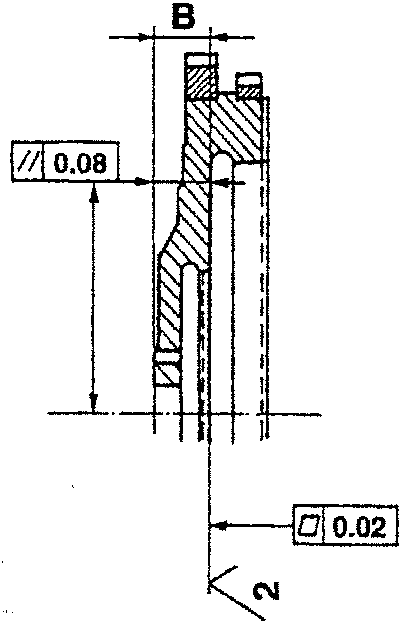
Refacing dimension
B ≥ 21.15 mm
CAUTIONS FOR RE-ASSEMBLY
For re-assembly operations reverse the sequence of those described for dis-assembly unless otherwise indicated below.
- Check valve tightness when the cylinder heads are assembled.
Reassembling the crankshaft
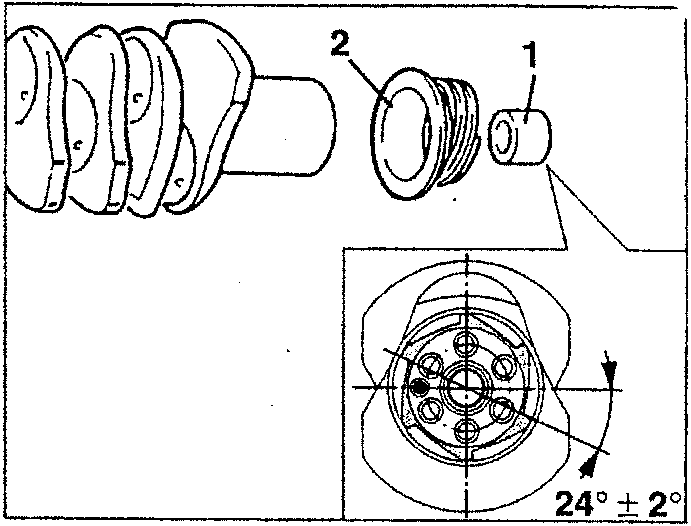
- If removed previously, the crankshaft rear bushing should be refitted using tool N° 1.821.104.000 (A.3.0450).
- Heat the oil pump drive gear to 150°C and shrink it onto the crankshaft directing it as illustrated.
Tightening the main bearing caps
- Assemble the main bearing caps on the crankcase bearings in the correct position and tighten the fastening screws in oil without locking them.
- Tighten the main bearing cap fastening screws to the respective crankcase bearings two or three times in the sequence shown (from A to F).
- Then in two or three operations, tighten the screws fastening the main bearing caps to the crankcase in the sequence shown (from G to N).
- Turn the crankshaft by hand and check that it turns smoothly.
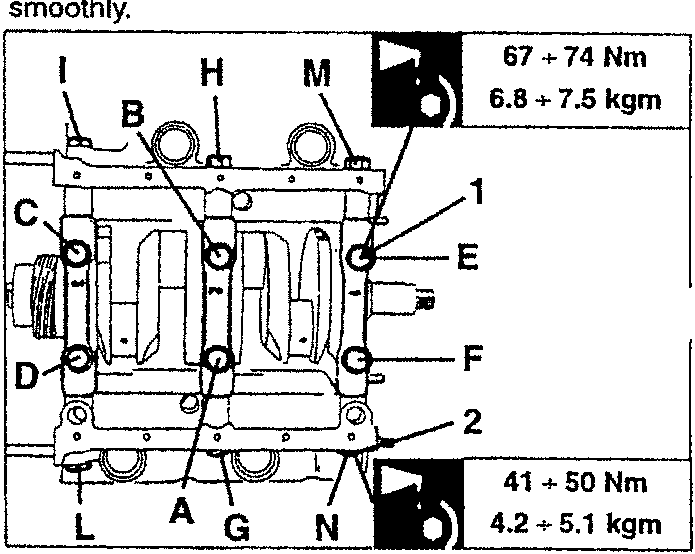
41 ÷ 50 Nm
4.2 ÷ 5.1 kgm
67 + 74 Nm
6.8 + 7.5 kgm
Checking the crankshaft end float
- Using a dial gauge on a magnetic base, measure the crankshaft end float and check that it is within the specified limits.
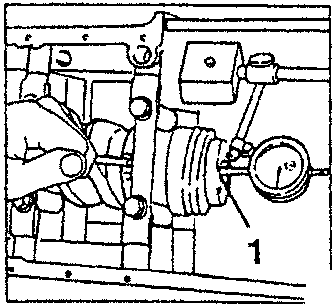
Crankshaft end float
0.35 mm
‹ Prev Checking the clearance between main bearing journals and the corresponding half bearingsNext › Reassembling the pistons and connecting rods
Parts & tools for this job For 1994 Alfa Romeo 145/146
- PARTEngine gasket setSearch: Alfa Romeo 145/146 1994 engine gasket set
- TOOLTorque wrenchSearch: 3/8 inch torque wrench
- TOOLFeeler gauge setSearch: feeler gauge set
Links open Amazon search results in a new tab. As an Amazon Associate I earn from qualifying purchases.