
Roof panel lining - r r
- Make
- Alfa Romeo
- Model
- 147 Factory Service Manual
- Year
- 2000–2002
- Section
- Body interior upholstery and trim › Roof panel lining - r r
Roof panel lining - r r
Removal
NOTE: Work carefully so as not to dirty or damage the cover.
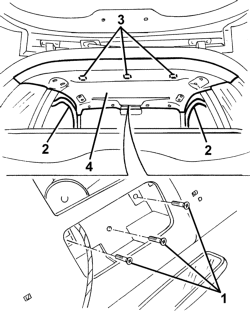
See Op. 7040H30 Front pillar trim - r r (left and right sides)
See Op. 7040L40 Front compartment scuff strip - r r (left and right sides)
See Op. 7040A22 Instrument facia complementary trim element (one) - arrange (left and right sides)
See Op. 7040H50 Rear panel - r r (left and right sides)
See Op. 7040H38 Central pillar upper element - r r (left and right sides)
See Op. 7040G30 Boot light bulb holder - r r
See Op. 7040H42 Rear pillar trim - r r (left and right sides)
See Op. 5580E22 Anti-theft device volumetric sensors - r+r following electrical wiring check
See Op. 7040E50 Front modular courtesy light unit - r+r
See Op. 7040E16 Rear courtesy light - r+r
Fold back the front seat squabs completely.
1 Undo the front screws securing the ceiling trim.
2 Remove the door seals near the ceiling trim.
3 Release the inner Velcro retainers.
4 Remove the ceiling trim and withdraw it from the interior compartment through the front right door.
Refitting
NOTE: Work carefully so as not to dirty or damage the cover.
Check that the trim is undamaged.
Insert the ceiling trim into the interior compartment through the front right door.
Position the ceiling trim and secure the inner Velcro retainers.
Tighten the front screws securing the ceiling trim.
Fit the door compartment seals.
Raise the front seat squabs.
See Op. 7040E16 Rear courtesy light - r+r
See Op. 7040E50 Front modular courtesy light unit - r+r
See Op. 5580E22 Anti-theft device volumetric sensors - r+r following electrical wiring check
See Op. 7040H42 Rear pillar trim - r r (left and right sides)
See Op. 7040G30 Boot light bulb holder - r r
See Op. 7040H38 Central pillar upper element - r r (left and right sides)
See Op. 7040H50 Rear panel - r r (left and right sides)
See Op. 7040A22 Instrument facia complementary trim element (one) - arrange (left and right sides)
See Op. 7040L40 Front compartment scuff strip - r r (left and right sides)
See Op. 7040H30 Front pillar trim - r r (left and right sides)
Check that all the parts are fitted correctly and check the operation of removed electrical components.
Parts & tools for this job For 2000 Alfa Romeo 147
- TOOLTrim removal tool kitSearch: trim removal tool kit
- PARTTouch-up paintSearch: Alfa Romeo touch up paint
- PARTPanel clip assortmentSearch: Alfa Romeo panel clips assortment
Links open Amazon search results in a new tab. As an Amazon Associate I earn from qualifying purchases.