
Pistons and Connecting Rods
- Make
- Aston Martin
- Model
- DB9 Factory Workshop Manual
- Year
- Issue 2, 2005
- Section
- Power Conversion › Pistons and Connecting Rods
Caution
Ensure that the crankshaft key is in the vertical position.
- Install the cylinder heads and camshafts (Refer to 'Cylinder Heads', page 3-2-2).
- Install the timing chains. Check and ensure that the valve timing is correct (Refer to 'Valve Timing Check', page 3-10-4).
- Install the timing cover (Refer to 'Timing Cover', page 3-11-3).
- Install the camshaft cover (Refer to 'Camshaft Cover', page 3-11-1).
- Install the engine auxiliaries.
- Install and tension the accessory drive belt.
- Complete engine reassembly and prepare to install to vehicle.
Pistons and Connecting Rods
| Repair Operation Time (ROT) | |
|---|---|
| Item | Code |
| Pisteo and Connecting Rods Renew | TBA |
Overhaul
Keep all components in sets for installing in their original locations, if serviceable.
- Remove the piston pin circlips. Discard the circlips.
Warning
Pistons are heated to approx. 70°C. Wear protective clothing, e.g. gloves, to avoid burns.
- Heat the piston to approx. 70°C and push out the piston pin. Allow the components to cool.
- Using a ring spreader, remove the piston rings from the piston.
- Wash all components. Replace any with obvious wear or other signs of deterioration.
Check that components meet dimensional specifications (Refer to 'Specifications', page 3-12-1). - Repeat for all pistons.
Reassembly
Pistons are graded for each cylinder bore. If the pistons and / or connecting rods are to be reinstalled, they must be in their original sets and in their original positions.
The grade of a cylinder bore (1, 2 or 3) is marked on outside of engine block, adjacent to the bore. Pistons are similarly graded (1,2 or 3) on their upper surface. Make sure the correct piston grade is chosen when installing a new piston.
Ensure that the connecting rods and caps are a matched set.
- Heat the piston to approximately 70°C and install the connecting rod and piston pin.
Warning
Pistons are heated to approx. 70°C. Wear protective clothing, e.g. gloves, to avoid burns.
Install the connecting rod to the piston with the 'notch' in the little end bearing (3) facing the same direction as the arrow stamped on the piston head (4).
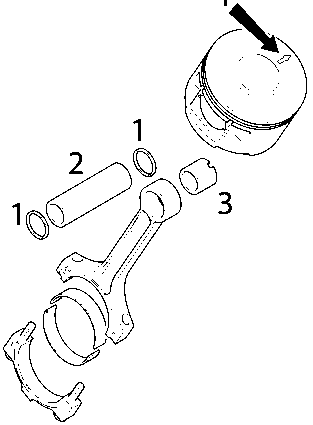
Secure the piston pin (2) with new circlips (1).
Allow the pistons cool.
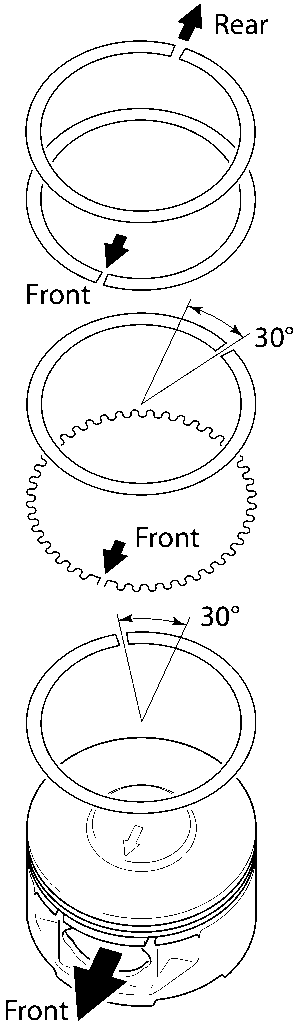
- Before installing to the engine, rotate the piston rings as necessary to the positions shown on the following diagram.
Parts & tools for this job For 2005 Aston Martin DB9
- PARTEngine gasket setSearch: Aston Martin DB9 2005 engine gasket set
- TOOLTorque wrenchSearch: 3/8 inch torque wrench
- TOOLFeeler gauge setSearch: feeler gauge set
Links open Amazon search results in a new tab. As an Amazon Associate I earn from qualifying purchases.