
Alternator - r+r
- Make
- Fiat
- Model
- Bravo Factory Service Manual
- Year
- 2007–2014
- Section
- Current generation › Alternator - r+r
ALTERNATOR - R+R
Removing
Op. 1092G10 SINGLE ENGINE BELT - R.R
Op. 7055B54 UNDER ENGINE PROTECTION/GUARD - R.R.
Op. 4410D17 REINFORCEMENT FOR FRONT SUSPENSION CROSSMEMBER - R.R.
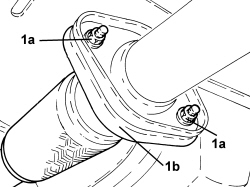
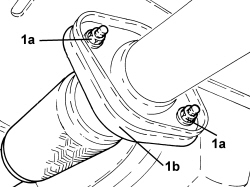
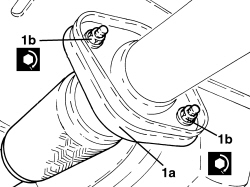
1. Undo nuts (1a) and disconnect exhaust pipe coupling (1b).
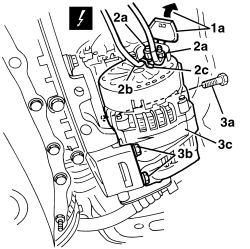
1. Release protection (1a) for the alternator electrical connections and open it.
2. Undo nuts (2a) and disconnect electrical connections (2b) and (2c) from the alternator.
| Description | Connector | |
|---|---|---|
| 2 | ALTERNATOR | See A010 ALTERNATOR |
3. Undo upper bolt (3a) and lower bolts (3b) and remove alternator (3c).
To remove upper bolt (3a) it may be easier to work from above the engine compartment.
Refitting
- Check that the alternator is not damaged.
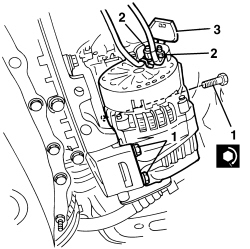
1. Place the alternator in position and secure it, tightening the bolts to the recommended torque.
| Component | Fastening | dia | Value (daNm) | Validity |
|---|---|---|---|---|
| Alternator | Bolt | M10 | 4.5 ÷ 5.5 |
2. Connect electrical connections (2a) and (2b) for the alternator and secure them using nuts (2c).
3. Close the protection for the electrical connections.
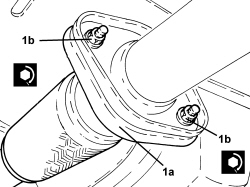
1. Connect exhaust pipe coupling (1a), screw in nuts (1b) and tighten to the specified torque.
| Component | Fastening | dia | Value (daNm) | Validity |
|---|---|---|---|---|
| Flange connecting catalyzer to exhaust pipe | Nut | M8 | 2.2 ÷ 2.7 |
Op. 4410D17 REINFORCEMENT FOR FRONT SUSPENSION CROSSMEMBER - R.R.
Op. 7055B54 UNDER ENGINE PROTECTION/GUARD - R.R.
Op. 1092G10 SINGLE ENGINE BELT - R.R
Removing
Op. 7055B54 UNDER ENGINE PROTECTION/GUARD - R.R.
Op. 7055B65 ENGINE COMPARTMENT DUST COVER IN LEFT FRONT WHEEL ARCH - R.R.
Op. 7055B66 ENGINE COMPARTMENT DUST COVER IN RIGHT FRONT WHEEL ARCH - R.R.
Op. 1092G10 SINGLE ENGINE BELT - R.R
Op. 1008C30 POWER UNIT LOWER REACTION LINK - R.R.
Op. 1008C33 BRACKET ON ENGINE FOR LOWER REACTION ROD - R.R.
1. Working under the engine, undo the bolts.
2. Remove the reinforcement.
3. Undo the bolt for the left-hand link.
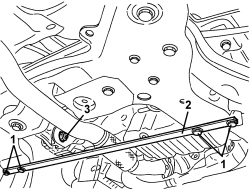
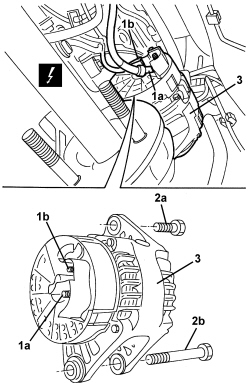
1. Disconnect electrical connections (1a) and (1b) for the alternator.
| Description | Connector | |
|---|---|---|
| 1 | ALTERNATOR | See A010 ALTERNATOR |
2. Undo and remove bolts (2a) and (2b) securing the alternator.
To remove bolt (2b), slightly oscillate the engine.
3. Remove the alternator by moving the engine forwards slightly.
Refitting
- Check that the alternator is not damaged.
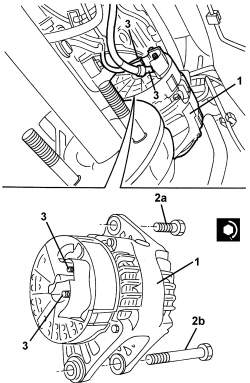
1. Position the alternator by moving the engine forwards slightly.
2. Insert and tighten bolts (2a) and (2b) securing the alternator.
To insert lower bolt (2b), slightly oscillate the engine.
| Component | Fastening | dia | Value (daNm) | Validity |
|---|---|---|---|---|
| Alternator | Bolt | M12 | 6.3 ÷ 7.7 |
| Component | Fastening | dia | Value (daNm) | Validity |
|---|---|---|---|---|
| Alternator | Bolt | M10 | 4.5 ÷ 5.5 |
3. Connect the electrical connections for the alternator.
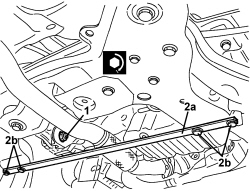
1. Screw in the bolt for the left-hand link.
| Component | Fastening | dia | Value (daNm) | Validity |
|---|---|---|---|---|
| Gearbox lower reaction rod - bracket side on gearbox | Bolt | M12 | 6.8 ÷ 8.2 |
2. Position the reinforcement and screw in the bolts, then tighten to the recommended torque.
| Component | Fastening | dia | Value (daNm) | Validity |
|---|---|---|---|---|
| Reinforcement for front suspension crossmember | Bolt | M10 | 5.9 ÷ 7.1 |
Op. 1008C33 BRACKET ON ENGINE FOR LOWER REACTION ROD - R.R.
Op. 1008C30 POWER UNIT LOWER REACTION LINK - R.R.
Op. 1092G10 SINGLE ENGINE BELT - R.R
Op. 7055B66 ENGINE COMPARTMENT DUST COVER IN RIGHT FRONT WHEEL ARCH - R.R.
Op. 7055B65 ENGINE COMPARTMENT DUST COVER IN LEFT FRONT WHEEL ARCH - R.R.
Op. 7055B54 UNDER ENGINE PROTECTION/GUARD - R.R.
Removing
Op. 1092G10 SINGLE ENGINE BELT - R.R
Op. 7055B54 UNDER ENGINE PROTECTION/GUARD - R.R.
Op. 4410D17 REINFORCEMENT FOR FRONT SUSPENSION CROSSMEMBER - R.R.
1. Undo the nuts (1a) and disconnect the exhaust pipe coupling (1b).
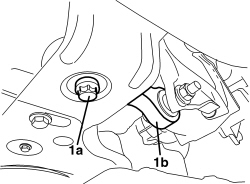
1. Undo the bolt (1a) fixing the gearbox lower reaction rod (1b).
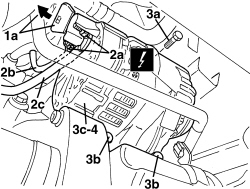
1. Release the protection (1a) for the alternator electrical connections and open it.
2. Undo the nuts (2a) and disconnect the electrical connections (2b) and (2c) for the alternator.
| Description | Connector | |
|---|---|---|
| 2 | ALTERNATOR | See A010 ALTERNATOR |
3. Undo the upper bolt (3a) and the lower bolts (3b) and remove the alternator (3c).
To remove upper bolt (3a) it may be easier to work from above the engine compartment.
4. Move the power unit slightly fowards and remove the alternator (3c).
Refitting
- Check that the alternator is not damaged.
1. Move the power unit slightly fowards and place the alternator in position.
2. Secure the alternator tightening the bolts to the recommended torque.
| Component | Fastening | dia | Value (daNm) | Validity |
|---|---|---|---|---|
| Alternator | Bolt | M10 | 4.5 ÷ 5.5 |
3. Connect the electrical connections for the alternator and secure them using the nuts.
| Component | Fastening | dia | Value (daNm) | Validity |
|---|---|---|---|---|
| Alternator recharging lead | Nut | M8 | 0.7 ÷ 1.1 |
4. Close the protection for the electrical connections.
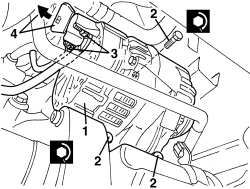
- Tighten the gearbox lower raction rod nut.
| Component | Fastening | dia | Value (daNm) | Validity |
|---|---|---|---|---|
| Gearbox lower reaction rod - bracket side on gearbox | Bolt | M12 | 6.8 ÷ 8.2 |
1. Connect the exhaust pipe coupling (1a), screw in the bolts (1b) and tighten them to the specified torque.
| Component | Fastening | dia | Value (daNm) | Validity |
|---|---|---|---|---|
| Flange connecting catalyzer to exhaust pipe | Nut | M8 | 2.2 ÷ 2.7 |
Op. 4410D17 REINFORCEMENT FOR FRONT SUSPENSION CROSSMEMBER - R.R.
Parts & tools for this job For 2007 Fiat Bravo
- TOOLBattery testerSearch: car battery tester
- TOOLDigital multimeterSearch: automotive digital multimeter
- TOOLBattery terminal cleanerSearch: battery terminal cleaner
Links open Amazon search results in a new tab. As an Amazon Associate I earn from qualifying purchases.