
Ignition control signal check
- Make
- Fiat
- Model
- Bravo Factory Service Manual
- Year
- 2007–2014
- Section
- Engine ignition › Ignition control signal check
IGNITION CONTROL SIGNAL CHECK
Connect the ammeter pliers N° 1806505000 to the diagnostic equipment using the EX01 cable.
There are two red LEDs on the handle of the pliers which light up when the ammeter pliers are open and warn the operator not to take any current measurements because they would be incorrect
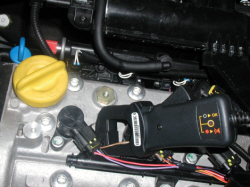
Position the pliers with the jaws closed and the red LEDs off, near the measurement point.
Zero the pliers using the CALIBRATION button.
On account of the extreme sensitivity of the instrument it is normal that if the pliers are rotated in the air the reading varies by several mA
Position the wire connected to pin 1 of the ignition coil (primary winding control cable) so that it passes inside the ammeter plier jaws and, before taking any reading, make sure that the red LEDs on the pliers are off.
Select the INSTRUMENT mode on the diagnostic equipment and then the AMMETER function.
Select 10 A PLIERS.
Select the time base at 1 sec.
Press the Start button and turn the ignition switch to the AVV position
The diagram below shows normal coil primary winding current uptake with the engine warm and idling.
Repeat the same test, positioned on the wire connected to pin 1 of the other ignition coil, and check that a signal the same as the one shown below is present.
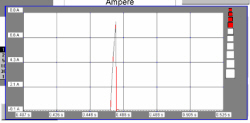
Ignition signal with normal pattern
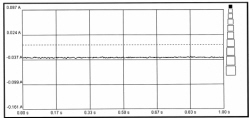
Interrupted or earthed ignition signal.
If the ignition control signals to the coils are not present, check the continuity and insulation to earth of the following wiring:
- between ignition coils and engine control unit.
Connect the ammeter pliers N° 1806505000 to the diagnostic equipment using the EX01 cable.
There are two red LEDs on the handle of the pliers which light up when the ammeter pliers are open and warn the operator not to take any current measurements because they would be incorrect
Position the pliers with the jaws closed and the red LEDs off, near the measurement point.
Zero the pliers using the "CALIBRATION" button.
On account of the extreme sensitivity of the instrument it is normal that if the pliers are rotated in the air the reading varies by several mA
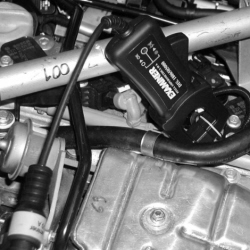
Position the wire connected to pin 3 of the ignition coil (primary winding control cable) so that it passes inside the ammeter plier jaws and, before taking any reading, make sure that the red LEDs on the pliers are off. Select "INSTRUMENT" on the diagnostic equipment and then "AMMETER".
Select 10 A PLIERS.
Select the time base at 1 sec.
Press the Start button and turn the ignition switch to the AVV position
The diagram below shows normal coil primary winding current uptake with the engine warm and idling.
Repeat the same test, positioned on the wire connected to pin 3 of the other ignition coil, and check that a signal the same as the one shown below is present.
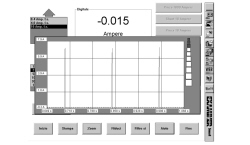
Ignition signal with normal pattern
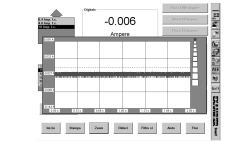
Interrupted or earthed ignition signal
If the ignition control signals to the coils are not present, check the continuity and insulation to earth of the following wiring:
- between ignition coils and engine control unit.
Parts & tools for this job For 2007 Fiat Bravo
- PARTEngine gasket setSearch: Fiat Bravo 2007 engine gasket set
- TOOLTorque wrenchSearch: 3/8 inch torque wrench
- TOOLFeeler gauge setSearch: feeler gauge set
Links open Amazon search results in a new tab. As an Amazon Associate I earn from qualifying purchases.