
Front brake caliper (one) - r.r
- Make
- Fiat
- Model
- Croma Factory Service Manual
- Year
- 2005–2010
- Section
- Disc brakes › Front brake caliper (one) - r.r
FRONT BRAKE CALIPER (ONE) - R.R
Removing
The following procedure describes left front brake caliper removal/refitting, do the same for the right front brake caliper.
- Position the vehicle on a lift.
- Make sure that the ignition key is in the OFF position, then disconnect the battery terminal (-).
| Description | Connector | |
|---|---|---|
| Battery | See A001 BATTERY |
- Replace the brake-clutch fluid reservoir plug using the tool.
| Tool | Description | Function | Validity |
|---|---|---|---|
| 2000001400 | Plug | Brake/clutch fluid reservoir cap |
Op. 4450B02 LEFT FRONT WHEEL - R.R
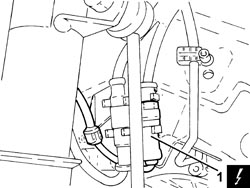
1. Disconnect the electrical connection for the brake pad wear sensor and release the wiring from the fastenings.
| Description | Connector | |
|---|---|---|
| 1 | Left brake pad wear sensor (switch) | See K020 LEFT BRAKE PAD WEAR SENSOR (SWITCH) |
There is no brake pad wear sensor on the right front caliper.
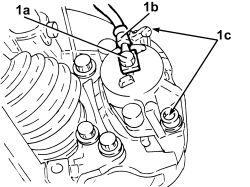
1. Undo the connector (1a) and disconnect the flexible pipe (1b) from the brake caliper.
Collect the bake-clutch fluid that comes out in a suitable container.
The bolts (1c) should never be undone.
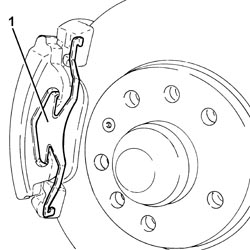
1. Remove the brake caliper traction spring.
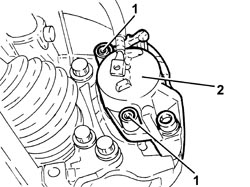
1. Remove the plugs and unscrew the brake caliper bolts.
2. Remove the brake caliper complete with inner plate.
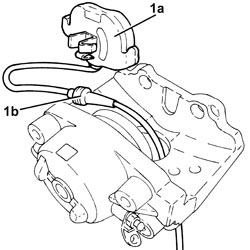
1. Working at the bench, remove the inner plate (1a) complete with sensor from the brake caliper (1b).
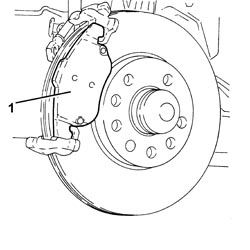
1. Remove the outer pad from the brake caliper bracket.
Refitting
- Push the brake caliper piston into its housing using a suitable tool.
- Grease the brake caliper and bracket in the areas of the pad support surfaces.
- Place the outer pad back in its housing on the brake caliper bracket.
- Place the inner pad complete with wear sensor in its housing on the brake caliper.
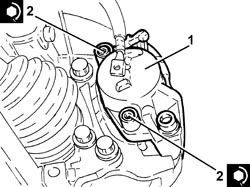
1. Refit the brake caliper with inner pad.
2. Tighten the brake caliper bolts to the specified torque and fit the plugs.
| Component | Fastening | dia | Value (daNm) | Validity |
|---|---|---|---|---|
| Front brake calipers | Bolt | (bracket side) 2.5 - 3.0 | 1.8 2.2 1.9 JTD 8v |
- Refit the brake caliper traction spring in its seat.
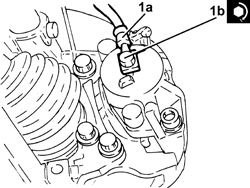
1. Connect the flexible pipe (1a) to the brake caliper and tighten the connector (1b) to the recommended torque.
Replace the seal.
| Component | Fastening | dia | Value (daNm) | Validity |
|---|---|---|---|---|
| Flexible pipe to front brakes | Connector | M12 | (brake caliper side) 3.5 - 4.5 | 1.8 2.2 1.9 JTD 8v |
- Connect the electrical connection for the brake pad wear sensor and fasten the electrical wiring.
Op. 4450B02 LEFT FRONT WHEEL - R.R
- Replace the tool with the brake-clutch fluid reservoir plug.
| Tool | Description | Function | Validity |
|---|---|---|---|
| 2000001400 | Plug | Brake/clutch fluid reservoir cap |
- Connect the negative battery terminal.
Op. 0010T64 BRAKE AND/OR CLUTCH FLUID CHECK LEVEL AND TOP UP AS NECESSARY
Op. 0010T65 HYDRAULIC BRAKE SYSTEM - BLEED AIR
- Remove the vehicle from the lift.
Removing
The following procedure describes left front brake caliper removal/refitting, do the same for the right front brake caliper.
- Position the vehicle on a lift.
- Make sure that the ignition key is in the OFF position, then disconnect the battery terminal (-).
| Description | Connector | |
|---|---|---|
| Battery | See A001 BATTERY |
Op. 4450B02 LEFT FRONT WHEEL - R.R
Op. 7055B90 LEFT FRONT WHEEL ARCH LINER - R.R.
Op. 3340B10 HOSE TO L/H OR R/H FRONT BRAKES (ONE) - R+R
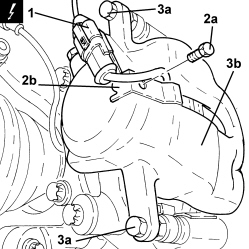
1. Disconnect the electrical connection for the brake pad wear sensor.
| Description | Connector | |
|---|---|---|
| 1 | Left brake pad wear sensor (switch) | See K020 LEFT BRAKE PAD WEAR SENSOR (SWITCH) |
There is no brake pad wear sensor on the right front caliper.
2. Undo the bolt (2a) for the bracket (2b) securing the brake pad wear sensor electrical connection.
3. Undo the bolts (3a) and remove the brake caliper (3b).
Refitting
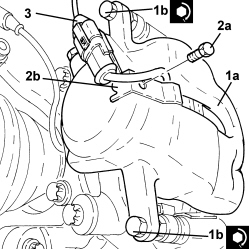
1. Position the brake caliper bracket (1a) in its housing and secure it tightening the bolts (1b) to the recommended torque.
| Component | Fastening | dia | Value (daNm) | Validity |
|---|---|---|---|---|
| Front brake calipers | Bolt | M8x1 | (bracket side) 3.1 - 3.8 | 1.9 JTD 16v 2.4 JTD 20v |
2. Tighten the bolt (2a) for the bracket (2b) securing the brake pad wear sensor electrical connection.
3. Connect the electrical connection for the brake pad wear sensor.
Op. 3340B10 HOSE TO L/H OR R/H FRONT BRAKES (ONE) - R+R
Op. 0010T64 BRAKE AND/OR CLUTCH FLUID CHECK LEVEL AND TOP UP AS NECESSARY
Op. 0010T65 HYDRAULIC BRAKE SYSTEM - BLEED AIR
Op. 7055B90 LEFT FRONT WHEEL ARCH LINER - R.R.
Op. 4450B02 LEFT FRONT WHEEL - R.R
- Connect the negative battery terminal.
- Remove the vehicle from the lift.
Parts & tools for this job For 2005 Fiat Croma
- PARTFront brake padsSearch: Fiat Croma 2005 front brake pads
- TOOLCaliper piston rewind toolSearch: brake caliper piston rewind tool
- FLUIDBrake fluidSearch: brake fluid
Links open Amazon search results in a new tab. As an Amazon Associate I earn from qualifying purchases.