
Exhaust manifold with catalytic converter - r.r.
- Make
- Fiat
- Model
- Croma Factory Service Manual
- Year
- 2005–2010
- Section
- Inlet and exhaust manifolds › Exhaust manifold with catalytic converter - r.r.
EXHAUST MANIFOLD WITH CATALYTIC CONVERTER - R.R.
Removing
- Position the vehicle on a lift.
- Make sure that the ignition key is in the OFF position, then disconnect the battery terminal (-).
| Description | Connector | |
|---|---|---|
| Battery | See A001 BATTERY |
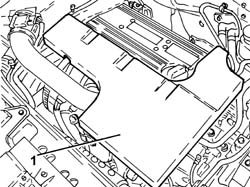
1. Remove the sound insulation cover fastened to the engine by three pins.
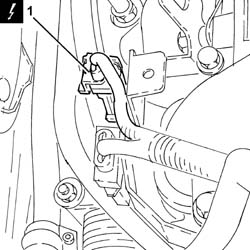
1. Disconnect the electrical connection for the front Lambda sensor to the catalytic converter.
| Description | Connector | |
|---|---|---|
| 1 | Lambda sensor on catalyzer | See K017 LAMBDA SENSOR ON CATALYZER |
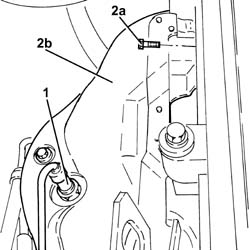
1. Undo the front Lambda sensor from the catalytic converter and remove it.
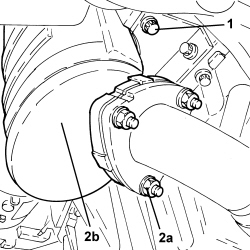
2. Undo the bolts (2a) and remove the heat shield (2b).
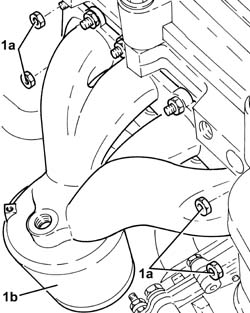
1. Undo the nuts (1a) and disconnect the front section of the exhaust pipe (1b), exhaust manifold side with the catalytic converter.
Fasten the disconnected part of the exhaust pipe so that it is not hanging loose. The front section of the exhaust pipe including the flexible pipe can be fastened to the bodyshell appropriately using, for example metal wire.
Bends in the flexible pipe at angles of between 5° and 10°, starting from the planned fitting position, can damage the flexible pipe.
2. Remove the gasket.
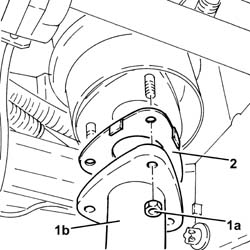
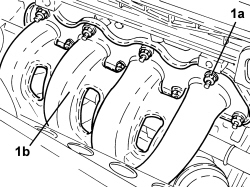
1. Undo the nuts (1a) and remove the exhaust manifold and catalytic converter (1b).
- Remove the gasket.
Refitting
- Place a new gasket back in position.
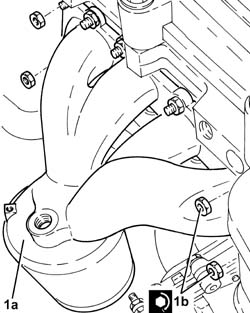
1. Place the exhaust manifold (1a) in its housing and secure it by tightening the new nuts (1b) to the recommended torque.
| Component | Fastening | dia | Value (daNm) | Validity |
|---|---|---|---|---|
| Exhaust manifold with catalytic converter | Nut (to replace) | (cylinder head side) 2.0 | 1.8 2.2 |
1. Place a new gasket in position.
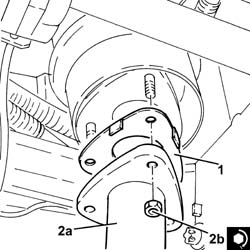
2. Connect the front section of the exhaust pipe (2a), exhaust manifold side with the catalytic converter and tighten the new nuts (2b) to the recommended torque.
| Component | Fastening | dia | Value (daNm) | Validity |
|---|---|---|---|---|
| Rigid pipe for exhaust pipe between catalytic converter and silencer | Nut (to replace) | M8 | (exhaust manifold with catalytic converter side) 1.6 | 2.2 |
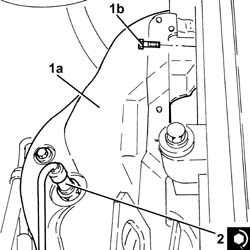
1. Place the heat shield (1a) in its housing and secure it using the bolts (1b).
2. Position the front Lambda sensor in its housing and tighten it to the recommended torque.
| Component | Fastening | dia | Value (daNm) | Validity |
|---|---|---|---|---|
| Front Lambda sensor to catalytic converter | - (with special black grease) | M18 x 1.5 | (exhaust manifold with catalytic converter side) 4.0 | 2.2 |
- Connect the electrical connection for the front Lambda sensor to the catalytic converter.
- Place the sound insulation cover back in its housing and secure it to the engine using the three pins.
- Connect the negative battery terminal.
- Remove the vehicle from the lift.
Removing
- Position the vehicle on a lift.
Op. 1084A16 OIL DIPSTICK PIPE - R.R
Op. 1072C44 EXHAUST MANIFOLD HEAT SHIELD - R+R
Op. 1080B94 FRONT LAMBDA SENSOR TO WITH CATALYTIC CONVERTER - R.R
1. Undo the bolts securing the catalyzer to the bracket.
2. Undo the nuts (2a) securing the catalyzer (2b) to the flange for the front section of the exhaust.
1. Undo the nuts (1a) and remove the exhaust manifold and catalytic converter (1b) from the cylinder head.
- Remove the gasket.
Refitting
- Place a new gasket back in position.
| Component | Fastening | dia | Value (daNm) | Validity |
|---|---|---|---|---|
| Exhaust manifold with catalytic converter | Nut (to replace) | (cylinder head side) 2.0 | 1.8 2.2 |
- Tighten the nuts securing the catalyzer to the flange for the front section of the silencer to the recommended torque.
| Component | Fastening | dia | Value (daNm) | Validity |
|---|---|---|---|---|
| Flange side catalyzzer for front section of exhaust | Nut | M8 | 2.2 ÷ 2.7 | 1.8 |
- Tighten the bolts securing the catalyzer to the bracket.
| Component | Fastening | dia | Value (daNm) | Validity |
|---|---|---|---|---|
| Bracket side caztalyzer | Bolt | 2.0 | 1.8 |
Op. 1080B94 FRONT LAMBDA SENSOR TO WITH CATALYTIC CONVERTER - R.R
Op. 1072C44 EXHAUST MANIFOLD HEAT SHIELD - R+R
Op. 1084A16 OIL DIPSTICK PIPE - R.R
- Remove the vehicle from the lift.
Parts & tools for this job For 2005 Fiat Croma
- PARTExhaust gasketSearch: Fiat Croma 2005 exhaust gasket
- TOOLPenetrating oilSearch: penetrating oil
- TOOLOBD2 scannerSearch: OBD2 scanner
Links open Amazon search results in a new tab. As an Amazon Associate I earn from qualifying purchases.