
Fuel tank - r + r for replacement
- Make
- Fiat
- Model
- Grande Punto Factory Service Manual
- Year
- 2005–2012
- Section
- Fuel tank and pipes › Fuel tank - r + r for replacement
FUEL TANK - R + R FOR REPLACEMENT
Removing
- Position the vehicle on a lift.
- Disconnect the negative battery terminal.
- Fold the rear seat cushion over.
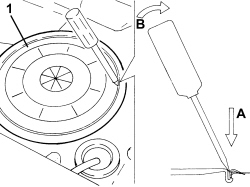
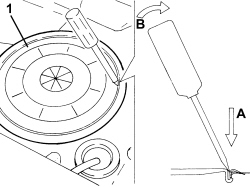
1. Use tool to release and remove the access cover to the fuel pump assembly.
Position the tool and apply leverage as indicated in the lever to prevent the cover tab deforming.
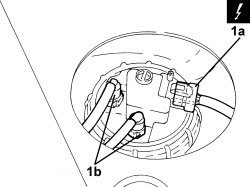
1. Disconnect the electrical connection (1a) and remove the fuel supply and return pipes (1b).
| Description | Connector | |
|---|---|---|
| 1a | Fuel pump and level gauge | See N040 FUEL PUMP AND LEVEL GAUGE |
- Raise the vehicle.
Op. 1076A51 HEAT SHIELD FOR EXHAUST PIPE ON FUEL TANK - R.R
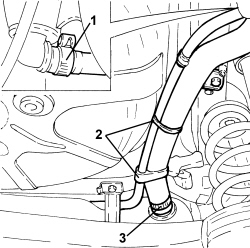
1. Loosen the band and disconnect the blow back pipe from the fuel filler pipe.
2. Open the bands securing the blow back pipe to the fuel fillter pipe.
3. Open the band and disconnect the fuel filler pipe from the tank.
Using a suitable plug, close the connector for the fuel filler pipe on the tank.
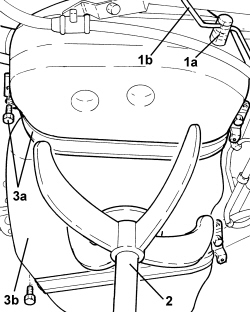
1. Open the clips (1a) and disconnect the brake pipes (1b) on the left and right sides of the tank.
2. Position a hydraulic jack with a suitable support under the fuel tank.
3. Undo the bolts (3a) and remove the fuel tank (3b).
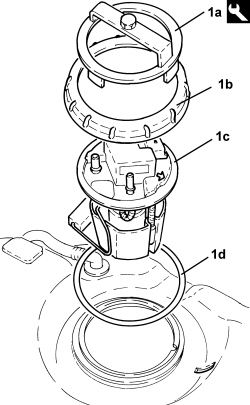
1. Fit the tool (1a), undo the ring nut (1b) securing the submerged pump assembly (1c) from the tank and remove it with the seal (1d).
| Tool | Description | Function | Validity |
|---|---|---|---|
| 1870736000 | Spanner | Loosen/ tighten ring nut securing submerged pump assembly complete with level gauge control |
- Proceed with transferring the fuel using suitable equipment.
Refitting
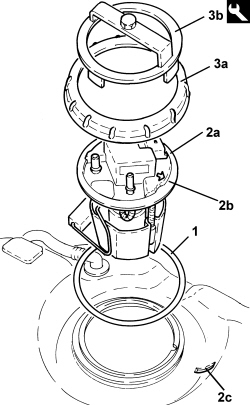
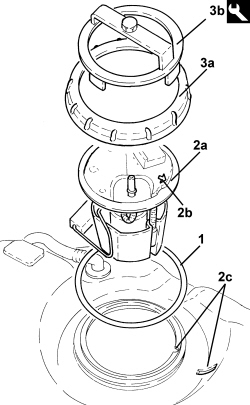
1. Fit a new seal on the tank.
2. Place the submerged pump assembly (2a) back in its housing taking care to ensure that the arrow (2b) stamped on the pump is aligned with the splining (2c) on the tank.
3. Tighten the ring nut (3a) securing the pump assembly using the tool (3b).
| Tool | Description | Function | Validity |
|---|---|---|---|
| 1870736000 | Spanner | Loosen/ tighten ring nut securing submerged pump assembly complete with level gauge control |
- Fit the fuel tank and tighten the bolts to the recommended torque.
| Component | Fastening | dia | Value (daNm) | Validity |
|---|---|---|---|---|
| Fuel tank | Bolt | M8 | 3.2 ÷ 3.9 |
- Remove the hydraulic jack and the support positioned underneath the fuel tank.
- Connect the brake pipes on the left and right sides of the tank and close the clips.
- Connect the fuel filler pipe to the tank and close the band.
- Connect the blow back pipe to the fuel filler pipe, close the clips and the band.
Op. 1076A51 HEAT SHIELD FOR EXHAUST PIPE ON FUEL TANK - R.R
- Lower the vehicle.
- Place the fuel supply and return pipes in their housings.
- Connect the electrical connection to the fuel pump assembly.
- Place the access cover to the fuel pump assembly back in its housing.
- Place the rear seat cushion back in position.
- Connect the negative battery terminal.
- Remove the vehicle from the lift.
Removing
- Position the vehicle on a lift.
- Disconnect the negative battery terminal.
Op. 4450B08 RIGHT REAR WHEEL - R.R
- Fold the rear seat cushion over.
1. Use tool to release and remove the access cover to the fuel pump assembly.
Position the tool and apply leverage as indicated in the lever to prevent the cover tab deforming.
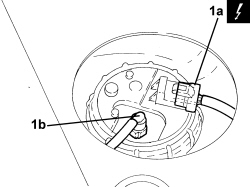
1. Disconnect the electrical connection (1a) and remove the fuel supply pipe (1b).
| Description | Connector | |
|---|---|---|
| 1a | Fuel pump and level gauge | See N040 FUEL PUMP AND LEVEL GAUGE |
- Raise the vehicle.
Op. 1076A51 HEAT SHIELD FOR EXHAUST PIPE ON FUEL TANK - R.R
1. Loosen the band and disconnect the blow back pipe from the fuel filler pipe.
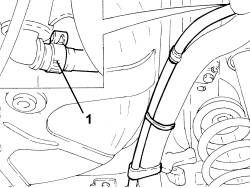
1. Disconnect the fuel vapour quick pipe fitting from the activated carbon filter for fuel vapours.
- Open the bands securing the blow back pipe to the fuel filler pipe.
2. Open the band and disconnect the fuel filler pipe from the tank.
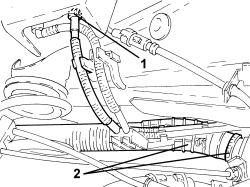
Using a suitable plug, close the connector for the fuel filler pipe on the tank.
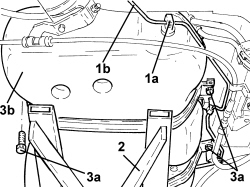
1. Open the clips (1a) and disconnect the brake pipes (1b) on the left and right sides of the tank.
2. Position a hydraulic jack with a suitable support under the fuel tank.
3. Undo the bolts (3a) and remove the fuel tank (3b).
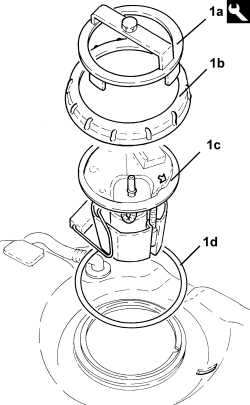
1. Fit the tool (1a), undo the ring nut (1b) securing the submerged pump assembly (1c) from the tank and remove it with the seal (1d).
| Tool | Description | Function | Validity |
|---|---|---|---|
| 1870736000 | Spanner | Loosen/ tighten ring nut securing submerged pump assembly complete with level gauge control |
- Proceed with transferring the fuel using suitable equipment.
Refitting
1. Fit a new seal on the tank.
2. Place the submerged pump assembly (2a) back in its housing taking care to ensure that the arrow (2b) stamped on the pump is aligned with the splining (2c) on the tank.
3. Tighten the ring nut (3a) securing the pump assembly using the tool (3b).
| Tool | Description | Function | Validity |
|---|---|---|---|
| 1870736000 | Spanner | Loosen/ tighten ring nut securing submerged pump assembly complete with level gauge control |
- Fit the fuel tank and tighten the bolts to the recommended torque.
| Component | Fastening | dia | Value (daNm) | Validity |
|---|---|---|---|---|
| Fuel tank | Bolt | M8 | 3.2 ÷ 3.9 |
- Remove the hydraulic jack and the support positioned underneath the fuel tank.
- Connect the brake pipes on the left and right sides of the tank and do up the clips.
- Connect the fuel filler pipe to the tank and close the band.
- Connect the blow back pipe to the fuel filler pipe, close the clips and the band.
- Connect the fuel vapour quick pipe fitting to the activated carbon filter for fuel vapours.
Op. 1076A51 HEAT SHIELD FOR EXHAUST PIPE ON FUEL TANK - R.R
- Lower the vehicle.
- Place the rear fuel supply pipe back in its housing.
- Connect the electrical connection to the fuel pump assembly.
- Place the access cover to the fuel pump assembly back in its housing.
- Place the rear seat cushion back in position.
Op. 4450B08 RIGHT REAR WHEEL - R.R
- Connect the negative battery terminal.
- Remove the vehicle from the lift.
Parts & tools for this job For 2005 Fiat Grande Punto
- PARTEngine gasket setSearch: Fiat Grande Punto 2005 engine gasket set
- TOOLTorque wrenchSearch: 3/8 inch torque wrench
- TOOLFeeler gauge setSearch: feeler gauge set
Links open Amazon search results in a new tab. As an Amazon Associate I earn from qualifying purchases.