
Expansion valve blower motor assembly
- Make
- Land Rover
- Model
- Defender V8i Workshop Manual Supplement
- Section
- Repair › Expansion valve blower motor assembly
Air conditioningExpansion valve blower motor assembly
EXPANSION VALVE BLOWER MOTOR ASSEMBLY
Service repair no - 82.25.01 Service repair no - 82.25.14
Remove Remove
- Remove evaporator. See evaporator
- Using a backing spanner, loosen union nut and remove high pressure pipe.
- Discard ’O’ ring.
- Pull insulation away from capillary tube coil and low pressure pipe.
- Loosen clip and withdraw capillary tube coil from low pressure pipe.
- Loosen capillary tube union and disconnect union from low pressure pipe. Discard ’O’ ring.
- Using a backing spanner, loosen union nut and remove expansion valve from pipe. Discard ’O’ ring.
Refit
- Lubricate NEW ’O’ rings with refrigerant oil and fit to pipe ends.
- Fit expansion valve to pipe, DO NOT tighten union nut.
- Connect capillary tube and tighten union nut.
- Position capillary tube coil on low pressure pipe and secure with clip.
- Wrap capillary coil and union with ’Prestite’ tape.
- Connect high pressure pipe to expansion valve, carefully align with low pressure pipe and tighten union nut.
- Tighten expansion valve union nut.
- Fit evaporator. See evaporator; Refit
- Carry out system test. See Adjustment, System test
Do not carry out further dismantling if component is removed for access only.
- Remove resistor unit and bracket.
- Fit resistor unit to blower motor.
- Remove evaporator. See evaporator
- Move passenger seat fully rearward.
- Position evaporator unit above centre console and seat panel.
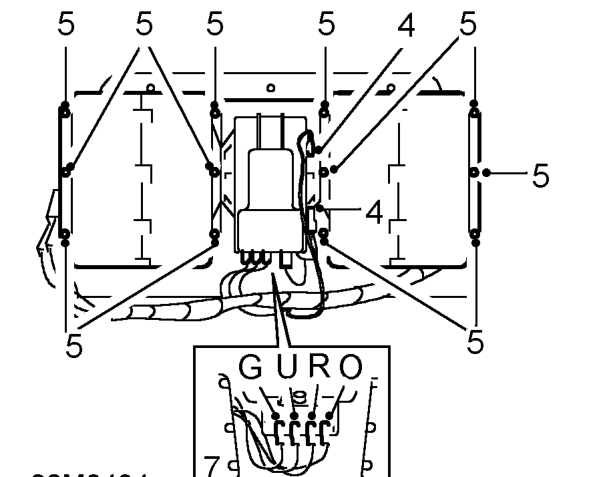
- Disconnect Lucars (B and O wires) from blower motor.
- Remove screws securing blower units to casing.
- Release blower unit flanges from casing, sealed with sealant.
- Disconnect Lucars from resistor unit.
NOTE: Wire positions: G, U and R wires.
- Remove blower motor unit.
- Remove screws securing resistor unit to blower motor. Note alignment of resistor unit.
Parts & tools for this job For Land Rover Defender
- PARTEngine gasket setSearch: Land Rover Defender engine gasket set
- TOOLTorque wrenchSearch: 3/8 inch torque wrench
- TOOLFeeler gauge setSearch: feeler gauge set
Links open Amazon search results in a new tab. As an Amazon Associate I earn from qualifying purchases.