
Refit wiring harness - supplementary
- Make
- Land Rover
- Model
- Defender V8i Workshop Manual Supplement
- Section
- Repair › Refit wiring harness - supplementary
Air conditioningRefit wiring harness - supplementary
Refit WIRING HARNESS - SUPPLEMENTARY
- Lubricate NEW ’O’ rings with refrigerant oil and Service repair no - 86.70.23 fit to pipe ends.
- Fit expansion valve to pipe, DO NOT tighten Remove union nut.
- Connect capillary tube and tighten union nut.
- Position capillary tube coil on low pressure pipe and secure with clip.
- Wrap capillary coil and union with Prestite tape.
- Connect high pressure pipe to expansion valve, carefully align with low pressure pipe and tighten union nut.
- Tighten expansion valve union nut.
- Position evaporator unit in lower casing, align bracket and engage blower flange screws, DO NOT tighten.
- Position upper casing, engage lower casing flange and secure with screws. Ensure mounting bracket screw engages evaporator bracket.
- Tighten blower flange screws.
- Apply Silicone sealant to casing joint and insulating tape to seal pipes to casing.
- Apply sealing tape around air duct joint.
- Position evaporator unit in footwell.
- Connect multiplugs to compressor relays and secure harness ’P’ clip.
- Connect Lucars (G, U, and R) to resistor unit and (B) to motor.
- Lift evaporator, insert pipes into aperture and engage mounting studs.
- Connect drain tube to pipe.
- Fit grommet into aperture.
- Lubricate NEW ’O’ rings with refrigerant oil and fit to joints.
- Carry out a functional check.
- Using a backing spanner, engage high pressure pipe and tighten union nut.
- Using a backing spanner, engage low pressure pipe and tighten union nut.
- Fit nuts and secure evaporator casing to mounting bracket.
- Fit fascia duct bezel. See fascia duct bezel; Refit
- Evacuate and recharge air conditioning system. See Adjustment, refrigerant recovery recycling recharging
- Reconnect battery negative lead.
- Perform leak test on disturbed joints
- Carry out system test. See Adjustment, System test
- Remove evaporator. See evaporator
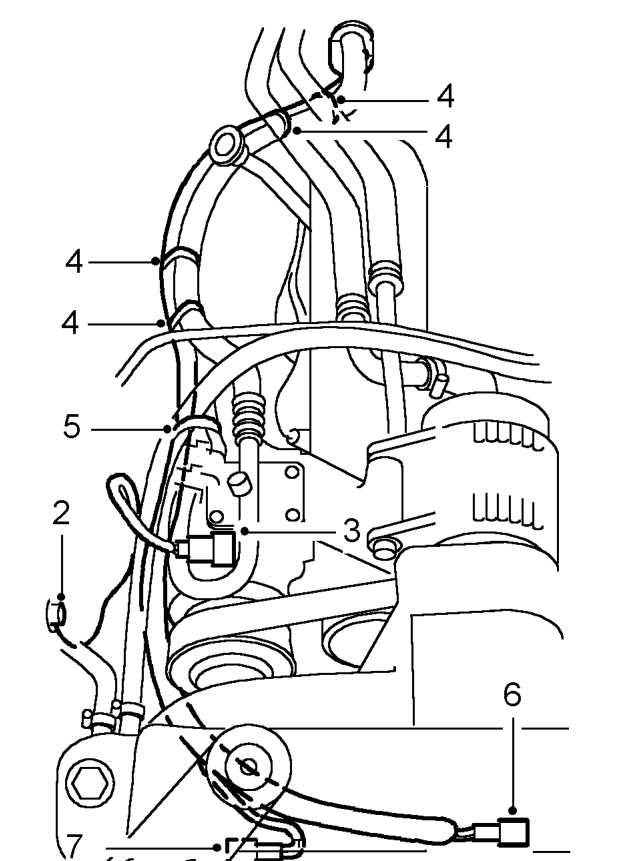
- Remove nut and release earth eyelet from bulkhead.
- Disconnect multiplug from compressor fly-lead.
- Remove 4 ties securing harness to air conditioning hoses.
- Remove tie securing harness to engine harness.
- Above chassis front crossmember, disconnect multiplug from condenser fan fly-lead.
- Disconnect multiplug from trinary switch.
- Release ties securing harness to pipes.
- Release harness.
Parts & tools for this job For Land Rover Defender
- TOOLDigital multimeterSearch: automotive digital multimeter
- PARTAssorted fuse kitSearch: car fuse assortment kit
- TOOLWire crimper and connector kitSearch: wire crimper connector kit
Links open Amazon search results in a new tab. As an Amazon Associate I earn from qualifying purchases.