
Rear brake shoes
- Make
- Mini
- Model
- Mini Workshop Manual
- Year
- 1996–2000
- Section
- Repairs › Rear brake shoes
BrakesRear brake shoes · page 1 of 2
Refit
- Rotate disc by hand and scrape all scale and rust from around edge of disc.
- Scrape rust from pad locating surfaces on caliper.
- Clean dust from calipers using brake cleaning fluid or industrial alcohol.
WARNING: Do not use an air line to blow dust from brake assembly. Do not use petroleum based fluid as damage will occur to rubber components.
- Position bleed bottle, connect bleed hose to bleed screw and loosen screw.
- Press piston back into housing.
- Tighten bleed screw to 9 Nm.
- Remove bleed bottle.
- Fit brake pads to caliper.
NOTE: Fit pad with wear indicator on the inside.
- Position brake pad anti-rattle spring.
- Fit split pins retaining brake pad anti-rattle spring.
- Repeat procedure for other side.
- Fit road wheel and tighten nuts to the correct torque.
- Remove stand(s) and lower vehicle.
- Depress brake several times to set pad to disc clearance.
- Check and top-up brake fluid See INFORMATION, Capacities, fluids and lubricants.
REAR BRAKE SHOES
Service repair no - 70.40.03
Remove
WARNING: Brake shoes must be renewed in axle sets only. Braking efficiency may otherwise be impaired.
- Remove both rear brake drums. See this section.
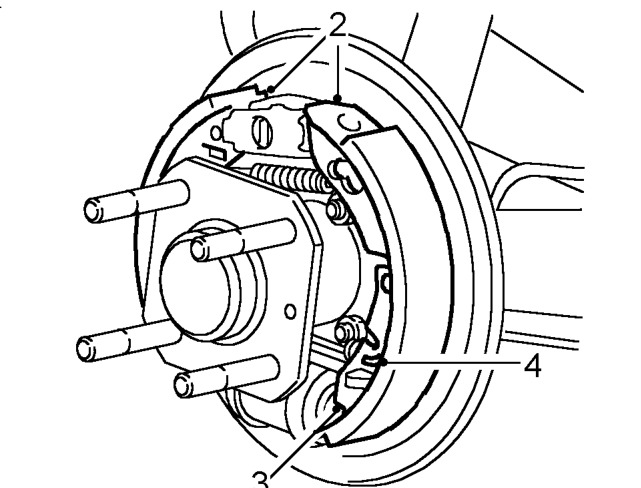
- Release brake shoes from adjuster.
- Release brake shoes from wheel cylinder and disengage from handbrake lever.
CAUTION: Ensure edges of brake shoes do not damage wheel cylinder dust covers.
- Release spring from a trailing brake shoe and remove brake shoe assembly
NOTE: The forward shoe is the LEADING shoe, the TRAILING shoe has the handbrake lever attached to it.
Parts & tools for this job For 1996 Mini Mini
- PARTRear brake padsSearch: Mini Mini 1996 rear brake pads
- TOOLCaliper piston rewind toolSearch: brake caliper piston rewind tool
- FLUIDBrake fluidSearch: brake fluid
Links open Amazon search results in a new tab. As an Amazon Associate I earn from qualifying purchases.