
To End of Model Year 1986:
- Make
- Peugeot
- Model
- J5 Pocket Mechanic, 1.8 and 2.0 petrol
- Year
- 1987–1994
- Section
- Engine assembly › To End of Model Year 1986:
The introduction of the modified engine has not taken place at the same time on all vehicles (manufacturers). The engine types listed below are given as a general guide line and you will have to make sure which engine is fitted to your vehicle:
- Engine 169 B (XM7-): To end of 1986
- Engine 170 B (XN1-T): To end of 1986
- Engine 169 B (XM7-T): To April 1989
- Engine 170 B (XN1-TA): To April 1989
- Engine 169 B (XM7-T): From April 1989
- Engine 170 B (XN1-TA): From April 1989
Different cylinder head wrenches are also required, again depending on the year of manufacture. Engines produced after April 1989 require a “Torrax 55” in conjunction with a graduated disc. The following differences must therefore be observed:
- In the case of all engines tighten the bolts to 5.0 kgm (36 ft.lb.).
- Tighten the rocker shaft pedestal bolts to 1.5 kgm (11 ft.lb.).
ATTENTION: Follow the instructions step by step. We have taken great care to describe each engine carefully to make sure you cannot encounter any problems.
To End of Model Year 1986:
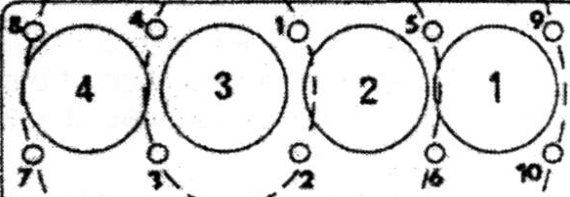
- Slacken all bolts in the reverse order to the one shown in Fig. 1.43 and re-tighten them in the order 1 to 10 to 2.0 kgm (14.5 ft.lb.).
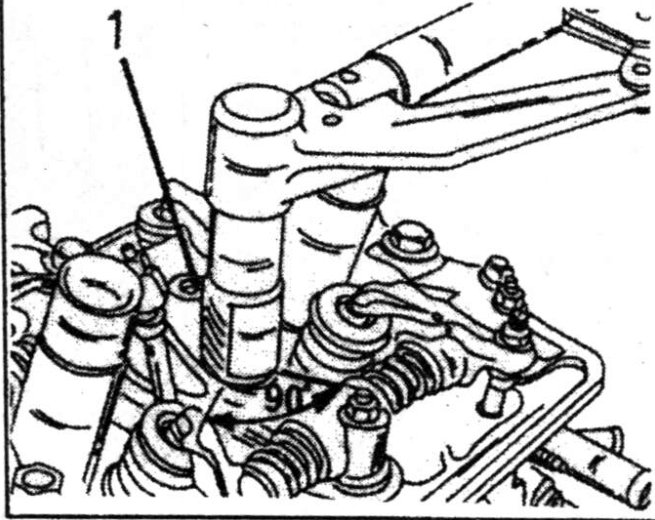
- Place the socket without torque wrench over bolt No. 1, make a note of the position of the bolt, as shown in Fig. 1.44 and tighten the bolt exactly by one quarter of a turn. This is the socket travel indicated in the illustration by 90°. The easiest way to do this, is to apply the socket and tommy bar parallel to the cylinder head and then tighten the bolt until the tommy bar is parallel to the small end of the head.
- Tighten the remaining cylinder head bolts in the same manner, following the tightening sequence.
Attention: If you think you may have omitted one of the bolts, re-start the tightening of the head from the beginning. The cylinder head bolts must
Parts & tools for this job For 1987 Peugeot J5
- PARTEngine gasket setSearch: Peugeot J5 1987 engine gasket set
- TOOLTorque wrenchSearch: 3/8 inch torque wrench
- TOOLFeeler gauge setSearch: feeler gauge set
Links open Amazon search results in a new tab. As an Amazon Associate I earn from qualifying purchases.