
1.2. Engine — Dismantling (page 3 of 3)
- Make
- Peugeot
- Model
- J5 Pocket Mechanic, 1.8 and 2.0 petrol
- Year
- 1987–1994
- Section
- Engine dismantling
Engine1.2. Engine — Dismantling · page 3 of 3
ral stages. Fig. 1.16. shows a view of the engine with the cylinder head cover removed.
- Lift off the rocker shaft assembly and withdraw the push rods in their order of installation. Immediately mark each push rod. We recommend to push them through a piece of cardboard, writing the number against each rod as it is removed (No. 1 on timing side).
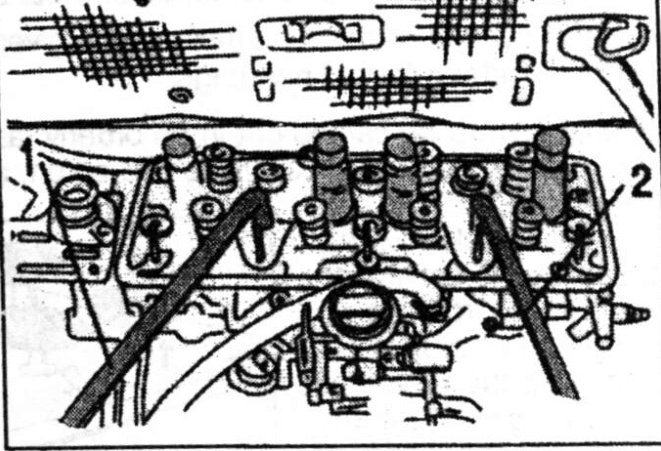
Fig. 1.17.— Lifting off the cylinder head. Use two lifting bars (1 and 2) as shown.
- The cylinder head should be lifted off as shown in Fig. 1.17. Insert two iron bars (1) and (2) as shown and lift the head with the bars. This will break the seal between cylinder head and cylinder liners. Immediately secure the cylinder liners in position as shown in Fig. 1.18. Each pair of cylinder liners must be secured with suitable clamps and bolt.
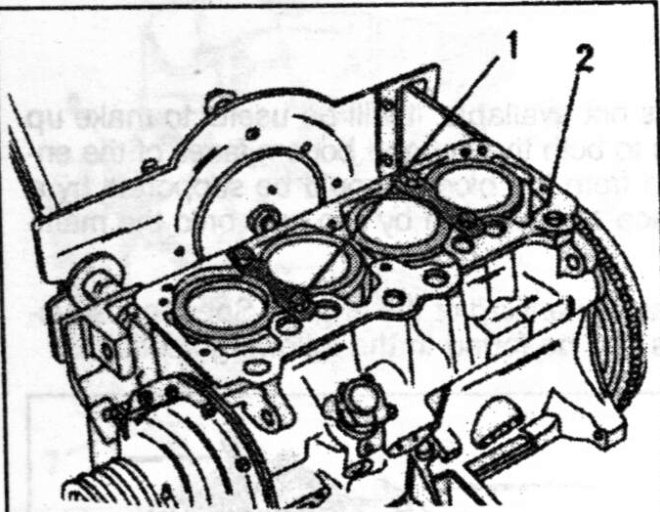
Fig. 1.18.— Cylinder liners can be clamped in position with two clamps (1) as shown. Bolt the clamps to the block (2).
- Remove the valve tappets from the cylinder block bores. Either use a magnet or insert a pointed piece of wood into the tappets to remove them. Store the tappets in their fitted order.
- Unscrew the distributor support housing. Below the housing you will find the distributor drive shaft which can also be removed.
- Unscrew the oil sump with the engine in the upright position. This will allow the oil to remain in the sump, preventing the contamination of the crankshaft assembly with old oil. It is assumed that the oil is already drained. Otherwise do it now.
- Invert the cylinder block and remove the oil pump from the bottom of the crankcase.
- Insert a wooden block between one of the crankshaft throws and the wall of the cylinder block to block the crankshaft against rotation and unscrew the clutch securing bolts evenly in a diagonal manner. Use a centre punch and mark the flywheel and the clutch at a point opposite each other. If clutch and/or flywheel are not to be replaced, refit the parts in the original position. Remove the clutch driven plate from the flywheel.
- With the crankshaft still locked against rotation unscrew the flywheel bolts. There is no need to mark the fitted position of the flywheel, as it can only be fitted in one position. Remove the flywheel with a mallet, if necessary.
Parts & tools for this job For 1987 Peugeot J5
- PARTEngine gasket setSearch: Peugeot J5 1987 engine gasket set
- TOOLTorque wrenchSearch: 3/8 inch torque wrench
- TOOLFeeler gauge setSearch: feeler gauge set
Links open Amazon search results in a new tab. As an Amazon Associate I earn from qualifying purchases.