
Remove
- Make
- Rover
- Model
- Coupé, Cabriolet & Tourer 200/400 Coupé, Cabriolet & Tourer Workshop Manual
- Section
- Repairs › Remove
ClutchRemove
Service Repair No. 33.10.07
Remove
- Remove gearbox assembly, see MANUAL GEARBOX – 2.0 – Repairs.

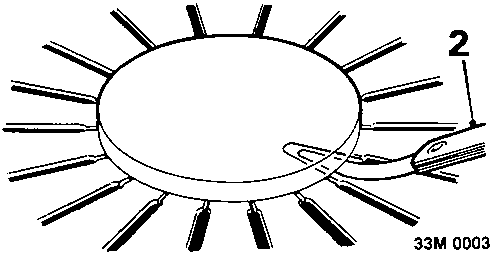
- Place a circular piece of flat plate across diaphragm fingers and insert feeler gauges between plate and fingers; measure finger clearance.
Diaphragm finger clearance – service limit = 1.0 mm
Renew pressure plate if clearance obtained is outside service limits.
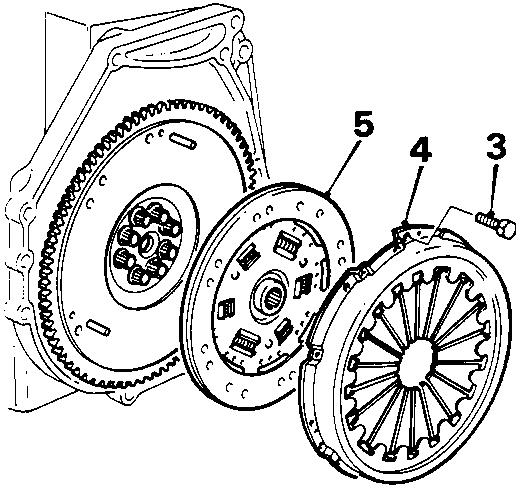
- Progressively slacken then remove 6 bolts securing pressure plate to flywheel.
- Remove pressure plate.
- Remove clutch plate.
- Inspect clutch linings for signs of wear or oil contamination. Check for broken or weak springs and signs of cracking of spring apertures; renew components as necessary.
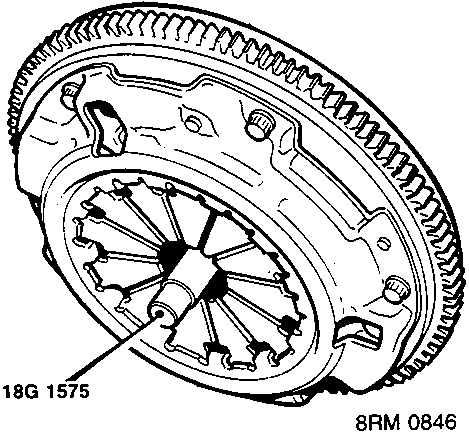
- Fit pressure plate to flywheel and fit alignment tool 18G 1575.
- Fit pressure plate bolts finger tight.
- Working in a diagonal sequence, progressively tighten pressure plate bolts to 26 Nm.
- Remove alignment tool 18G 1575.
- Remove locking tool 18G 1571.
- Clean release fork and sleeve.
- Smear release shaft with molybdenum disulphide grease.
- Engage spring legs in holes in release bearing. Smear bore of release bearing with molybdenum disulphide grease.
- Place release fork and bearing in position and insert release shaft.
- Fit a new washer to release fork bolt.
- Align hole in release fork with hole in shaft.Fit bolt and tighten to 29 Nm.
- Move release fork up and down to ensure it fits correctly against bearing and bearing slides freely.
- Fit gearbox assembly, see MANUAL GEARBOX – 1.6 – Repairs.
Parts & tools for this job For Rover Coupé, Cabriolet & Tourer
- PARTClutch kitSearch: Rover Coupé, Cabriolet & Tourer clutch kit
- TOOLClutch alignment toolSearch: clutch alignment tool
- FLUIDGear oilSearch: Rover Coupé, Cabriolet & Tourer manual gearbox oil
Links open Amazon search results in a new tab. As an Amazon Associate I earn from qualifying purchases.