
R.r. rear wing
- Make
- Alfa Romeo
- Model
- 147 Factory Service Manual
- Year
- 2000–2004
- Section
- Removing refitting › R.r. rear wing
R.R. REAR WING
Removing
Check if any of the connected parts are deformed by checking body alignment dimensions. Use appropriate measurement tools (reference rigs, templates or gauges).
Straighten the body if necessary.
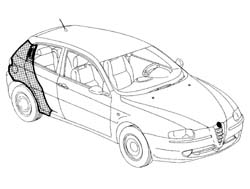
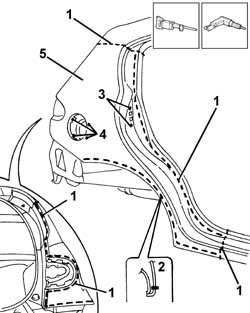
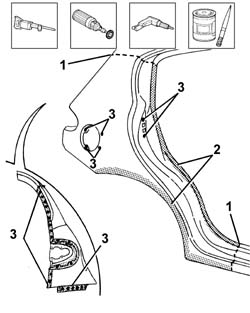
1. Use a hacksawing machine to follow the cutting lines shown in the figure.
2. Cross-sections representing the cutting point to allow the operator to adjust cutting position and depth in order to avoid damage to the underlying panels.
3. Drill out the weld spots shown in the figure.
4. (Only for right wing) Drill out the weld spots shown in the figure.
5. Remove the wing.
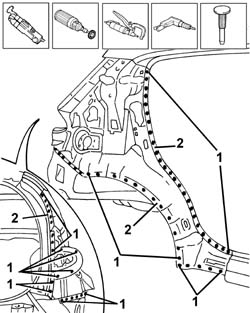
Use a vibrating cutter with appropriate blade to remove P.V.C. from the cut end of the rear wing on the car.
Use a rotary brush to remove paint to gain access to the weld spots.
1. Use a chamfering machine to remove the weld spots shown in the figure.
Drill out any weld spots not accessible to the chamfering machine.
Use a chisel and mallet to remove spots drilled previously.
2. Remove the cut edge of the rear wing from the car.
Straighten the car edges using a mallet and profiled stake.
Use a grinding wheel to remove the weld spot residues.
Use a rotary brush to clean treated areas.
1. Apply the electric weld paint finish.
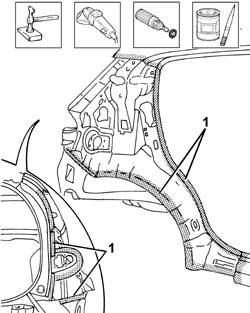
1. Cut the part at the bench. Take care to leave a sufficiently wide section of steel to attach the new part.
2. Use a grinding wheel to remove the corrosion-proofing from around the inner and outer edge of the parts.
3. Drill out the holes indicated.
Apply electric weld paint finish to the edges to be welded.
Refitting
1. Lay the wing on the car correctly and secure using self-locking grippers.
2. Fit the door compartment seal, striker and front door.
3. Fit the tail-gate seal and the tail-gate.
Check the alignment and surrounding gaps.
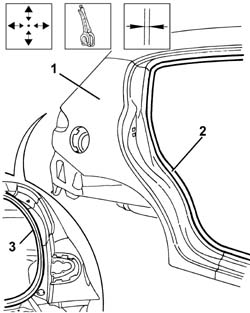
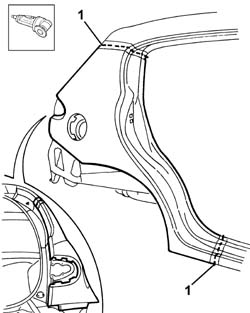
1. Use a circular saw to cut both panel sections in order to achieve a perfect joint line.
Remove any excess sheet steel and adjustment components from the part.
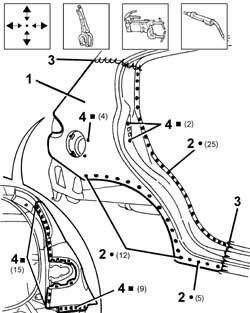
1. Lay the wing on the car correctly and secure using self-locking grippers.
2. Use a spot welder to weld the areas shown in the figure.
3. Use a MIG welder to seam weld the areas shown in the figure.
4. Use a MIG welder to fill the holes made previously.
Correct any deformations in the panel using a profiled stake and mallet.
Crimp the reference tabs.
1. Use a grinding wheel to level the welds
Use a rotary brush to clean the newly-welded areas.
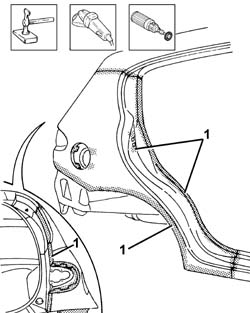
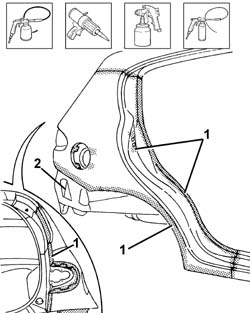
1. Apply rust-proofing to newly-welded areas.
Seal the joint lines between the part and the car.
Apply paint.
2. Apply wax oil inside the rear wing.
Removing
Check if any of the connected parts are deformed by checking body alignment dimensions. Use appropriate measurement tools (reference rigs, templates or gauges).
Straighten the body if necessary.
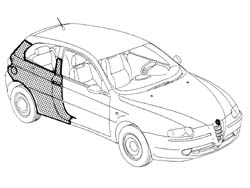
1. Use a hacksawing machine to follow the cutting lines shown in the figure.
2. Cross-section representing the cutting point to allow the operator to adjust cutting position and depth in order to avoid damage to the underlying panels.
3. Drill out the weld spots shown in the figure.
4. (Only for right wing) Drill out the weld spots shown in the figure.
5. Remove the wing.
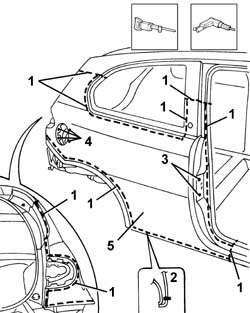
Use a vibrating cutter with appropriate blade to remove P.V.C. from the cut end of the rear wing on the car.
Use a rotary brush to remove paint to gain access to the weld spots.
1. Use a chamfering machine to remove the weld spots shown in the figure.
Drill out any weld spots not accessible to the chamfering machine.
Use a chisel and mallet to remove spots drilled previously.
2. Remove the cut edge of the rear wing from the car.
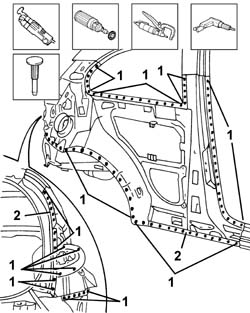
Straighten the car edges using a mallet and profiled stake.
Use a grinding wheel to remove the weld spot residues.
Use a rotary brush to clean treated areas.
1. Apply the electric weld paint finish.
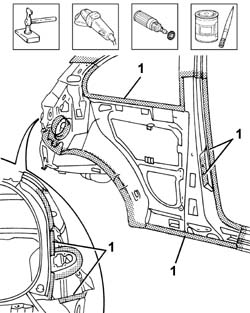
1. Cut the part at the bench. Take care to leave a sufficiently wide section of steel to attach the new part to.
2. Use a rotary brush to remove the corrosion-proofing from around the inner and outer edge of the parts.
3. Drill out the holes indicated.
Apply electric weld paint finish to the edges to be welded.
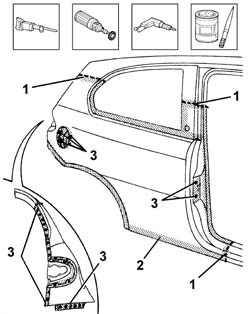
Refitting
1. Lay the wing on the car correctly and secure using self-locking grippers.
2. Fit the door sealing strip, catch striker and front door.
3. Fit the tailgate seal and tailgate.
Check the alignment and surrounding gaps.
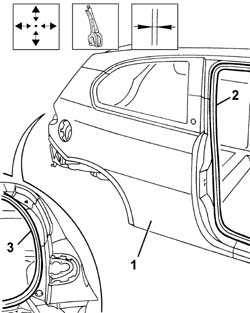
1. Use a circular saw to cut both panel sections in order to achieve a perfect joint line.
Remove any excess sheet steel and adjustment components from the part.
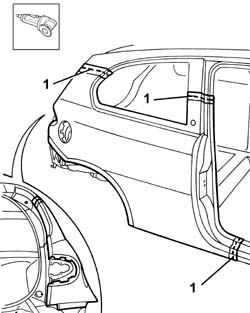
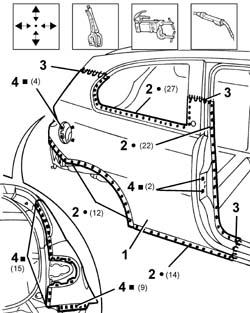
1. Lay the wing on the car correctly and secure using self-locking grippers.
2. Use a spot welder to weld the areas shown in the figure.
3. Use a MIG welder to seam weld the areas shown in the figure.
4. Use a MIG welder to fill the holes made previously.
Correct any deformations in the panel using a profiled stake and mallet.
Crimp the reference tabs.
1. Use a grinding wheel to level the welds made previously
Use a rotary brush to clean the newly-welded areas.
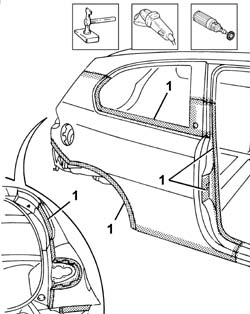
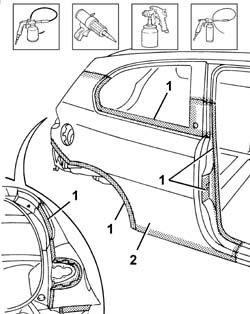
1. Apply rust-proofing to newly-welded areas.
Seal the joint lines between the part and the car.
Apply paint.
2. Apply wax oil inside the rear wing.
Parts & tools for this job For 2000 Alfa Romeo 147
- TOOLTrim removal tool kitSearch: trim removal tool kit
- PARTTouch-up paintSearch: Alfa Romeo touch up paint
- PARTPanel clip assortmentSearch: Alfa Romeo panel clips assortment
Links open Amazon search results in a new tab. As an Amazon Associate I earn from qualifying purchases.