
3.1 Initial Torque
- Make
- Aston Martin
- Model
- DB9 Factory Workshop Manual
- Year
- Issue 2, 2005
- Section
- Engine Structure › 3.1 Initial Torque
Caution
The following ‘Torque - Release - Torque’ sequence must be performed exactly as specified to ensure correct cylinder head to engine block sealing.
- Torque the cylinder head in stages using the following procedure:
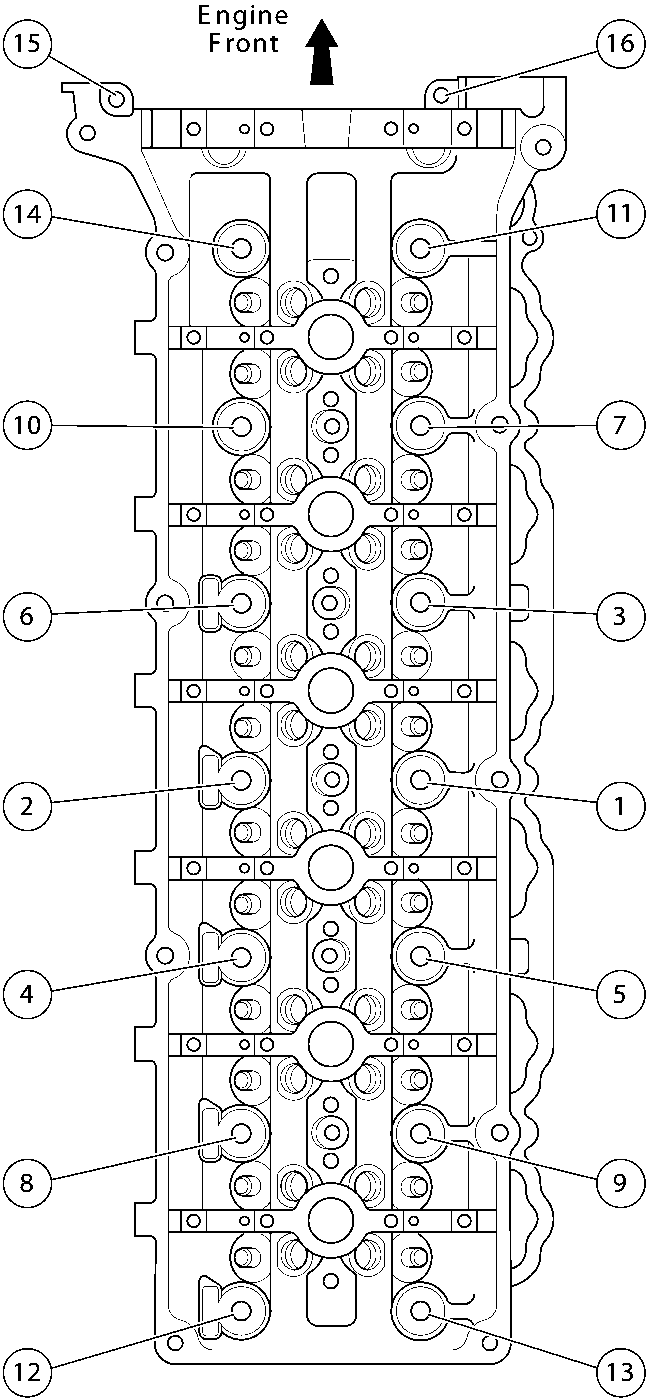
3.1 Initial Torque
- Torque bolts 1 -14 (M10) to 37-43 Nm. in the sequence shown.
- Torque bolts 15-16 (M8) to 15-20 Nm.
- Torque bolts 1-14 (M10) a further 85-95° in the sequence shown.
3.2 Release
- Loosen bolts 1-14 (M10) a minimum of one full turn (360°).
3.3 Final Torque
- Torque bolts 1-14 (M10) to 37-43 Nm. in the sequence shown.
- Torque bolts 15-16 (M8) to 23-27 Nm.
- Torque bolts 1-14 (M10) a further 85-95° in the sequence shown.
- Torque bolts 1-14 (M10) an additional 85-95° in the sequence shown.
- Repeat for the second cylinder head.
- Install all lash adjusters.
Soak the lash adjusters in engine oil.
Insert each lash adjuster into its correct recess in the cylinder head.
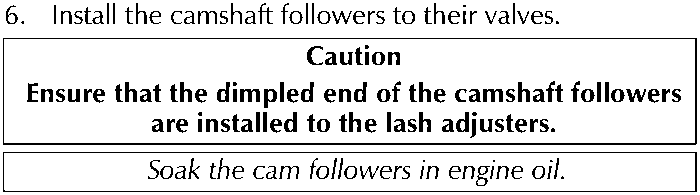
Install the camshaft followers to their valves.
Caution
Ensure that the dimpled end of the camshaft followers are installed to the lash adjusters.
Soak the cam followers in engine oil.
- Lubricate the camshaft journals, camshaft bearing caps with engine oil.
- Ensure the crankshaft key is vertical.
Caution
The crankshaft key must remain in the vertical position until the camshaft chains are correctly installed and tensioned. Movement of the crankshaft before completion of valve timing may cause contact between a piston and a valve, resulting in valve and / or piston damage.
The crankshaft key is exactly in line with No.1 crankshaft throw. With the crankshaft key vertical, No.1 piston is 30° ATDC and all pistons are below engine block surface.
Parts & tools for this job For 2005 Aston Martin DB9
- PARTEngine gasket setSearch: Aston Martin DB9 2005 engine gasket set
- TOOLTorque wrenchSearch: 3/8 inch torque wrench
- TOOLFeeler gauge setSearch: feeler gauge set
Links open Amazon search results in a new tab. As an Amazon Associate I earn from qualifying purchases.