
Exhaust Manifold
- Make
- Aston Martin
- Model
- DB9 Factory Workshop Manual
- Year
- Issue 2, 2005
- Section
- Engine Structure › Exhaust Manifold
03 EngineExhaust Manifold
- Install the injectors to the inlet manifold, complete with new ‘O’ rings.
Note position of ‘O’ rings
- Blue (top)
- Green (bottom)
- Install the fuel rails.
- Locate fuel rails over injectors.
- Pull down’ fuel rail onto injectors by tightening bolts (x3). Torque bolts to 8-12 Nm.
- Connect fuel rails to fuel supply lines.
Ensure each fuel rail and fuel supply line are ‘in-line’ before connection.
- Install the secondary latch clips to the fuel lines.
- Connect the following wiring harness plugs:
- Temperature sender to fuel rail
- Pressure sensor to fuel rail
- To the injectors
- Connect thermostat housing by-pass pipe.
- Install the air intake hose.
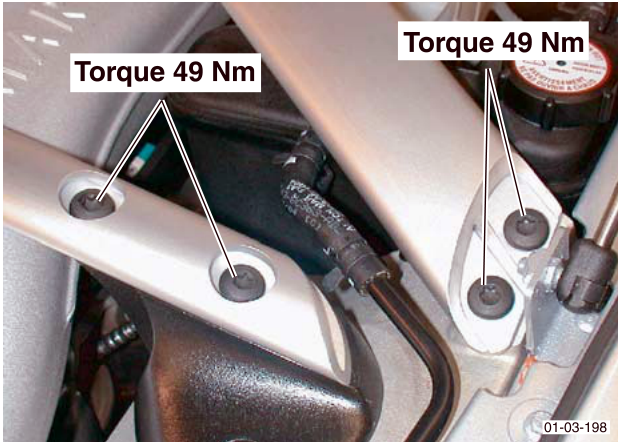
- Install the engine bay corner braces (x2), engine bay cross brace and manifold brace. Torque bolts to:
- Engine cross brace - 49 Nm.
- Manifold brace - 8-12 Nm.
- Corner braces - 49 Nm.
Exhaust Manifold
| Repair Operation Time (ROT) | |
|---|---|
| Item | Code |
| Exhaust Manifold Renew | LH 09.03.DB RH 09.03.EB |
Removal
- Disconnect the vehicle battery.
- Raise the vehicle and make safe.
- Remove the front roadwheels and wheel arch liners.
- Remove the undertray.
- Remove the lower suspension arms.
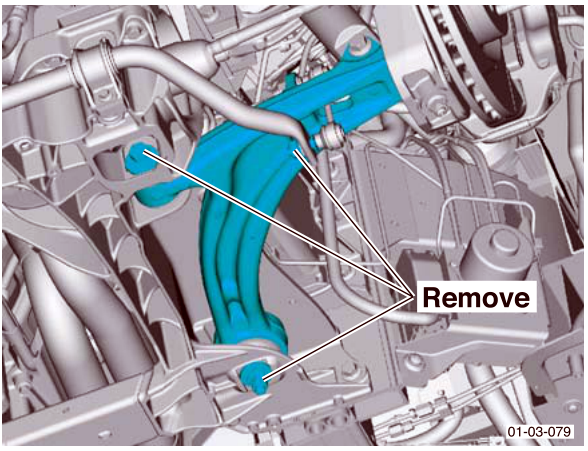
- Disconnect the anti-roll bar links.
- Remove the front subframe (Refer to ‘Front Subframe’, page 2-1-2).
RH manifold
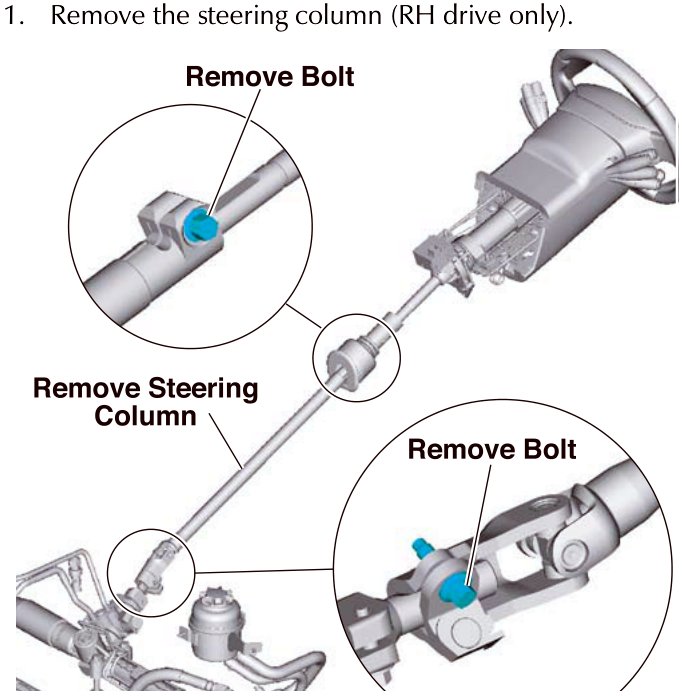
F3 Remove the steering column (RH drive only).
Parts & tools for this job For 2005 Aston Martin DB9
- PARTExhaust gasketSearch: Aston Martin DB9 2005 exhaust gasket
- TOOLPenetrating oilSearch: penetrating oil
- TOOLOBD2 scannerSearch: OBD2 scanner
Links open Amazon search results in a new tab. As an Amazon Associate I earn from qualifying purchases.