
Stalk unit assembly - r+r
- Make
- Fiat
- Model
- Bravo Factory Service Manual
- Year
- 2007–2014
- Section
- Warning and manoeuvring indicators › Stalk unit assembly - r+r
STALK UNIT ASSEMBLY - R+R
Removing
Follow the safety instructions for this operation meticulously
Op. 5580C18 AIR BAG MODULE - R+R
- Place the steering wheel in a central position with the wheels straight.
Op. 4110A10 STEERING WHEEL - R+R FOR REPLACEMENT OR CHECKS
Op. 7040A26 STEERING COLUMN TRIM - R+R
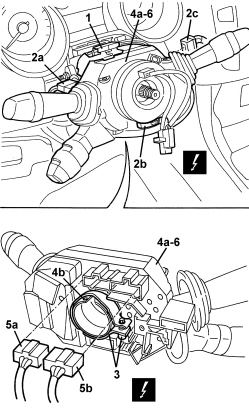
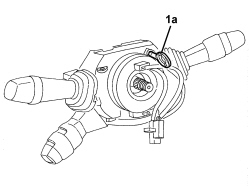
If the stalk unit is reused, take care not to press the clock spring ring (1a) in order not to turn lockring (1b) on lockring (1c) and affect the operation of the clock spring.
1. Disconnect the wiring support.
2. Disconnect the electrical connections (2a, 2b, 2c).
| Description | Connector | |
|---|---|---|
| 2a | CRUISE CONTROL COMMAND | See H007 CRUISE CONTROL SYSTEM CONTROL |
| 2b | CLOCK SPRING COUPLING | See D047 CLOCK SPRING COUPLING |
| 2c | STEERING COLUMN SWITCH UNIT | See H005 STEERING COLUMN SWITCH UNIT |
3. Loosen the steering column switch unit retaining band.
4. Move the steering column switch unit (4a) releasing the retainer (4b).
5. Disconnect the electrical connections (5a, 5b).
| Description | Connector | |
|---|---|---|
| 5a,5b | CRUISE CONTROL COMMAND | See H005 STEERING COLUMN SWITCH UNIT |
6. Keep the steering column switch unit.
The clock spring is fitted with a device that automatically stops it from rotating when it is removed from the steering wheel. Avoid forcing it to rotate.
If the clock spring is being reused, it is advisable to secure the two shims with a band to prevent accidental rotation.
Refitting
- Check that the steering column switch unit is not damaged.
- Remove the band applied to secure the lockrings.
The new replacement parts are supplied to be installed in a centred position.
1. If the stalk unit to be fitted is new, remove tab (1a) securing both lockrings.
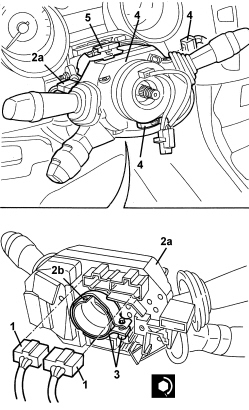
- Check that the wheels are straight.
1. Connect the electrical connections for the steering column switch unit.
2. Fit the steering column switch unit (2a) in position and attach the retainer (2b).
3. Tighten the steering column switch unit retaining band.
| Component | Fastening | dia | Value (daNm) | Validity |
|---|---|---|---|---|
| Steering column switch unit | Bolt | M6 | 0.6 ÷ 1.0 |
4. Connect the electrical connections.
5. Connect the wiring support.
Op. 7040A26 STEERING COLUMN TRIM - R+R
Parts & tools for this job For 2007 Fiat Bravo
- TOOLDigital multimeterSearch: automotive digital multimeter
- PARTAssorted fuse kitSearch: car fuse assortment kit
- TOOLWire crimper and connector kitSearch: wire crimper connector kit
Links open Amazon search results in a new tab. As an Amazon Associate I earn from qualifying purchases.