
Alternator - r+r
- Make
- Fiat
- Model
- Croma Factory Service Manual
- Year
- 2005–2010
- Section
- Current generation › Alternator - r+r
ALTERNATOR - R+R
Removing
- Position the vehicle on a lift.
- Make sure that the ignition key is in the OFF position, then disconnect the battery terminal (-).
| Description | Connector | |
|---|---|---|
| Battery | See A001 BATTERY |
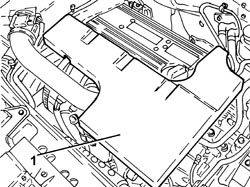
1. Remove the sound insulation cover fastened to the engine by three pins.
1. Loosen the band and disconnect the engine oil vapour recovery pipe from the cylinder head cover.
2. Loosen the bands and remove the air supply hose from the air flow meter to the throttle casing.
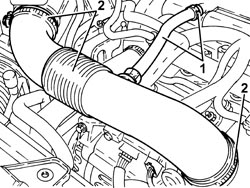
1. Disconnect the electrical connection from the air flow meter.
| Description | Connector | |
|---|---|---|
| 1 | Air flow meter | See K041 AIR FLOW METER |
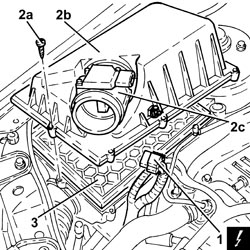
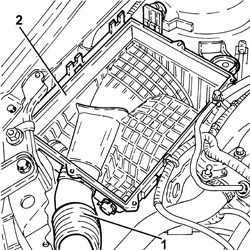
2. Undo the bolts (2a) and remove the air filter cover (2b), complete with air flow meter (2c).
3. Remove the air filter filter element.
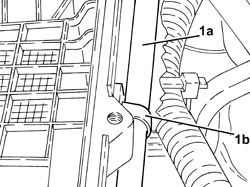
1. Release the fuel vapour pipe (1a) from the band (1b) on the air filter casing.
1. Disconnect the cold air intake from the air filter casing.
2. Remove the air filter casing fastened to the bodyshell by three pins.
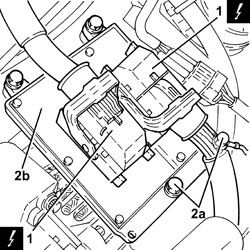
1. Disconnect the electrical connections from the injection/ignition system control unit.
| Description | Connector | |
|---|---|---|
| 1 | Engine management control unit | See M010 ENGINE MANAGEMENT CONTROL UNIT |
2. Undo the bolts (2a) and remove the injection/ignition system control unit (2b).
One of the bolts also secures the earth lead.
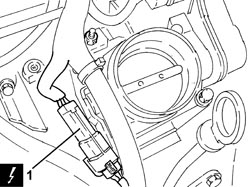
1. Disconnect the engine coupling.
| Description | Connector | |
|---|---|---|
| 1 | Engine cables/engine services cable coupling | See D029 ENGINE CABLES/ENGINE SERVICES CABLE COUPLING |
Op. 4450B04 RIGHT FRONT WHEEL - R.R
Op. 7055B66 ENGINE COMPARTMENT DUST COVER IN RIGHT FRONT WHEEL ARCH - R.R.
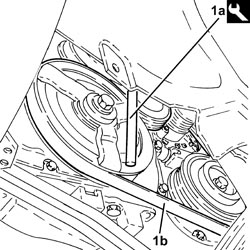
1. Use tool (1a) to adjust the mobile tensioner and prise off the auxiliary drivebelt (1b).
| Tool | Description | Function | Validity |
|---|---|---|---|
| 1860815000 | Flange | Crankshaft rotation | 1.8 |
Op. 7055B54 UNDER ENGINE PROTECTION/GUARD - R.R.
1. Undo the radiator coolant drain plug and drain the coolant.
Collect the engine coolant in a suitable container.
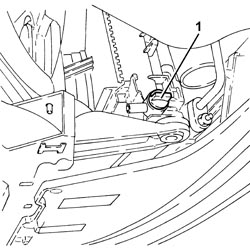
1. Loosen the band and disconnect the radiator lower coolant outlet hose, cylinder head side.
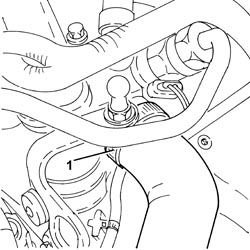
1. Disconnect the intermediate rapid connector for the fuel vapour pipe.
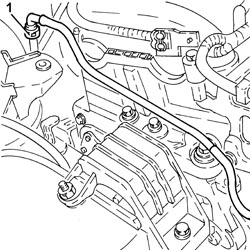
1. Disconnect the rapid connector for the fuel vapour recovery pipe, air chamber side.
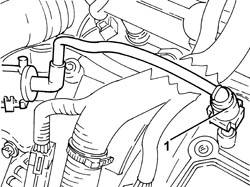
1. Disconnect the electrical connection from the fuel vapour recovery solenoid valve.
| Description | Connector | |
|---|---|---|
| 1 | Fuel vapour recovery solenoid valve | See L010 FUEL VAPOUR RECOVERY SOLENOID VALVE |
2. Release the fuel vapour recovery solenoid valve from the fastening, then remove it complete with pipes.
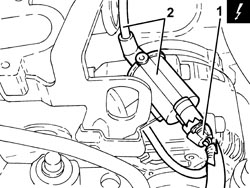
1. Undo the nuts (1a) and remove the bracket (1b).
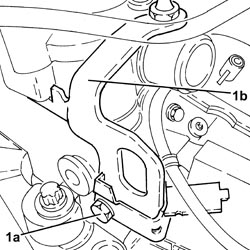
1. Undo the alternator fixing bolts.
2. Move the alternator as required and disconnect the electrical connections.
| Description | Connector | |
|---|---|---|
| 2 | Alternator | See A010 ALTERNATOR |
3. Remove the alternator.
Refitting
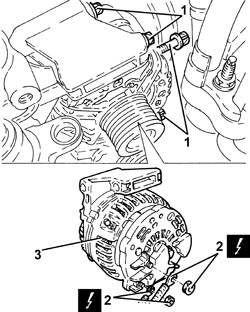
1. Connect the electrical connections to the alternator and secure them using the nuts.
2. Place the alternator (2a) in its housing and fasten it tightening the bolts (2b) to the recommended torque.
| Component | Fastening | dia | Value (daNm) | Validity |
|---|---|---|---|---|
| Alternator | Bolt | M8 | (engine crankcase side) 2.3 - 2.8 | 2.2 |
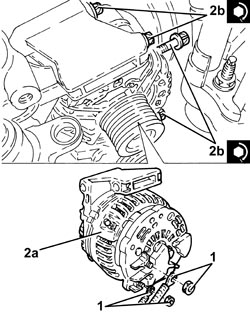
- Refit the bracket and secure with the bolt.
- Place the fuel vapour recovery solenoid valve complete with pipes in its housing and secure it.
- Connect the electrical connection to the fuel vapour recovery solenoid valve.
- Connect the rapid connector for the fuel vapour recovery pipe, air chamber side.
- Connect the intermediate rapid connector for the fuel vapour pipe.
- Connect the radiator lower coolant outlet hose, cylinder head side, and tighten the band.
- Tighten the radiator coolant radiator drain plug.
Op. 7055B54 UNDER ENGINE PROTECTION/GUARD - R.R.
- Refit the auxiliary drivebelt by adjusting the moving tensioner with the tool.
| Tool | Description | Function | Validity |
|---|---|---|---|
| 1860815000 | Flange | Crankshaft rotation | 1.8 |
Op. 7055B66 ENGINE COMPARTMENT DUST COVER IN RIGHT FRONT WHEEL ARCH - R.R.
Op. 4450B04 RIGHT FRONT WHEEL - R.R
- Connect the engine coupling.
1. Place the injection/ignition system control unit (1a) in its housing and secure it tightening the bolts (1b) to the recommended torque.
One of the bolts also secures the earth lead (1c).
| Component | Fastening | dia | Value (daNm) | Validity |
|---|---|---|---|---|
| Injection/ignition system control unit | Bolt | M6 x 1 | (air chamber side) 0.9 | 2.2 |
2. Connect the electrical connections to the injection/ignition system control unit.
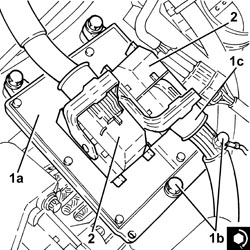
- Place the air filter casing in its housing and secure it to the bodyshell using the three pins.
- Connect the cold air intake to the air filter casing.
- Fasten the fuel vapour pipe to the air filter casing using the band.
- Fit the air filter filter element in place.
- Fit the cover for the air filter, complete with air flow meter, and secure it using the bolts.
- Connect the electrical connection to the air flow meter.
- Place the air supply hose from the air flow meter to the throttle casing back in its housing and secure it using the bands.
- Connect the engine oil vapour recovery pipe to the cylinder head cover and secure it using the band.
- Place the sound insulation cover back in its housing and secure it to the engine using the three pins.
- Connect the negative battery terminal.
Op. 0010T20 ENGINE COOLANT - CHANGE
- Remove the vehicle from the lift.
Removing
- Open the bonnet.
- Turn the ignition key to the OFF position.
- Disconnect the negative battery terminal.
| Description | Connector | |
|---|---|---|
| BATTERY | See A001 BATTERY |
Op. 7055B54 UNDER ENGINE PROTECTION/GUARD - R.R.
Op. 7055B91 RIGHT FRONT WHEEL ARCH LINER - R.R.
Op. 7055B66 ENGINE COMPARTMENT DUST COVER IN RIGHT FRONT WHEEL ARCH - R.R.
Op. 1092B40 AIR CONDITIONING COMPRESSOR/ALTERNATOR DRIVE BELT - R + R
Op. 5520C20 HEATER PLUGS CONTROL UNIT - R.R
1. Release the retaining clip and disconnect the diesel preheating coil electrical connection.
| Description | Connector | |
|---|---|---|
| TEMPERATURE SENSOR AND COM HEATING COIL | See K100 TEMPERATURE SENSOR AND HEATING RESISTANCE |
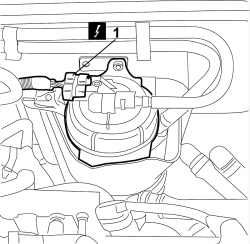
1. Release the retaining clip and disconnect the diesel filter water sensor electrical connection.
| Description | Connector | |
|---|---|---|
| SENSOR FOR PRESENCE OF WATER IN DIESEL FILTER | See K031 WATER IN DIESEL FILTER SENSOR |
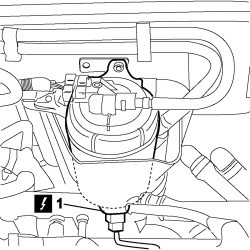
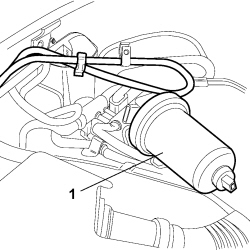
1. Prise out the diesel delivery and return pipes (1a) from retaining clips (1b).
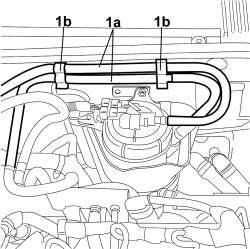
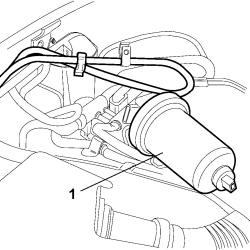
1. Remove the diesel filter from its seat and place to one side to free up the working area.
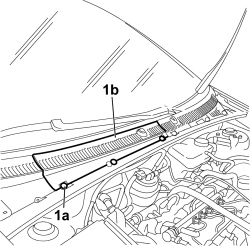
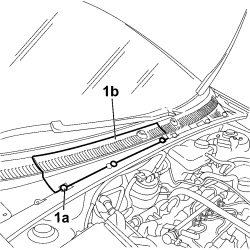
1. Using the special tool, release the three fixing buttons (1a) and remove the windscreen base trim right cover (1b).
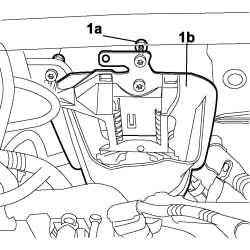
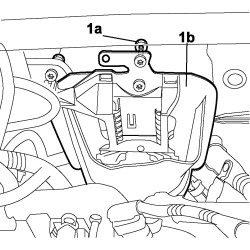
1. Working from inside the windscreen base trim, unscrew the three nuts (1a) securing the diesel filter mount (1b) and remove the mount from the vehicle.
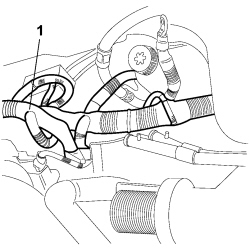
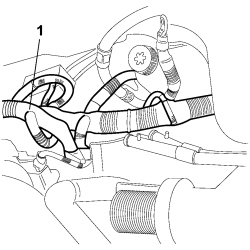
1. Release the wiring harness from the retaining clips and prise out the harness to free up the working area.
Op. 0010T20 ENGINE COOLANT - CHANGE
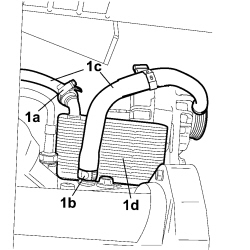
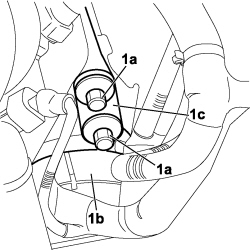
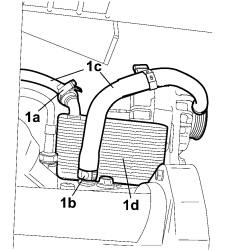
1. Use the appropriate tool to loosen both collars (1a) and (1b) retaining the delivery and return pipes (1c) to the Modine unit (1d) and move the pipes aside to free up the working area.
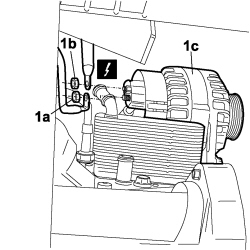
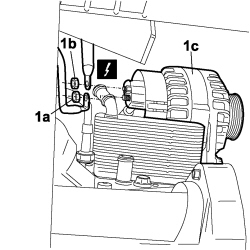
1. Prise out the cover protecting the electrical connections and unscrew both nuts (1a) and (1b) securing the electrical connection to alternator (1c), disconnect the electrical connections.
| Description | Connector | |
|---|---|---|
| ALTERNATOR | See A010 ALTERNATOR |
1. Undo the lower bolts (1a) and (1b) securing the alternator to the mounting bracket (1c).
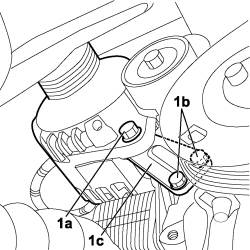
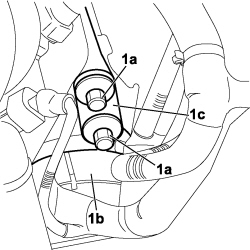
1. Unscrew both upper bolts (1a) securing the alternator (1b), remove the bolts and recover the mounting bracket (1c).
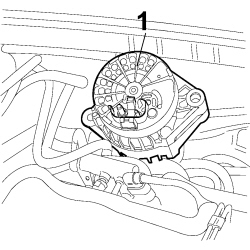
1. Remove the alternator from the upper part of the engine, prising up the wiring harness to facilitate removal.
Refitting
- Check that the alternator is not damaged.
- Fit alternator through the upper part of the engine, prising up the wiring harness to facilitate removal.
- Position the alternator upper bracket and screw in the two bolts, without tightening.
- Screw in the three lower bolts securing the alternator to the mounting bracket and tighten them to the recommended torque.
| Component | Fastening | dia | Value (daNm) | Validity |
|---|---|---|---|---|
| ALTERNATOR TO IE PUMP MOUNTING | Bolt | M12 | 6,3 ÷ 7,6 | 1.9 jtd 16v 1.9 jtd 8v |
- Tighten both upper bolts to the specified torque.
| Component | Fastening | dia | Value (daNm) | Validity |
|---|---|---|---|---|
| ALTERNATOR TO BRACKET | Bolt | M12 | 6,3 ÷ 7,6 | 1.9 jtd 16v 1.9 jtd 8v 2.4 jtd 20v |
- Fit the electrical cable in the corresponding two connection bolts on the alternator and tighten both nuts securing the electrical connections to the alternator.
| Connector | Description | |
|---|---|---|
| ALTERNATOR | See A010 ALTERNATOR |
- Fit the access cover for the electrical connections.
- Fit both delivery and return pipes to the Modine and use the appropriate tool to tighten both retaining collars.
Op. 0010T20 ENGINE COOLANT - CHANGE
- Position the cable loom and fasten the retaining bands.
- Position the diesel filter mounting on the vehicle and, working from inside the windscreen base trim, screw in the three nut and tighten them.
- Position the right cover for the windscreen base trim and fit the three securing studs.
- Fit the diesel filter in the mount and secure the delivery and return pipes using the retaining clips.
- Connect the diesel filter water sensor electrical connection and secure the retaining clip.
| Description | Connector | |
|---|---|---|
| SENSOR FOR PRESENCE OF WATER IN DIESEL FILTER | See K031 WATER IN DIESEL FILTER SENSOR |
- Connect the diesel preheating coil electrical connection and secure the retaining clip.
| Description | Connector | |
|---|---|---|
| TEMPERATURE SENSOR AND COM HEATING COIL | See K100 TEMPERATURE SENSOR AND HEATING RESISTANCE |
Op. 5520C20 HEATER PLUGS CONTROL UNIT - R.R
Op. 1092B40 AIR CONDITIONING COMPRESSOR/ALTERNATOR DRIVE BELT - R + R
Op. 7055B66 ENGINE COMPARTMENT DUST COVER IN RIGHT FRONT WHEEL ARCH - R.R.
Op. 7055B91 RIGHT FRONT WHEEL ARCH LINER - R.R.
Op. 7055B54 UNDER ENGINE PROTECTION/GUARD - R.R.
- Connect the negative battery terminal.
| Description | Connector | |
|---|---|---|
| BATTERY | See A001 BATTERY |
Removing
- Remove the upper engine protective cover.
- Turn the ignition key to the OFF position.
- Disconnect the negative battery terminal.
| Description | Connector | |
|---|---|---|
| BATTERY | See A001 BATTERY |
Op. 7055B54 UNDER ENGINE PROTECTION/GUARD - R.R.
Op. 7055B91 RIGHT FRONT WHEEL ARCH LINER - R.R.
Op. 7055B66 ENGINE COMPARTMENT DUST COVER IN RIGHT FRONT WHEEL ARCH - R.R.
Op. 1092G10 SINGLE ENGINE BELT - R.R
Op. 5520C20 HEATER PLUGS CONTROL UNIT - R.R
1. Release the retaining clip and disconnect the diesel preheating coil electrical connection.
| Description | Connector | |
|---|---|---|
| 1 | TEMPERATURE SENSOR AND COM HEATING COIL | See K100 TEMPERATURE SENSOR AND HEATING RESISTANCE |
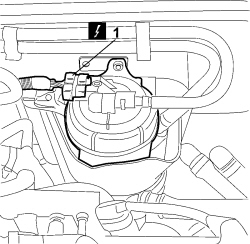
1. Release the retaining clip and disconnect the diesel filter water sensor electrical connection.
| Description | Connector | |
|---|---|---|
| 1 | SENSOR FOR PRESENCE OF WATER IN DIESEL FILTER | See K031 WATER IN DIESEL FILTER SENSOR |
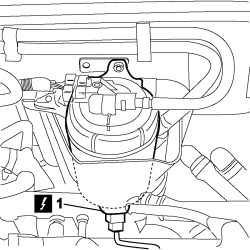
1. Prise out the diesel delivery and return pipes (1a) from retaining clips (1b).
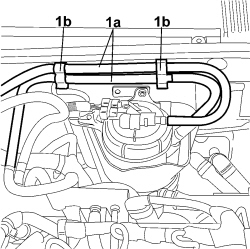
1. Remove the diesel filter from its seat and place to one side to free up the working area.
1. Using the special tool, release the three fixing buttons (1a) and remove the windscreen base trim right cover (1b).
1. Working from inside the windscreen base trim, unscrew the three nuts (1a) securing the diesel filter mount (1b) and remove the mount from the vehicle.
1. Release the wiring harness from the retaining clips and prise out the harness to free up the working area.
Op. 0010T20 ENGINE COOLANT - CHANGE
1. Use the appropriate tool to loosen both collars (1a) and (1b) retaining the delivery and return pipes (1c) to the Modine unit (1d) and move the pipes aside to free up the working area.
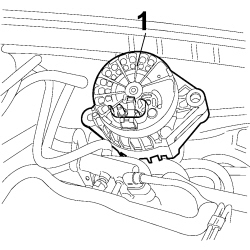
1. Prise off the cover protecting the electrical connections and unscrew both nuts (1a) and (1b) securing the electrical connections to alternator (1c), disconnect the electrical connections.
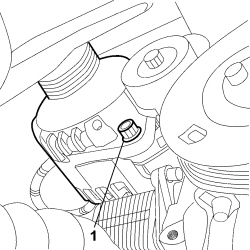
1. Undo the lower bolt fixing the alternator.
1. Unscrew both upper bolts (1a) securing the alternator (1b), remove the bolts and recover the mounting bracket (1c).
1. Remove the alternator from the upper part of the engine, prising up the wiring harness to facilitate removal.
Refitting
- Check that the alternator is not damaged.
- Fit alternator through the upper part of the engine, prising up the wiring harness to facilitate removal.
- Position the alternator upper bracket and screw in the two bolts, without tightening.
- Screw in the alternator lower bolt and tighten to the recommended torque.
| Component | Fastening | dia | Value (daNm) | Validity |
|---|---|---|---|---|
| ALTERNATOR TO IE PUMP MOUNTING | Bolt | M12 | 6,3 ÷ 7,6 | 1.9 jtd 16v 1.9 jtd 8v |
- Tighten both upper bolts to the specified torque.
| Component | Fastening | dia | Value (daNm) | Validity |
|---|---|---|---|---|
| ALTERNATOR TO BRACKET | Bolt | M12 | 6,3 ÷ 7,6 | 1.9 jtd 16v 1.9 jtd 8v 2.4 jtd 20v |
- Fit the electrical cable in the corresponding two connection bolts on the alternator and tighten both nuts securing the electrical connections to the alternator. Fit the access cover for the electrical connection.
- Fit both delivery and return pipes to the Modine and use the appropriate tool to tighten both retaining collars.
Op. 0010T20 ENGINE COOLANT - CHANGE
- Position the cable loom and fasten the retaining bands.
- Position the diesel filter mounting on the vehicle and, working from inside the windscreen base trim, screw in the three nut and tighten them.
- Position the right cover for the windscreen base trim and fit the three securing studs.
- Fit the diesel filter in the mount and secure the delivery and return pipes using the retaining clips.
- Connect the diesel filter water sensor electrical connection and secure the retaining clip.
| Description | Connector | |
|---|---|---|
| SENSOR FOR PRESENCE OF WATER IN DIESEL FILTER | See K031 WATER IN DIESEL FILTER SENSOR |
- Connect the diesel preheating coil electrical connection and secure the retaining clip.
| Description | Connector | |
|---|---|---|
| TEMPERATURE SENSOR AND COM HEATING COIL | See K100 TEMPERATURE SENSOR AND HEATING RESISTANCE |
Op. 5520C20 HEATER PLUGS CONTROL UNIT - R.R
Op. 1092G10 SINGLE ENGINE BELT - R.R
Op. 7055B66 ENGINE COMPARTMENT DUST COVER IN RIGHT FRONT WHEEL ARCH - R.R.
Op. 7055B91 RIGHT FRONT WHEEL ARCH LINER - R.R.
Op. 7055B54 UNDER ENGINE PROTECTION/GUARD - R.R.
- Reconnect the negative battery terminal.
| Description | Connector | |
|---|---|---|
| BATTERY | See A001 BATTERY |
- Fit the upper engine protective cover.
Removing
- Position the vehicle on a lift.
- Open the bonnet.
- Turn the ignition key to the OFF position.
- Disconnect the negative battery terminal.
| Description | Connector | |
|---|---|---|
| BATTERY | See A001 BATTERY |
Op. 7055B54 UNDER ENGINE PROTECTION/GUARD - R.R.
Op.
Op. 1092G10 SINGLE ENGINE BELT - R.R
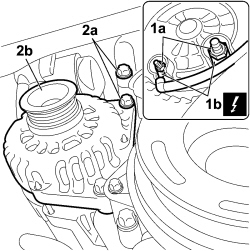
1. Undo the fixing nuts (1a) and disconnect the electrical connections (1b) for the alternator.
| Description | Connector | |
|---|---|---|
| 1b | ALTERNATOR | See A10 ALTERNATOR |
2. Undo the fixing bolts (2a) and remove the alternator (2b).
Refitting
- Place the alternator in position and tighten the fixing bolts to torque.
| Component | Fastening | dia | Value (daNm) | Validity |
|---|---|---|---|---|
| Alternator | Bolt | M10 | 4.5 ÷ 5.5 | 1.8 16v 2.4 JTD 20v |
- Connect the electrical connections to the alternator and tighten the nuts.
| Description | Connector | |
|---|---|---|
| ALTERNATOR | See A10 ALTERNATOR |
Op. 1092G10 SINGLE ENGINE BELT - R.R
Op.
Op. 7055B54 UNDER ENGINE PROTECTION/GUARD - R.R.
- Connect the negative battery terminal.
| Description | Connector | |
|---|---|---|
| BATTERY | See A001 BATTERY |
- Remove the vehicle from the lift.
Removing
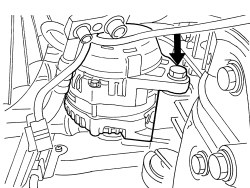
To remove the alternator, proceed in two different ways according to the lower fastening of the alternator. If the head of the lower bolt is facing the outside of the vehicle, the engine must be removed. If the head of the lower bolt is facing inward, proceed as described below.
Op. 0010T84 COOLANT FOR AIR CONDITIONING SYSTEM - DEHYDRATE AND REPRESSURIZE
Op. 7055B54 UNDER ENGINE PROTECTION/GUARD - R.R.
Op. 4450B04 RIGHT FRONT WHEEL - R.R
Op. 7055B91 RIGHT FRONT WHEEL ARCH LINER - R.R.
Op. 7040D30 ENGINE BAY FRONT BEAM COVER - R R
Op. 1092D10 AIR CONDITIONER COMPRESSOR DRIVE BELT - R + R
Op. 1048B20 AIR SUPPLY HOSE FROM HEAT EXCHANGER TO RIGID PIPE - REPLACE
Op. 1048B10 RIGID SUPPLY PIPE (ONE) BETWEEN TURBOCHARGER AND HEAT EXCHANGER -R.R.
Op. 5040A20 AIR CONDITIONING COMPRESSOR - R+R - INCLUDES FLUID LEVEL CHECK AND TOP UP IF NECESSARY
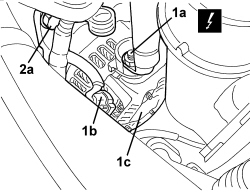
1. Working from the top of the engine compartment, unscrew electrical connections (1a) and (1b) of alternator (1c).
| Description | Connector | |
|---|---|---|
| 1c | ALTERNATOR | See A10 ALTERNATOR |
2. Unscrew upper bolt (2a) of alternator (1c).
1. Raise the vehicle, then unscrew bolts (1a) and remove the air outlet sleeve (1b) from the turbine.
2. Undo the lower alternator bolt.
3. Remove the alternator.
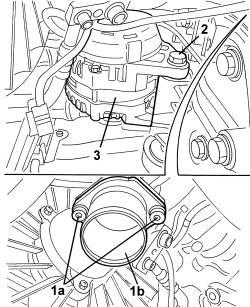
- If the engine must be removed, proceed as follows:
Op. 1004B14 POWER UNIT WITH AUTOMATIC TRANSMISSION R + R
Op. 1092D10 AIR CONDITIONER COMPRESSOR DRIVE BELT - R + R
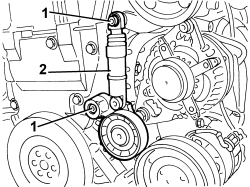
- Recover the alternator drive belt.
1. Undo the bolts.
2. Remove the tensioner.
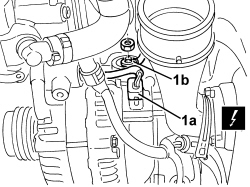
1. Disconnect the electrical connection (1a), undo the nut and disconnect the electrical connection (1b).
| Description | Connector | |
|---|---|---|
| 1a | ALTERNATOR | See A10 ALTERNATOR |
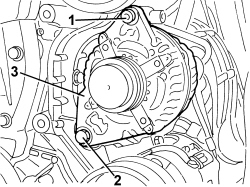
1. Undo the upper bolt.
2. Undo the lower bolt.
3. Keep the alternator releasing the retainers for the cables.
Refitting
- Check that the alternator is not damaged.
- If the engine has been removed, proceed as follows:
1. Place the alternator in the housing.
2. Tighten the lower bolt.
| Component | Fastening | dia | Value (daNm) | Validity |
|---|---|---|---|---|
| ALTERNATOR TO BRACKET | Bolt | M12 | 6,3 ÷ 7,6 | 1.9 jtd 16v 1.9 jtd 8v 2.4 jtd 20v |
3. Tighten the upper bolt.
| Component | Fastening | dia | Value (daNm) | Validity |
|---|---|---|---|---|
| Alternator | Bolt | M10 | 4.5 ÷ 5.5 | 1.8 16v 2.4 JTD 20v |
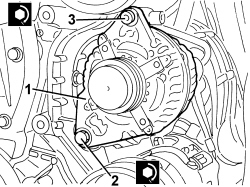
- Connect the electrical connections for the alternator.
- Position the tensioner and secure it using the bolts.
Op. 1092D10 AIR CONDITIONER COMPRESSOR DRIVE BELT - R + R
Op. 1004B14 POWER UNIT WITH AUTOMATIC TRANSMISSION R + R
- If only the alternator has been removed, proceed as follows:
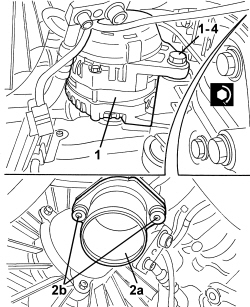
1. Position the alternator and tighten the lower bolt.
2. Position the air outlet sleeve (2a) from the turbine and tighten bolts (2b).
3. Tighten the alternator upper bolt.
4. Tighten the alternator fixing bolts to the recommended torque.
| Component | Fastening | dia | Value (daNm) | Validity |
|---|---|---|---|---|
| ALTERNATOR TO BRACKET | Bolt | M12 | 6,3 ÷ 7,6 | 1.9 jtd 16v 1.9 jtd 8v 2.4 jtd 20v |
| Component | Fastening | dia | Value (daNm) | Validity |
|---|---|---|---|---|
| Alternator | Bolt | M10 | 4.5 ÷ 5.5 | 1.8 16v 2.4 JTD 20v |
5. Connect the electrical connections for the alternator.
Op. 5040A20 AIR CONDITIONING COMPRESSOR - R+R - INCLUDES FLUID LEVEL CHECK AND TOP UP IF NECESSARY
Op. 1048B10 RIGID SUPPLY PIPE (ONE) BETWEEN TURBOCHARGER AND HEAT EXCHANGER -R.R.
Op. 1048B20 AIR SUPPLY HOSE FROM HEAT EXCHANGER TO RIGID PIPE - REPLACE
Op. 1092D10 AIR CONDITIONER COMPRESSOR DRIVE BELT - R + R
Op. 7040D30 ENGINE BAY FRONT BEAM COVER - R R
Op. 7055B91 RIGHT FRONT WHEEL ARCH LINER - R.R.
Op. 4450B04 RIGHT FRONT WHEEL - R.R
Op. 7055B54 UNDER ENGINE PROTECTION/GUARD - R.R.
Op. 0010T84 COOLANT FOR AIR CONDITIONING SYSTEM - DEHYDRATE AND REPRESSURIZE
Parts & tools for this job For 2005 Fiat Croma
- TOOLBattery testerSearch: car battery tester
- TOOLDigital multimeterSearch: automotive digital multimeter
- TOOLBattery terminal cleanerSearch: battery terminal cleaner
Links open Amazon search results in a new tab. As an Amazon Associate I earn from qualifying purchases.