
Power unit with automatic transmission r + r
- Make
- Fiat
- Model
- Croma Factory Service Manual
- Year
- 2005–2010
- Section
- Engine and power unit › Power unit with automatic transmission r + r
POWER UNIT WITH AUTOMATIC TRANSMISSION R + R
Removing
- Position the vehicle on a lift.
Op. 4450B12 FRONT WHEELS (TWO) - R+R
Op. 7055B66 ENGINE COMPARTMENT DUST COVER IN RIGHT FRONT WHEEL ARCH - R.R.
Op. 7055B91 RIGHT FRONT WHEEL ARCH LINER - R.R.
Op. 7055B90 LEFT FRONT WHEEL ARCH LINER - R.R.
Op. 7055B54 UNDER ENGINE PROTECTION/GUARD - R.R.
Op. 1080B95 REAR LAMBDA SENSOR TO CATALYTIC CONVERTER - R.R
Op. 1076B18 RIGID SECTION OF EXHAUST PIPE BETWEEN CATALYTIC CONVERTER AND SILENCER - R + R
Op. 7055A43 CENTRE FRONT GRILLE - R.R.
Op. 4410D10 FRONT SUSPENSION FRAME - R+R
Op. 5530B52 BATTERY SUPPORT/DRIP TRAY - R.R
Op. 0010T84 COOLANT FOR AIR CONDITIONING SYSTEM - DEHYDRATE AND REPRESSURIZE
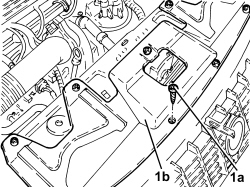
1. Undo the bolts (1a) and remove the upper radiator crossmember guard (1b).
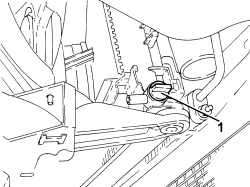
1. Undo the radiator coolant drain plug.
Collect the coolant in a suitable container.
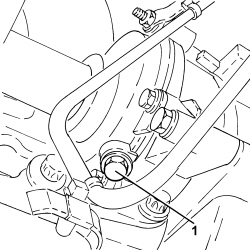
1. Undo the water pump coolant drain plug.
Collect the coolant that comes out in a suitable container.
Op. 0010T44 CHANGE AUTOMATIC TRANSMISSION FLUIDS
Op. 2130A27 DELIVERY AND RETURN DUPLEX PIPING OF AUTOMATIC GEARBOX OIL TO COOLING RADIATOR - R R
1. Disconnect the left driveshaft from the differential and move it to the side.
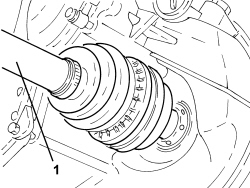
- Loosen the bolts fixing the intermediate driveshaft to the mounting.
1. Disconnect the intermediate driveshaft from the differential and move it to the side.
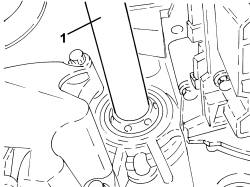
1. Remove the electrical connection holder cover.
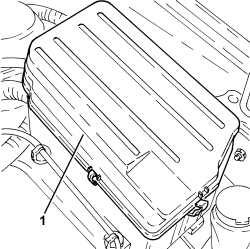
1. Rotate the electrical connections holder casing and disconnect the electrical connections.
| Description | Connector | |
|---|---|---|
| 1 | Engine compartment junction unit | See B001 ENGINE COMPARTMENT JUNCTION UNIT |
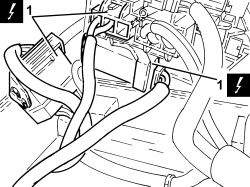
1. Undo the nuts (1a) and disconnect the earth leads (1b) from the bodyshell.
| Description | Connector | |
|---|---|---|
| 1b | Earth on engine | See C040 EARTH ON ENGINE |
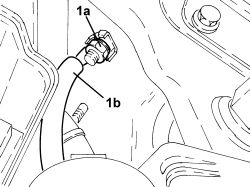
1. Disconnect the electrical connection (1a) from the fans, then release the electrical wiring from the fastenings (1b) and move it aside.
| Description | Connector | |
|---|---|---|
| 1a | Engine fan motor | See N011 ELECTRIC FAN MOTOR |
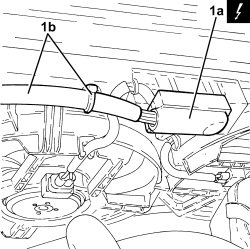
1. Undo the nut (1a), loosen the bands and remove the engine coolant return pipe to the supply reservoir (1b).
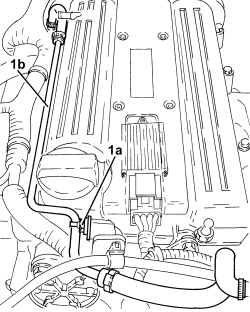
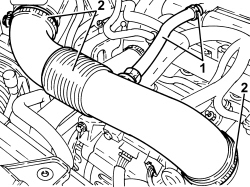
1. Loosen the band and disconnect the engine oil vapour recovery pipe from the cylinder head cover.
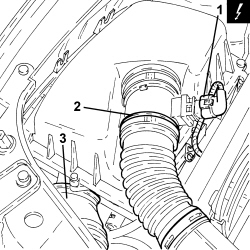
2. Loosen the bands and remove the air supply hose from the air flow meter to the throttle casing.
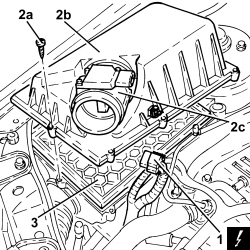
1. Disconnect the electrical connection from the air flow meter.
| Description | Connector | |
|---|---|---|
| 1 | Air flow meter | See K041 AIR FLOW METER |
2. Undo the bolts (2a) and remove the air filter cover (2b), complete with air flow meter (2c).
3. Remove the air filter filter element.
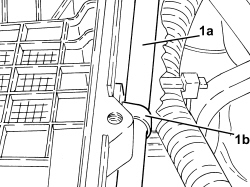
1. Release the fuel vapour pipe (1a) from the band (1b) on the air filter casing.
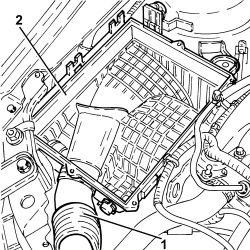
1. Disconnect the cold air intake from the air filter casing.
2. Remove the air filter casing fastened to the bodyshell by three pins.
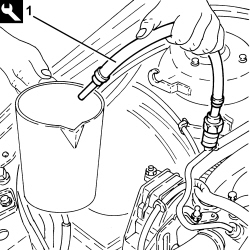
1. Connect the tool to the bleed valve on the fuel supply pipe and discharge the fuel pressure.
Follow the safety instructions and specific recommendations.
| Tool | Description | Function | Validity |
|---|---|---|---|
| 2000002900 | Breather connector | Fuel system pressure drainage | 1.8 2.2 |
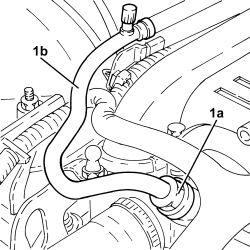
1. Undo the connector (1a), disconnect the fuel supply pipe (1b), fuel manifold pipe side and move it to the side.
1. Disconnect the electrical connection from the air conditioning system multi-stage pressure switch.
| Description | Connector | |
|---|---|---|
| 1 | 4 stage pressure switch | See K120 LINEAR SENSOR FOR FANS |
2. Undo the nut fixing the air conditioning system pipe flange.
Seal the connectors that have been disconnected using suitable plugs to prevent dampness and impurities from entering the system.
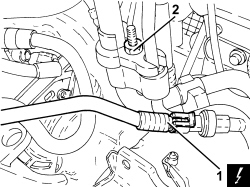
1. Disconnect the rapid connector for the air intake chamber fuel vapour inlet pipe, intermediate fuel vapour pipe side.
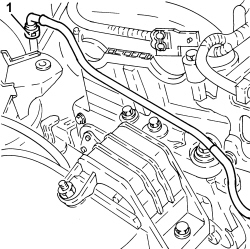
1. Loosen the bands and disconnect the engine coolant supply reservoir pipes.
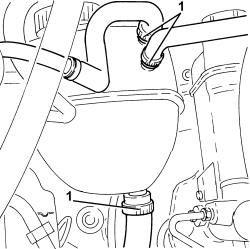
1. Working underneath the vehicle, loosen the band and disconnect the radiator upper coolant inlet hose, radiator side.
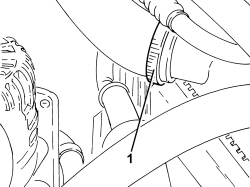
1. Loosen the band and disconnect the radiator upper coolant inlet hose, thermostat side and remove it.
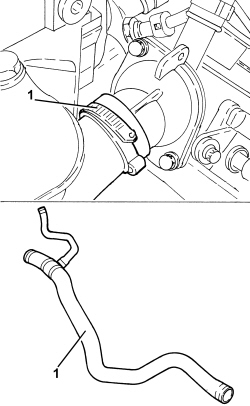
1. Disconnect the rapid connectors for the air conditioning system heater coolant inlet and outlet pipes.
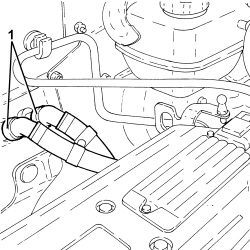
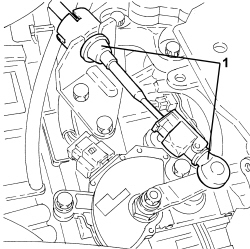
1. Disconnect the gear selector cable from the gear selector and from the reaction bracket.
- Postion a suitable footboard beneath the power unit.
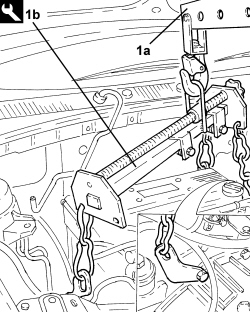
1. Support the power unit using a hydraulic hoist (1a) and the tool (1b) connected to the mounting brackets (1c).
| Tool | Description | Function | Validity |
|---|---|---|---|
| 1871001700 | Balance | Removing-refitting power unit |
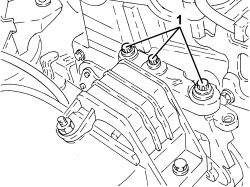
1. Undo the bolts fixing the timing side power unit support flexible mounting, rigid support side.
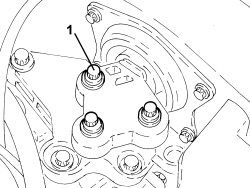
1. Undo the bolts fixing the gearbox side power unit support flexible mounting, support side.
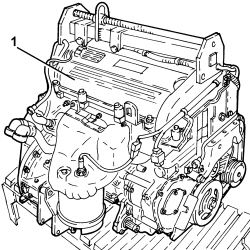
1. Lower the power unit with the hydraulic hoist until it rests on the board positioned previously.
- Release the power unit from the support tools.
Refitting
- Secure the power unit using the support tools.
- Place the power unit in its housing using the hydraulic hoist.
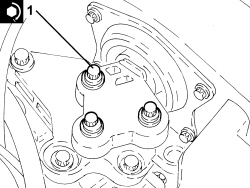
1. Tighten the bolts fixing the power unit gearbox side support flexible mounting, support side to the recommended torque.
| Component | Fastening | dia | Value (daNm) | Validity |
|---|---|---|---|---|
| Gearbox side support flexible mounting | Bolt | M10 | (support side) 5.0 - 6.0 |
1. Tighten the bolts fixing the timing side power unit support flexible mounting, rigid support side to the recommended torque.
| Component | Fastening | dia | Value (daNm) | Validity |
|---|---|---|---|---|
| Timing side power unit rigid support flexible mounting | Bolt | M10 | (rigid support side) 5.0 - 6.0 | 1.8 2.2 1.9 JTD 16v 1.9 JTD 8v |
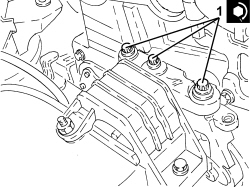
- Remove the hydraulic hoist and tool used for supporting the power unit safely.
- Remove the support used for supporting the power unit.
- Connect the gear selector cable to the selector and to the reaction bracket.
- Connect the rapid connectors for the air conditioning system heater coolant inlet and outlet pipes.
- Place the radiator upper coolant inlet hose in position, connect it to the thermostat and tighten the band.
- Connect the radiator upper coolant inlet hose and tighten the band.
- Connect the pipes to the engine coolant supply reservoir and tighten the bands.
- Connect the rapid connector for the air intake chamber fuel vapour inlet pipe, intermediate fuel vapour pipe side.
- Connect the air conditioning system pipe flange and tighten the nut to the recommended torque.
Replace any O-Rings for the connectors using green coloured seals only which are resistant to the R134a refrigerant fluid.
Lubricate the connector threads using anti-freeze.
| Component | Fastening | dia | Value (daNm) | Validity |
|---|---|---|---|---|
| PIPE SECTION ON BODYSHELL WITH ENGINE COMPARTMENT PIPES | Nut | M8 | 1,8 ÷ 2,0 |
- Connect the electrical connection to the air conditioning system multi-stage pressure switch.
1. Place the fuel supply pipe (1a) in its housing, connect it and tighten the connector (1b) to the recommended torque.
| Component | Fastening | dia | Value (daNm) | Validity |
|---|---|---|---|---|
| Front fuel supply pipe | Connector | (fuel manifold side) 1.0 | 2.2 |
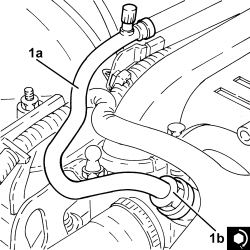
- Place the air filter casing in its housing and secure it to the bodyshell using the three pins.
- Connect the cold air intake to the air filter casing.
- Fasten the fuel vapour pipe to the air filter casing using the band.
- Fit the air filter filter element in place.
- Fit the cover for the air filter, complete with air flow meter, and secure it using the bolts.
- Connect the electrical connection to the air flow meter.
- Place the air supply hose from the air flow meter to the throttle casing back in its housing and secure it using the bands.
- Connect the engine oil vapour recovery pipe to the cylinder head cover and secure it using the band.
- Place the coolant return pipe to the engine coolant reservoir in position and tighten the bands and the nut.
- Place the electrical wiring back in its housing, then secure it and connect the electrical connection to the fans.
- Connect the earth leads to the bodyshell and secure them using the nuts.
- Connect the electrical connections, then place the electrical connections casing in its housing.
- Place the cover for the electrical connections casing in position.
- Connect the intermediate driveshaft to the differential.
- Tighten the bolts fixing the intermdiate driveshaft to the mounting to the recommended torque.
| Component | Fastening | dia | Value (daNm) | Validity |
|---|---|---|---|---|
| Intermediate driveshaft | Bolt | M8 | (support side) 2.3 - 2.8 | 2.2 |
- Connect the left driveshaft to the differential.
Op. 2130A27 DELIVERY AND RETURN DUPLEX PIPING OF AUTOMATIC GEARBOX OIL TO COOLING RADIATOR - R R
- Tighten the coolant drain plug to the water pump to the recommended torque.
| Component | Fastening | dia | Value (daNm) | Validity |
|---|---|---|---|---|
| Drain plug on water pump | M20 x 1.5 | (water pump side) 2.0 | 2.2 |
- Tighten the radiator coolant drain plug.
- Place the upper radiator crossmember guard back in its housing and secure it using the bolts.
Op. 0010T84 COOLANT FOR AIR CONDITIONING SYSTEM - DEHYDRATE AND REPRESSURIZE
Op. 5530B52 BATTERY SUPPORT/DRIP TRAY - R.R
Op. 4410D10 FRONT SUSPENSION FRAME - R+R
Op. 7055A43 CENTRE FRONT GRILLE - R.R.
Op. 1076B18 RIGID SECTION OF EXHAUST PIPE BETWEEN CATALYTIC CONVERTER AND SILENCER - R + R
Op. 1080B95 REAR LAMBDA SENSOR TO CATALYTIC CONVERTER - R.R
Op. 7055B90 LEFT FRONT WHEEL ARCH LINER - R.R.
Op. 7055B91 RIGHT FRONT WHEEL ARCH LINER - R.R.
Op. 7055B66 ENGINE COMPARTMENT DUST COVER IN RIGHT FRONT WHEEL ARCH - R.R.
Op. 4450B12 FRONT WHEELS (TWO) - R+R
Op. 0010T44 CHANGE AUTOMATIC TRANSMISSION FLUIDS
Op. 0010T20 ENGINE COOLANT - CHANGE
Op. 7055B54 UNDER ENGINE PROTECTION/GUARD - R.R.
- Remove the vehicle from the lift.
Removing
- Position the vehicle on a lift.
Op. 5530B52 BATTERY SUPPORT/DRIP TRAY - R.R
Op. 0010T84 COOLANT FOR AIR CONDITIONING SYSTEM - DEHYDRATE AND REPRESSURIZE
Op. 7055B54 UNDER ENGINE PROTECTION/GUARD - R.R.
Op. 0010T20 ENGINE COOLANT - CHANGE
Op. 4450B12 FRONT WHEELS (TWO) - R+R
Op. 7055B66 ENGINE COMPARTMENT DUST COVER IN RIGHT FRONT WHEEL ARCH - R.R.
Op. 7055B91 RIGHT FRONT WHEEL ARCH LINER - R.R.
Op. 7055B90 LEFT FRONT WHEEL ARCH LINER - R.R.
Op. 1076B18 RIGID SECTION OF EXHAUST PIPE BETWEEN CATALYTIC CONVERTER AND SILENCER - R + R
Op. 7055A43 CENTRE FRONT GRILLE - R.R.
Op. 4410D10 FRONT SUSPENSION FRAME - R+R
- Loosen the band and disconnect the air outlet hose from the supercharging air/air heat exchanger.
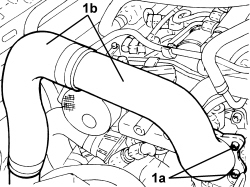
1. Undo the bolts (1a) and remove the air supply pipe from the supercharging air/air heat exchanger to the throttle casing (1b) assembly.
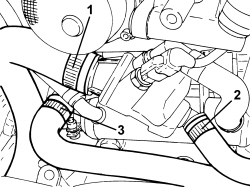
1. Loosen the band and disconnect the upper coolant inlet hose to the radiator, thermostat side.
2. Loosen the band and disconnect the coolant delivery pipe to the climate control system heater, thermostat side.
3. Loosen the band and disconnect the coolant return pipe from the climate control system heater, water pump rigid inlet pipe side.
1. Loosen the coolar and disconnect the coolant return pipe from the engine coolant reservoir.
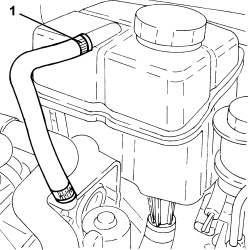
1. Disconnect the quick-release fitting for the brake servo vacuum intake pipe from the vacuum pump.
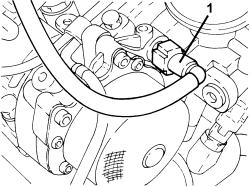
1. Disconnect the electrical connection from the automatic transmission control unit.
| Description | Connector | |
|---|---|---|
| 1 | Automatic transmission control unit | See M055 AUTOMATIC TRANSMISSION CONTROL UNIT |
2. Undo the nut (2a) and disconnect the earth lead (2b) from the automatic gearbox.
| Description | Connector | |
|---|---|---|
| 2b | Electric steering front earth | See C014 ELECTRIC STEERING FRONT EARTH |
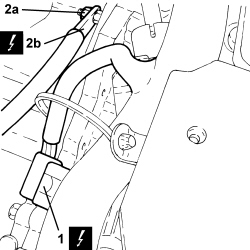
1. Disconnect the gear selection cable from the gear selector and reaction bracket.
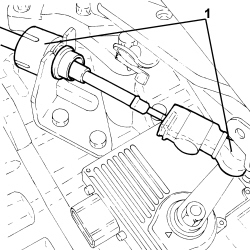
1. Disconnect the electrical connections from the diesel electronic injection system control unit.
| Description | Connector | |
|---|---|---|
| 1 | Engine management control unit | See M010 ENGINE MANAGEMENT CONTROL UNIT |
2. Undo the bolts (2a) and remove the diesel electronic injection system control unit (2b).
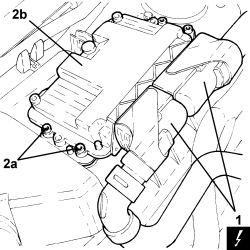
1. Disconnect the electrical connection from the air flow meter.
| Description | Connector | |
|---|---|---|
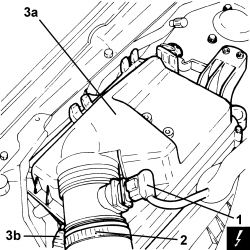
| 1 | Air flow meter | See K041 AIR FLOW METER |
2. Loosen the band and disconnect the hose from the air filter to the turbocharger, air filter side.
3. Remove the air filter (3a) assembly after having released it from the cold air intake.
The air filter is fastened to the bodyshell by two pins and a side fitting.
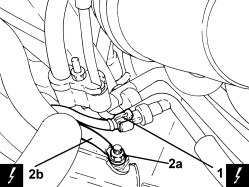
1. Disconnect the electrical connection from the air conditioning system multistage pressure switch.
| Description | Connector | |
|---|---|---|
| 1 | 4 stage pressure switch | See K010 4 STAGE PRESSURE SWITCH |
2. Undo the nut (2a) and disconnect the earth lead (2b).
| Description | Connector | |
|---|---|---|
| 2b | Injection control unit earth | See C060 INJECTION CONTROL UNIT EARTH |
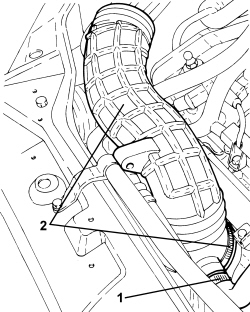
1. Loosen the band and disconnect the engine oil vapour recovery pipe from the corrugated hose.
2. Loosen the band and remove the corrugated hose from the air filter to the turbocharger.
1. Loosen the band and disconnect the lower coolant inlet hose from the radiator, water pump rigid coolant inlet pipe side.
2. Undo the bolt (2a) and disconnect the coolant inlet and outlet pipes flange (2b), air conditioning compressor side.
Seal the connectors that have been disconnected using suitable plugs to prevent dampness and impurities from entering the system.
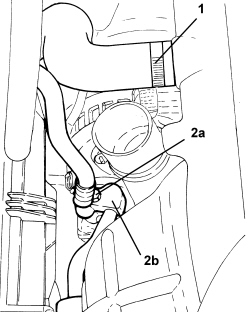
1. Disconnect the fuel supply pipe rapid connector, pressure pump side.
2. Disconnect the rapid connector for the fuel return pipe, fuel return manifold side.
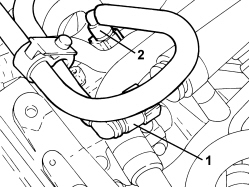
- Disconnect the electrical connection from the heater plugs control unit.
| Description | Connector | |
|---|---|---|
| Heater plugs control unit | See M015 HEATER PLUGS CONTROL UNIT |
1. Disconnect the electrical connections from the alternator.
| Description | Connector | |
|---|---|---|
| 1 | Alternator | See A010 ALTERNATOR |
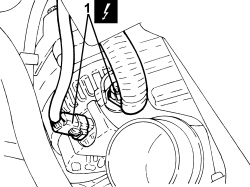
1. Disconnect the engine wiring coupling.
| Description | Connector | |
|---|---|---|
| 1 | See D029 ENGINE CABLES/ENGINE SERVICES CABLE COUPLING |
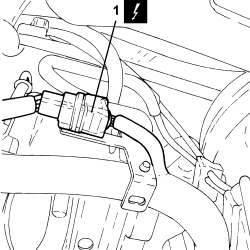
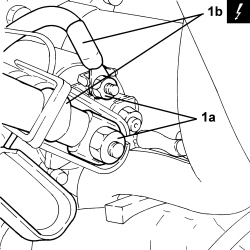
1. Open the protective cover, loosen the nuts (1a) and disconnect the electrical connections (1b) from the starter motor.
| Description | Connector | |
|---|---|---|
| 1b | Starter motor | See A020 STARTER MOTOR |
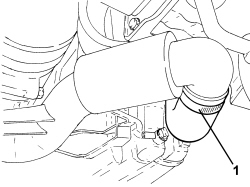
1. Loosen the band and disconnect the air supply hose from the turbocharger to the supercharging air/air heat exchanger.
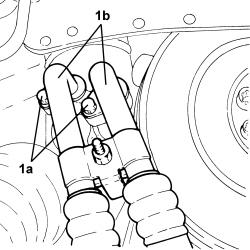
1. Undo the nut (1a) and disconnect the flange for the automatic transmission fluid supply and return pipes to the radiator (1b), automatic gearbox side.
Collect the transnmission fluid that comes out in a suitable container.
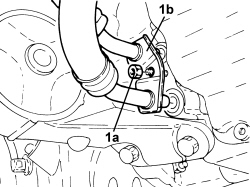
1. Undo the bolts (1a) and disconnect the engine oil supply and return pipe to the heat exchanger (1b), engine oil filter mounting side.
Collect the engine oil that comes out in a suitable container.
1. Disconnect the turbocharger actuator control pipe, vane position actuator control solenoid valve side on the turbocharger.
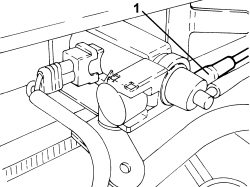
- Postion a footboard beneath the power unit.
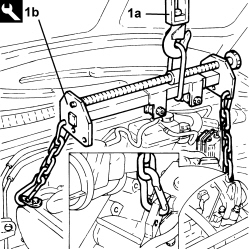
1. Support the power unit using a hydraulic hoist (1a) and the tool (1b) fitted with suitable chains.
| Tool | Description | Function | Validity |
|---|---|---|---|
| 1871001700 | Balance | Removing-refitting power unit |
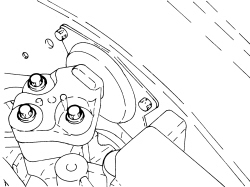
1. Undo the bolts fixing the automatic gearbox side power unit flexible mounting to the rigid support.
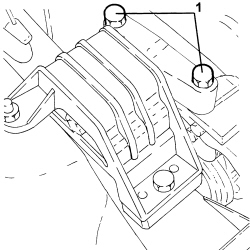
1. Undo the bolts fixing the timing side power unit support flexible mounting, rigid support side.
- Slowly lower the power unit with the hydraulic hoist until it rests on the board positioned previously.
- Release the power unit from the support tools.
Refitting
- Secure the power unit using the support tools.
- Place the power unit in its housing using the hydraulic hoist.
1. Tighten the bolts fixing the timing side power unit support flexible mounting, rigid support side to the recommended torque.
| Component | Fastening | dia | Value (daNm) | Validity |
|---|---|---|---|---|
| Timing side power unit rigid support flexible mounting | Bolt | M12 | (rigid support side) 7.5 - 8.5 | 2.4 JTD 20V |
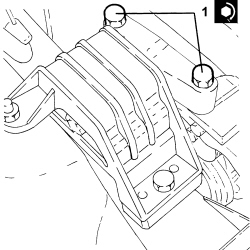
1. Tighten the bolts fixing the automatic gearbox side power unit flexible mounting to the rigid support to the recommended torque.
| Component | Fastening | dia | Value (daNm) | Validity |
|---|---|---|---|---|
| Gearbox side support flexible mounting | Bolt | M10 | (support side) 5.0 - 6.0 |
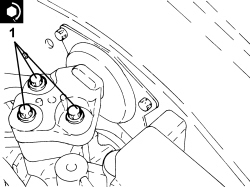
- Remove the hydraulic hoist and tool used for supporting the power unit safely.
| Tool | Description | Function | Validity |
|---|---|---|---|
| 1871001700 | Balance | Removing-refitting power unit |
- Remove the support used for supporting the power unit.
- Connect the turbocharger actuator control pipe, vane position actuator control solenoid valve side on the turbocharger.
1. Connect the engine oil supply and return pipes to the radiator (1a), engine oil filter mounting side and tighten the bolts (1b) to the recommended torque.
| Component | Fastening | dia | Value (daNm) | Validity |
|---|---|---|---|---|
| Engine oil radiator supply and return pipes | Connector | M22 | (oil filter mounting side) 4.0 - 4.5 | 2.4 JTD 20v |
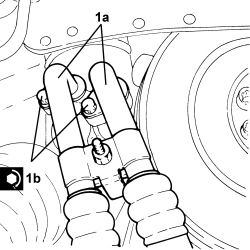
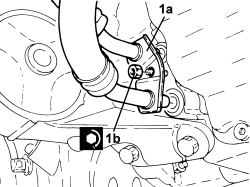
1. Connect the flange for the automatic transmission fluid supply and return pipes to the radiator (1b), automatic gearbox side and tighten the nut (1b) to the recommended torque.
| Component | Fastening | dia | Value (daNm) | Validity |
|---|---|---|---|---|
| Automatic transmission fluid radiator supply and return pipes | Nut | (automatic gearbox side) 0.7 | 2.4 JTD 20v CAE |
- Connect the air supply hose from the turbocharger to the supercharging air/air heat exchanger and tighten the band.
- Connect the starter motor electrical connections and secure them using the nuts, then close the protective cover.
- Connect the engine wiring coupling.
- Connect the electrical connections to the alternator.
- Connect the electrical connection to the heater plugs control unit.
- Connect the rapid connector for the fuel return pipe, fuel return manifold side.
- Connect the fuel supply pipe rapid connector, pressure pump side.
1. Connect the flange for the coolant inlet and outlet pipes (1a), air conditioning compressor side and tighten the bolt (1b) to the recommended torque.
Replace any O-Rings for the connectors using green coloured seals only which are resistant to the R134a refrigerant fluid. Lubricate the connector threads using anti-freeze.
| Component | Fastening | dia | Value (daNm) | Validity |
|---|---|---|---|---|
| EVAPORATOR/COMPRESSOR PIPE ON COMPRESSOR | Bolt | M8 | 1,8 ÷ 2,2 |
2. Connect the lower coolant inlet hose from the radiator, water pump rigid coolant inlet pipe side and tighten the band.
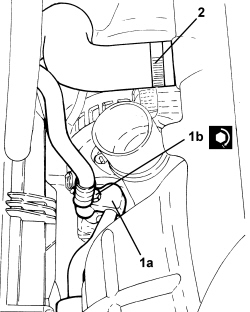
- Place the corrugated hose from the air filter to the turbocharger in its housing and tighten the band.
- Connect the engine oil vapour recovery pipe to the corrugated hose and tighten the band.
- Connect the electrical connection to the air conditioning system multistage pressure switch.
- Connect the earth lead and tighten the nut.
- Place the air filter assembly back in its housing and connect it to the cold air intake.
- Connect the hose from the air filter to the turbocharger, air filter side and tighten the band.
- Connect the electrical connection to the air flow meter.
- Refit the diesel electronic injection system control unit in its housing and secure it using the bolts.
- Connect the electrical connections to the diesel electronic injection system control unit.
- Connect the gear selector cable to the gear selector and to the bracket.
- Connect the earth lead to the automatic gearbox and tighten the nut.
- Connect the electrical connection to the automatic transmission control unit.
- Connect the vacuum intake pipe for the brake servo to the vacuum pump.
- Connect the coolant return pipe to the engine coolant reservoir to the coolant reservoir and tighten the band.
- Connect the coolant return pipe from the climate control system heater, water pump rigid coolant inlet pipe side and tighten the band.
- Connect the coolant delivery pipe to the climate control system heater, thermostat side, and tighten the band.
- Connect the radiator upper coolant inlet hose, thermostat side, and tighten the band.
- Refit the air supply pipe from the supercharging air/air heat exchanger to the throttle casing anse cure it using the bolts.
- Connect the air outlet hose from the supercharging air/air heat exchanger and tighten the band.
Op. 4410D10 FRONT SUSPENSION FRAME - R+R
Op. 7055A43 CENTRE FRONT GRILLE - R.R.
Op. 1076B18 RIGID SECTION OF EXHAUST PIPE BETWEEN CATALYTIC CONVERTER AND SILENCER - R + R
Op. 7055B90 LEFT FRONT WHEEL ARCH LINER - R.R.
Op. 7055B91 RIGHT FRONT WHEEL ARCH LINER - R.R.
Op. 7055B66 ENGINE COMPARTMENT DUST COVER IN RIGHT FRONT WHEEL ARCH - R.R.
Op. 4450B12 FRONT WHEELS (TWO) - R+R
Op. 0010T20 ENGINE COOLANT - CHANGE
Op. 5530B52 BATTERY SUPPORT/DRIP TRAY - R.R
Op. 0010T12 ENGINE OIL AND FILTER - REPLACE
Op. 0010T45 AUTOMATIC TRANSMISSION FLUID CHECK LEVEL AND TOP UP IF NECESSARY
Op. 0010T84 COOLANT FOR AIR CONDITIONING SYSTEM - DEHYDRATE AND REPRESSURIZE
Op. 7055B54 UNDER ENGINE PROTECTION/GUARD - R.R.
Op. 4450A10 FRONT WHEEL GEOMETRY - CHECK USING OPTICAL EQUIPMENT - INCLUDES ADJUSTMENT IF NECESSARY
- Remove the vehicle from the lift.
Removing
- Position the vehicle on a lift.
Op. 1016A10 SOUND-PROOFING COVER - R.R
Op. 5530B52 BATTERY SUPPORT/DRIP TRAY - R.R
Op. 0010T84 COOLANT FOR AIR CONDITIONING SYSTEM - DEHYDRATE AND REPRESSURIZE
Op. 7055B54 UNDER ENGINE PROTECTION/GUARD - R.R.
Op. 4450B12 FRONT WHEELS (TWO) - R+R
Op. 7055B66 ENGINE COMPARTMENT DUST COVER IN RIGHT FRONT WHEEL ARCH - R.R.
Op. 7055B91 RIGHT FRONT WHEEL ARCH LINER - R.R.
Op. 7055B90 LEFT FRONT WHEEL ARCH LINER - R.R.
1. Undo the radiator coolant drain plug.
Collect the coolant in a suitable container.
2. Loosen the bands (2a) and remove the intercooler air inlet sleeve (2b).
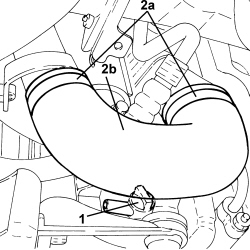
1. Undo the bolt (1a) and disconnect the coolant inlet/outlet pipes flange (1b) from the air conditioning compressor.
Seal the connectors that have been disconnected using suitable plugs to prevent dampness and impurities from entering the system.
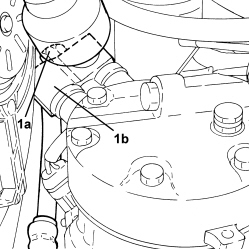
1. Disconnect the electrical connections from the diesel electronic injection system control unit.
| Description | Connector | |
|---|---|---|
| 1 | Engine management control unit | See M010 ENGINE MANAGEMENT CONTROL UNIT |
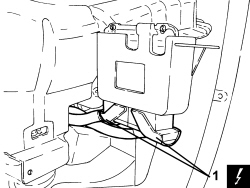
1. Disconnect the electrical connection from the air flow meter.
| Description | Connector | |
|---|---|---|
| 1 | Air flow meter | See K041 AIR FLOW METER |
2. Loosen the band and disconnect the corrugated sleeve from the turbocharger air inlet hose.
3. Disconnect the cold air intake pipe from the air filter.
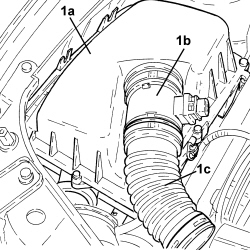
1. Release the air filter (1a) from the fastenings on the bodyshell and remove it complete with air flow meter (1b) and corrugated sleeve (1c).
1. Loosen the band and disconnect the lower coolant inlet hose from the radiator, water pump rigid coolant inlet pipe side.
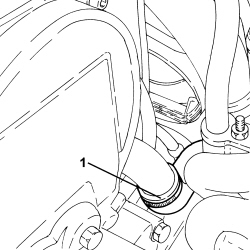
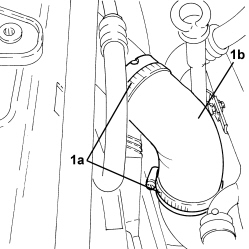
1. Loosen the bands (1a) and remove the air outlet hose from the turbocharger (1b).
1. Disconnect the rapid connector for the fuel return pipe, fuel return manifold side.
2. Disconnect the fuel supply pipe rapid connector, pressure pump side.
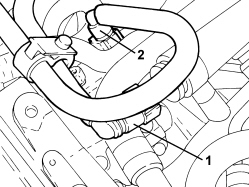
1. Loosen the bands and disconnect the engine coolant supply reservoir pipes.
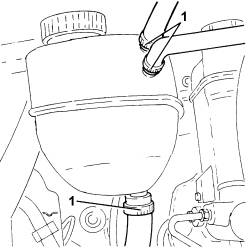
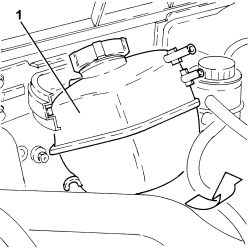
1. Rotate the engine coolant supply reservoir as illustrated in the diagram, then remove it.
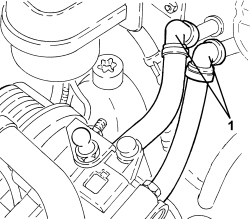
1. Disconnect the rapid connectors for the air conditioning system heater coolant inlet and outlet pipes.
1. Disconnect the electrical connection from the electronic automatic transmission control unit.
| Description | Connector | |
|---|---|---|
| 1 | Automatic transmission control unit | See M055 AUTOMATIC TRANSMISSION CONTROL UNIT |
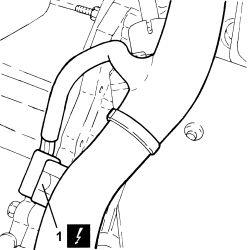
1. Disconnect the gear selection cable from the gear selector and reaction bracket.
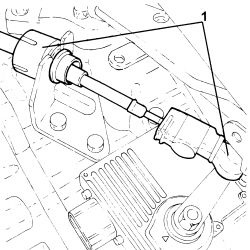
1. Unscrew bolts (1a), loosen collar (1b) and remove the sleeve (1c) and rigid air intake pipe (1d) to the throttle body.
2. Disconnect the rapid connector for the vacuum intake pipe from the vacuum pump.
3. Loosen the band (3a) and disconnect the radiator upper coolant inlet hose to the radiator (3b), thermostat side.
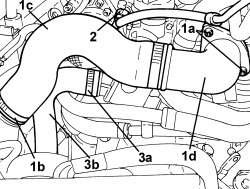
1. Disconnect the electrical connection from the turbocharger vane position actuator solenoid valve.
| Description | Connector | |
|---|---|---|
| 1 | Turbine variable geometry control solenoid | See L036 TURBINE VARIABLE GEOMETRY CONTROL SOLENOID VALVE |
2. Unscrew the nuts (2a) and move the turbocharger vane position actuator control solenoid valve (3b) aside.
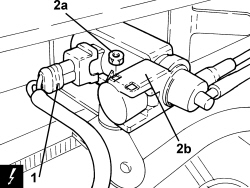
- Disconnect the electrical connection from the water presence sensor on the fuel filter.
| Description | Connector | |
|---|---|---|
| Water in diesel filter sensor | See K031 WATER IN DIESEL FILTER SENSOR |
- Disconnect the electrical connection from the particulate filter differential pressure sensor.
| Description | Connector | |
|---|---|---|
| FAP differential pressure sensor | See K187 |
1. Unscrew the nut and move the glow plug control unit as necessary.
2. Disconnect the electrical connections from the heater plugs control unit.
| Description | Connector | |
|---|---|---|
| 2 | Heater plugs control unit | See M015 HEATER PLUGS CONTROL UNIT |
3. Remove the control unit for glow plugs.
4. Disconnect the intermediate engine wiring coupling.
| Description | Connector | |
|---|---|---|
| 4 | Engine cables/engine services cable coupling | See D029 ENGINE CABLES/ENGINE SERVICES CABLE COUPLING |
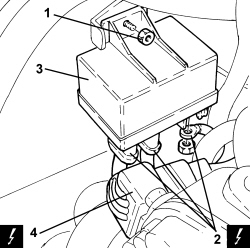
1. Disconnect the electrical connections from the power steering pump.
| Description | Connector | |
|---|---|---|
| 1 | Electric steering control unit | See M086 ELECTRIC STEERING CONTROL UNIT |
The version with ABS is shown in the diagram. The version with ESP comes with the two electrical connections indicated plus a third electrical connection with wiring for connection to the steering angle sensor.
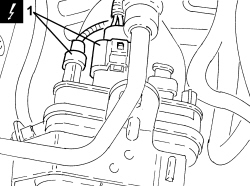
1. Disconnect the electrical connection from the air conditioning system multi-stage pressure switch.
| Description | Connector | |
|---|---|---|
| 1 | 4 stage pressure switch | See K010 4 STAGE PRESSURE SWITCH |
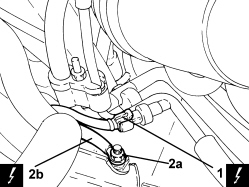
2. Undo the nut (2a) and disconnect the earth lead (2b).
- Secure the engine cooling radiator to the headlamp beam.
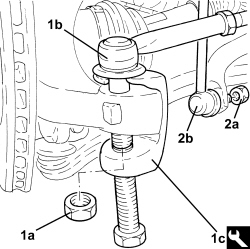
1. Undo the nut (1a) and disconnect the steering links (1b) from the steering knuckles using the tool (1c).
| Tool | Description | Function | Validity |
|---|---|---|---|
| 1871000700 | Extractor | Extracting steering rod from steering knuckle |
2. Undo the nuts (2a) and disconnect the rear suspension anti-roll bar joints (2b), anti-roll bar side.
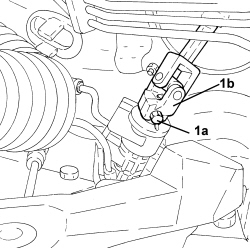
1. Undo the fixing bolt (1a) and disconnect the steering column (1b) from the steering box.
The bolt is the pre-treated type and it therefore cannot be reused when refitting.
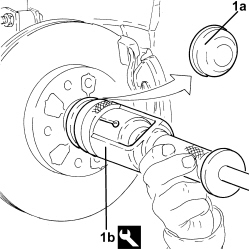
1. Remove right front hub cap (1a) using the tool (1b).
| Tool | Description | Function | Validity |
|---|---|---|---|
| 1870470560 | Extractor | Removing wheel hub cap |
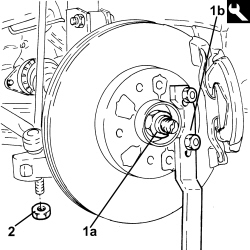
1. Undo the nut (1a) securing the right front driveshaft to the wheel hub using tool (1b) for counter-torque.
| Tool | Description | Function | Validity |
|---|---|---|---|
| 1870815000 | Counter-torque | Loosen/tighten timing driven toothed pulley fixing bolt Loosen/tighten nut securing front driveshaft to wheel hub | 1.9 JTD 16V 1.9 JTD 8V |
1. Undo the lower bolt securing the left front shock absorber to the knuckle.
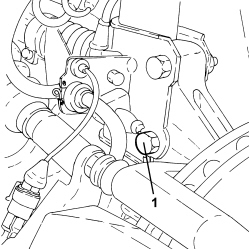
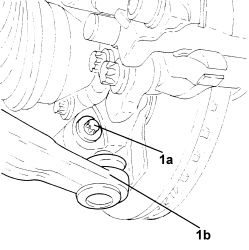
1. Undo the bolt (1a) and disconnect the left lower track control arm for the front suspension (1b) from the steering knuckle pulling it downwards.
Do not use expansion tools for disconnecting the track control arm from the steering knuckle.
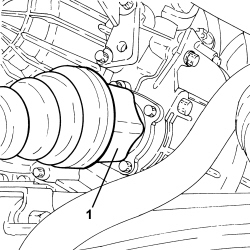
1. Disconnect the left driveshaft from the differential using a suitable lever and move it to the side.
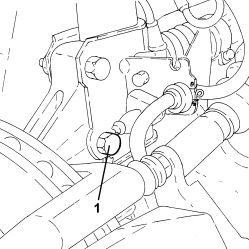
1. Undo the lower bolt securing the right front shock absorber to the knuckle.
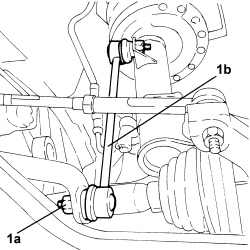
1. Undo the nuts (1a) and disconnect the right front anti-roll bar link (1b) from the antiroll bar.
1. Undo the bolt (1a) and disconnect the right lower track control arm for the front suspension (1b) from the steering knuckle pulling it downwards.
Do not use expansion tools for disconnecting the track control arm from the steering knuckle.
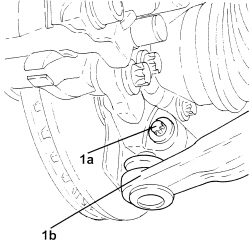
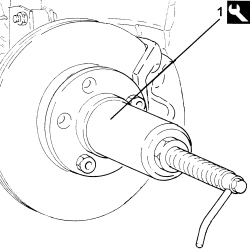
1. Use the tool to move the right driveshaft back from the wheel hub.
| Tool | Description | Function | Validity |
|---|---|---|---|
| 2000001600 | Extractor | Retract driveshaft from front wheel hub |
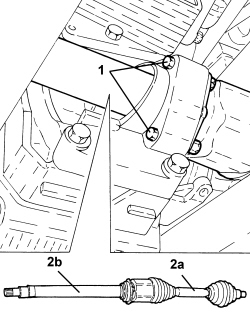
1. Loosen the bolts fixing the intermediate driveshaft to the mounting.
2. Remove the right drive shaft (2a) with intermediate drive shaft (2b).
Op. 1076B72 INTERMEDIATE EXHAUST PIPE WITH HOSE SECTION - R+R
1. Undo the nuts (1a) and remove the engine coolant radiator mounts (1b).
- Position a hydraulic jack beneath the power unit.
1. Undo the nut (1a) and disconnect the flange for the automatic transmission supply and return pipes to the radiator (1b), automatic gearbox side.
Collect the automatic transmission fluid that comes out in a suitable container.
2. Unscrew the left engine mount flexible block bolt, front suspension frame side.
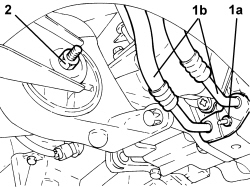
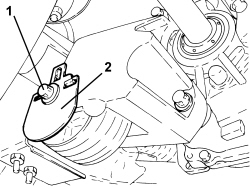
1. Undo the bolt securing the lower gearbox reaction rod to the bracket on the gearbox.
2. Keep the plate.
1. Position a hydraulic lift (1a) using tools (1b) and (1c) to support the front suspension frame.
Fit the guide pins (arrowed) into the front suspension frame body.
During disassembly, lower the two locating pins (1d) on the body.
| Tool | Description | Function | Validity |
|---|---|---|---|
| 1870835001 | Hydraulic lift | Supporting front suspension frame Rear suspension crossmember support |
| Tool | Description | Function | Validity |
|---|---|---|---|
| 2000001700 | Chassis | Removing-refitting front suspension frame |
| Tool | Description | Function | Validity |
|---|---|---|---|
| 2000001800 | Support | Removing-refitting front suspension frame |
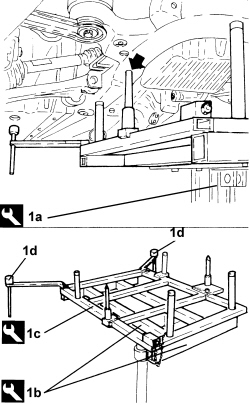
- If the above hydraulic lift is not available, use a general hydraulic lift plus the adaptor shown in the drawing, which must be made up by the workshop to allow the use of the above frames
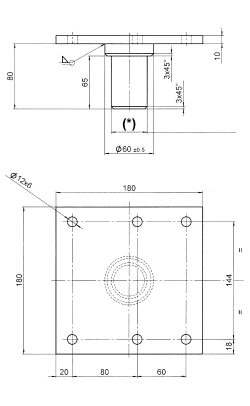
(*): Ensure the shank diameter fits the hydraulic lift used.
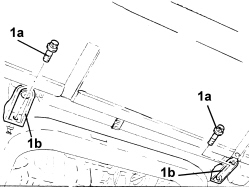
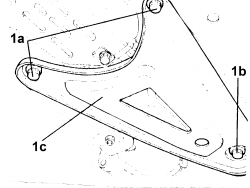
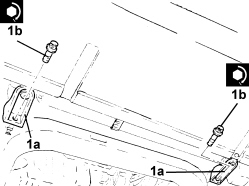
1. Unscrew the bolts (1a) and (1b) and remove the brackets securing the frame to the body (1c).
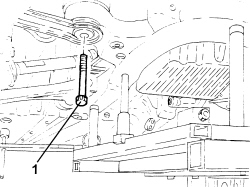
1. Undo the bolts fixing the front suspension frame to the bodyshell.
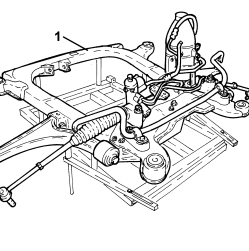
1. Lower the hydraulic jack and remove the front suspension frame assembly.
- Postion a suitable footboard beneath the power unit.
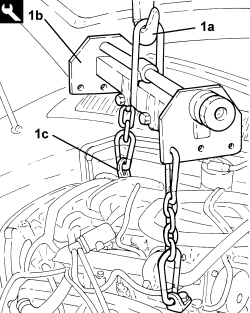
1. Support the power unit using a hydraulic hoist (1a) and the tool (1b) connected to the mounting brackets (1c).
| Tool | Description | Function | Validity |
|---|---|---|---|
| 1871001700 | Balance | Removing-refitting power unit |
1. Undo the bolts fixing the gearbox side power unit flexible mounting to the rigid support.
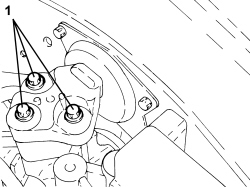
1. Undo the bolts fixing the timing side power unit support flexible mounting, rigid support side.
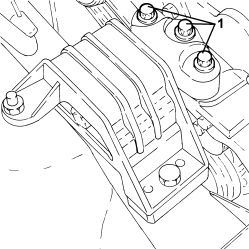
- Slowly lower the power unit with the hydraulic hoist until it rests on the board positioned previously.
- Release the power unit from the support tools.
Refitting
- Secure the power unit using the support tools.
- Place the power unit in its housing using the hydraulic hoist.
1. Tighten the bolts fixing the timing side power unit support flexible mounting, rigid support side to the recommended torque.
| Component | Fastening | dia | Value (daNm) | Validity |
|---|---|---|---|---|
| Timing side power unit rigid support flexible mounting | Bolt | M10 | (rigid support side) 5.0 - 6.0 | 1.8 2.2 1.9 JTD 16v 1.9 JTD 8v |
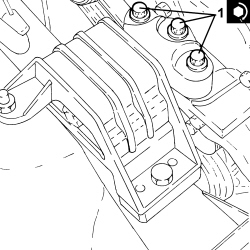
1. Tighten the bolts fixing the gearbox side power unit flexible mounting to the rigid support to the recommended torque.
| Component | Fastening | dia | Value (daNm) | Validity |
|---|---|---|---|---|
| Gearbox side support flexible mounting | Bolt | M10 | (support side) 5.0 - 6.0 |
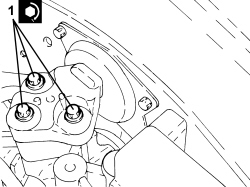
- Remove the hydraulic hoist and tool used for supporting the power unit safely.
| Tool | Description | Function | Validity |
|---|---|---|---|
| 1871001700 | Balance | Removing-refitting power unit |
- Remove the support used for supporting the power unit.
1. Refit the front suspension frame assembly using the mounting tools and hydraulic lift.
During refitting, remove both locating pins (1a), which must fit into the holes in the underbody during assembly.
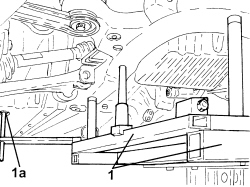
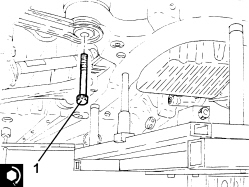
1. Tighten the new side bolts fixing the front suspension crossmember to the bodyshell to the recommended torque.
| Component | Fastening | dia | Value (daNm) | Validity |
|---|---|---|---|---|
| Front suspension frame | Front-rear bolts (to replace) | M12 | (bodyshell side) 9.0 - 11.0 + 90° |
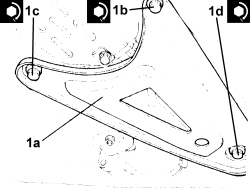
1. Place the underbody reinforcement (1a) in its housing and secure it tightening the new bolts (1b), (1c) and (1d) to the recommended torque.
| Component | Fastening | dia | Value (daNm) | Validity |
|---|---|---|---|---|
| Underbody reinforcements | Inner bolt (to replace) | M12 | (bodyshell side) 8.1 - 9.9 + 45° |
| Component | Fastening | dia | Value (daNm) | Validity |
|---|---|---|---|---|
| Underbody reinforcements | Outer bolt (to replace) | M10 | (bodyshell side) 5.0 - 6.1 + 45° |
| Component | Fastening | dia | Value (daNm) | Validity |
|---|---|---|---|---|
| Underbody reinforcements | Bolt (to be replaced) | M12 | (front suspension frame side) 9.0 - 11.0 + 90° |
- Remove the tools and the hydraulic jack used to support the front suspension frame.
| Tool | Description | Function | Validity |
|---|---|---|---|
| 1870835001 | Hydraulic lift | Supporting front suspension frame Rear suspension crossmember support |
| Tool | Description | Function | Validity |
|---|---|---|---|
| 2000001700 | Chassis | Removing-refitting front suspension frame |
| Tool | Description | Function | Validity |
|---|---|---|---|
| 2000001800 | Support | Removing-refitting front suspension frame |
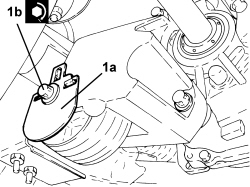
1. Place the plate (1a) in its housing and tighten the bolt (1b) securing the lower gearbox reaction rod to the mounting bracket on the gearbox to the recommended torque.
| Component | Fastening | dia | Value (daNm) | Validity |
|---|---|---|---|---|
| Lower reaction rod for gearbox | Bolt | M12 | (bracket side on gearbox) 7.5 - 8.5 |
1. Tighten the left engine mount flexible block bolt, front suspension frame side, to the specified torque.
| Component | Fastening | dia | Value (daNm) | Validity |
|---|---|---|---|---|
| Flexible mounting for left side engine support | Bolt | M12 | (front suspension frame side) 7.5 ÷ 8.5 |
2. Connect the flange for the automatic transmission supply and return pipes to the radiator (1b), automatic gearbox side and tighten the nut (1b) to the recommended torque.
| Component | Fastening | dia | Value (daNm) | Validity |
|---|---|---|---|---|
| Automatic transmission fluid radiator supply and return pipes | Nut | (automatic gearbox side) 0.7 | 2.4 JTD 20v CAE |
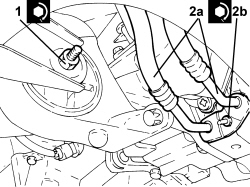
- Remove the hydraulic jack from beneath the power unit
1. Position the engine cooling radiator mount (1a) in its housing and secure it tightening the bolts (1b) to the recommended torque.
| Component | Fastening | dia | Value (daNm) | Validity |
|---|---|---|---|---|
| Engine cooling radiator supports | Bolt | (front suspension frame side) 1.5 |
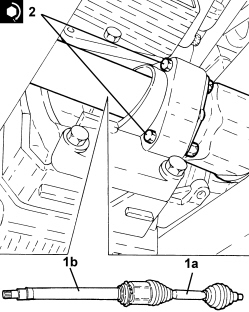
Op. 1076B72 INTERMEDIATE EXHAUST PIPE WITH HOSE SECTION - R+R
1. Refit the right drive shaft (1a) complete with intermediate drive shaft (1b).
2. Tighten the bolts fixing the intermdiate driveshaft to the mounting to the recommended torque.
| Component | Fastening | dia | Value (daNm) | Validity |
|---|---|---|---|---|
| Intermediate driveshaft | Bolt | M8 | (support side) 2.3 - 2.8 | 2.2 |
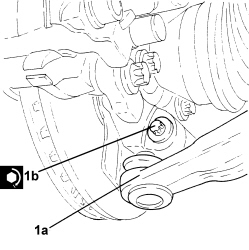
1. Connect the front suspension lower track control arm (1a) to the steering knuckle and secure it tightening a new bolt (1b) to the recommended torque.
| Component | Fastening | dia | Value (daNm) | Validity |
|---|---|---|---|---|
| Front suspension lower track control arm | Bolt (to be replaced) | M10 | (steering knuckle side) 2.7 - 3.3 + 60° |
1. Connect the right front antiroll bar link (1a), antiroll bar side, and tighten nut (1b) to the specified torque.
| Component | Fastening | dia | Value (daNm) | Validity |
|---|---|---|---|---|
| Front suspension anti-roll bar joint | Nut | M12 | (anti-roll bar side) 6.0 - 7.0 |
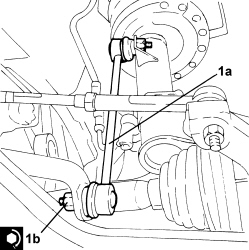
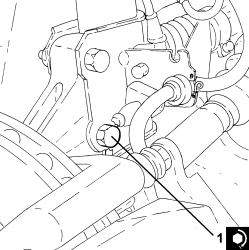
1. Tighten the new lower bolt fixing the right front shock absorber to the steering knuckle to the recommended torque.
| Component | Fastening | dia | Value (daNm) | Validity |
|---|---|---|---|---|
| Front shock absorber | Bolt (to be replaced) | M12 | (steering knuckle side) 7.7 - 9.4 +75° |
- Connect the left driveshaft to the differential.
1. Connect the left lower suspension lower track control arm (1a) to the steering knuckle and secure it tightening a new bolt (1b) to the recommended torque.
| Component | Fastening | dia | Value (daNm) | Validity |
|---|---|---|---|---|
| Front suspension lower track control arm | Bolt (to be replaced) | M10 | (steering knuckle side) 2.7 - 3.3 + 60° |
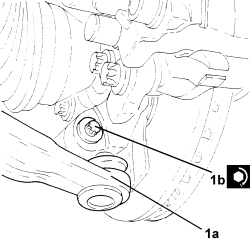
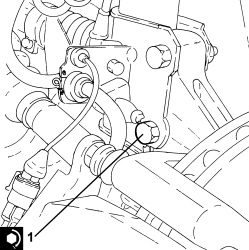
1. Tighten the new lower bolt fixing the left front shock absorber to the steering knuckle to the recommended torque.
| Component | Fastening | dia | Value (daNm) | Validity |
|---|---|---|---|---|
| Front shock absorber | Bolt (to be replaced) | M12 | (steering knuckle side) 7.7 - 9.4 +75° |
1. Tighten nut (1a) securing the right front drive shaft to the wheel hub using tool (1b) for countertorque.
| Component | Fastening | dia | Value (daNm) | Validity |
|---|---|---|---|---|
| Front wheel hub | Nut (to replace) | M24 | (driveshaft side) see operation 4450C28 |
| Tool | Description | Function | Validity |
|---|---|---|---|
| 1870815000 | Counter-torque | Loosen/tighten timing driven toothed pulley fixing bolt Loosen/tighten nut securing front driveshaft to wheel hub | 1.9 JTD 16V 1.9 JTD 8V |
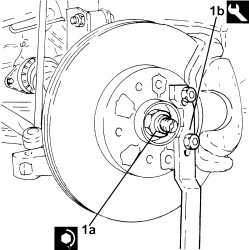
- Refit a new front hub cap in its seat using the appropriate tool.
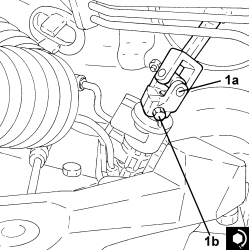
1. Connect the steering column (1a) to the power steering box pinion and secure by tightening a new bolt (1b) to the specified torque.
| Component | Fastening | dia | Value (daNm) | Validity |
|---|---|---|---|---|
| Steering column | Bolt (to be replaced) | M8 | (power assisted steering box side) 2.3 - 2.8 |
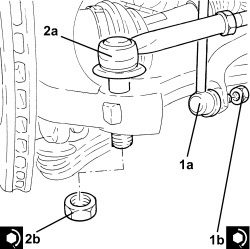
1. Connect the left front antiroll bar link (1a) to the antiroll bar and tighten nut (1b) to the specified torque.
| Component | Fastening | dia | Value (daNm) | Validity |
|---|---|---|---|---|
| Front suspension anti-roll bar joint | Nut | M12 | (anti-roll bar side) 6.0 - 7.0 |
2. Connect the left steering link (2a) to the front steering knuckles and tighten the nut (2b) to the specified torque.
| Component | Fastening | dia | Value (daNm) | Validity |
|---|---|---|---|---|
| Steering rods | Nut | M12 | (steering knuckle side) 3.0 - 4.0 |
- Release the engine cooling radiator from the headlamp beam.
- Connect the earth lead and tighten the nut.
- Connect the electrical connection to the air conditioning system multi-stage pressure switch.
- Connect the electrical connections to the power steering pump.
- Connect the intermediate engine wiring coupling.
- Connect the electrical connections to the heater plugs control unit.
- Place the heater plugs control unit in position and secure it using the nut.
- Connect the electrical connection to the particle filter differential pressure sensor.
- Connect the electrical connection to the water presence sensor on the fuel filter.
- Refit the turbocharger vane position actuator control solenoid valve and secure with nuts.
- Connect the electrical connection to the turbocharger vane position actuator solenoid valve.
- Connect the radiator upper coolant inlet hose, thermostat side, and tighten the band.
- Connect the vacuum pipe rapid connector to the vacuum pump.
- Place the throttle body rigid air inlet pipe in its housing complete with hose and tighten the bolts and the band.
- Connect the gear selector cable to the gear selector and to the bracket.
-Connect the electrical connection to the electronic automatic transmission control unit.
- Connect the rapid connectors for the air conditioning system heater coolant inlet and outlet pipes.
- Place the engine coolant supply reservoir in its housing.
- Connect the pipes to the engine coolant supply reservoir and tighten the bands.
- Connect the fuel supply pipe rapid connector, pressure pump side.
- Connect the rapid connector for the fuel return pipe, fuel return manifold side.
- Place the air outllet hose from the turbocharger back in its housing and secure it using the bands.
- Connect the lower coolant inlet hose from the radiator, water pump rigid coolant inlet pipe side and tighten the band.
- Refit the air filter with air flow meter and corrugated hose in its seat.
- Connect the cold air intake pipe to the air filter.
- Connect the corrugated hose to the turbocharger air inlet pipe and tighten the band.
- Connect the electrical connection to the air flow meter.
- Connect the electrical connections to the diesel electronic injection system control unit.
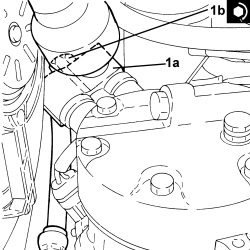
1. Connect the flange for the air conditioning compressor coolant inlet and outlet pipes (1a) and tighten the bolt (1b) to the recommended torque.
Replace any O-Rings for the connectors using green coloured seals only which are resistant to the R134a refrigerant fluid.
Lubricate the connector threads using anti-freeze.
| Component | Fastening | dia | Value (daNm) | Validity |
|---|---|---|---|---|
| EVAPORATOR/COMPRESSOR PIPE ON COMPRESSOR | Bolt | M8 | 1,8 ÷ 2,2 |
- Place the intercooler air intake sleeve back in its housing and secure it using the bands.
- Tighten the radiator coolant drain plug.
Op. 7055B90 LEFT FRONT WHEEL ARCH LINER - R.R.
Op. 7055B91 RIGHT FRONT WHEEL ARCH LINER - R.R.
Op. 7055B66 ENGINE COMPARTMENT DUST COVER IN RIGHT FRONT WHEEL ARCH - R.R.
Op. 4450B12 FRONT WHEELS (TWO) - R+R
Op. 0010T84 COOLANT FOR AIR CONDITIONING SYSTEM - DEHYDRATE AND REPRESSURIZE
Op. 5530B52 BATTERY SUPPORT/DRIP TRAY - R.R
Op. 0010T20 ENGINE COOLANT - CHANGE
Op. 0010T64 BRAKE AND/OR CLUTCH FLUID CHECK LEVEL AND TOP UP AS NECESSARY
Op. 0010T67 HYDRAULIC CLUTCH SYSTEM - BLEED AIR
Op. 0010T45 AUTOMATIC TRANSMISSION FLUID CHECK LEVEL AND TOP UP IF NECESSARY
Op. 7055B54 UNDER ENGINE PROTECTION/GUARD - R.R.
Op. 1016A10 SOUND-PROOFING COVER - R.R
- Remove the vehicle from the lift.
Parts & tools for this job For 2005 Fiat Croma
- PARTTransmission filter kitSearch: Fiat Croma 2005 transmission filter kit
- FLUIDAutomatic transmission fluidSearch: Fiat automatic transmission fluid
- TOOLFluid transfer pumpSearch: fluid transfer pump
Links open Amazon search results in a new tab. As an Amazon Associate I earn from qualifying purchases.