
Starter motor - r+r
- Make
- Fiat
- Model
- Croma Factory Service Manual
- Year
- 2005–2010
- Section
- Engine starting › Starter motor - r+r
STARTER MOTOR - R+R
Removing
- Position the vehicle on a lift.
- Make sure that the ignition key is in the OFF position, then disconnect the battery terminal (-).
| Description | Connector | |
|---|---|---|
| Battery | See A001 BATTERY |
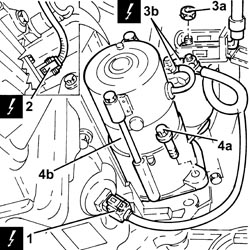
1. Disconnect the electrical connection from the engine oil level sensor.
| Description | Connector | |
|---|---|---|
| 1 | Engine oil level sensor | See K032 ENGINE OIL LEVEL SENSOR |
2. Disconnect the electrical connection from the rpm sensor.
| Description | Connector | |
|---|---|---|
| 2 | Rpm sensor | See K046 RPM SENSOR |
- Open the access cover for the electrical connection.
3. Undo the nuts (3a) and disconnect the electrical connections (3b) from the starter motor.
| Description | Connector | |
|---|---|---|
| 3b | Starter motor | See A020 STARTER MOTOR |
4. Undo the bolts (4a) and remove the starter motor (4b).
Refitting
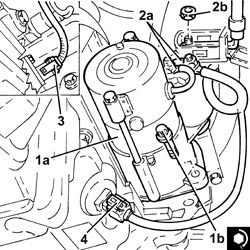
1. Place the starter motor (1a) in its housing and secure it tightening the bolts (1b) to the recommended torque.
| Component | Fastening | dia | Value (daNm) | Validity |
|---|---|---|---|---|
| Starter motor | Bolt | M10 x 1.5 | (gearbox side) 3.5 - 4.5 | 2.2 |
2. Connect the electrical connections (2a) to the starter motor and secure them using the nuts (2b).
- Close the access cover for the electrical connection.
3. Connect the electrical connection to the rpm sensor.
4. Connect the electrical connection to the engine oil level sensor.
- Connect the negative battery terminal.
- Remove the vehicle from the lift.
Removing
- Remove the upper engine protective cover.
- Turn the ignition key to the OFF position.
- Disconnect the negative battery terminal.
| Description | Connector | |
|---|---|---|
| BATTERY | See A001 BATTERY |
Op. 5530B52 BATTERY SUPPORT/DRIP TRAY - R.R
Op. 7055B54 UNDER ENGINE PROTECTION/GUARD - R.R.
Op. 0010T20 ENGINE COOLANT - CHANGE
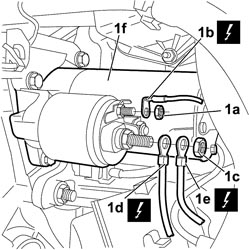
1. Release the protective cover for the electrical connections, undo the nut (1a) and disconnect the electrical connection (1b), undo the nut (1c) and disconnect the electrical connections (1d) and (1e) from the starter motor (1f).
| Description | Connector | |
|---|---|---|
| 1b | STARTER MOTOR | See A020 STARTER MOTOR |
| Description | Connector | |
|---|---|---|
| 1d | STARTER MOTOR | See A020 STARTER MOTOR |
| Description | Connector | |
|---|---|---|
| 1e | STARTER MOTOR | See A020 STARTER MOTOR |
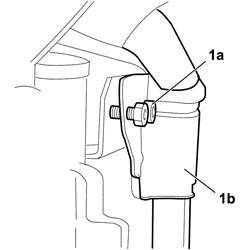
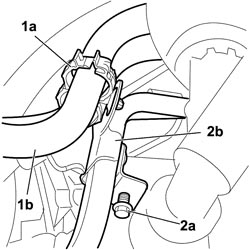
1. Unscrew both nuts (1a) securing EGR circuit pipe bracket (1b).
1. Move the heater supply pipes (1a) away from the work area after having released them from the retaining bands (1b).
2. Undo the bolt (2a) securing the EGR circuit pipe bracket (1b).
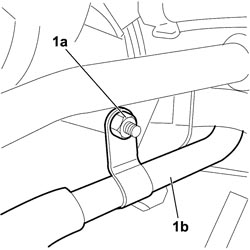
1. Undo the nut (1a) securing the EGR circuit pipe side bracket (1b).
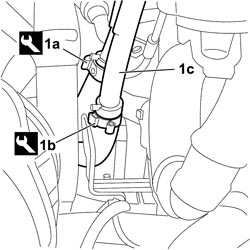
1. Use the appropriate tool to loosen both collars (1a) and (1b) retaining the engine cooling circuit pipes (1c) and move aside to free up the working area.
| Tool | Description | Function | Validity |
|---|---|---|---|
| 1881138000 | Caliper | Band opening |
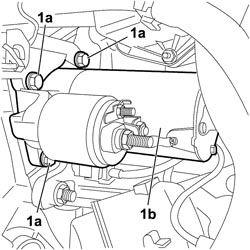
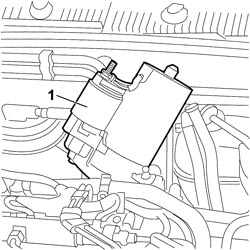
1. Unscrew the three bolts (1a) securing the starter motor (1b) to the gearbox bell housing.
1. Remove the starter motor from the vehicle, withdrawing from the upper part of the engine compartment.
Refitting
- Check that the starter motor is not damaged.
- Position the starter motor in its housing on the vehicle, inserting from the upper part of the engine.
- Tighten the three bolts and tighten to the specified torque.
| Component | Fastening | dia | Value (daNm) | Validity |
|---|---|---|---|---|
| Starter motor assembly | Bolt | M8 | 2,25 ÷ 2,75 | 1.9 JTD 8v 1.9 JTD 16v |
- Connect the engine cooling circuit lines and use the appropriate tool to tighten both retaining bands.
| Tool | Description | Function | Validity |
|---|---|---|---|
| 1881138000 | Caliper | Band opening |
- Position the EGR circuit pipe brackets and tighten the nut and bolts.
- Position the heater delivery pipes and tighten the collars.
- Position the EGR circuit pipe brackets and tighten the nuts.
- Connect the starter motor electrical connections and tighten both electrical connection nuts.
| Description | Connector | |
|---|---|---|
| STARTER MOTOR | See A020 STARTER MOTOR |
| Description | Connector | |
|---|---|---|
| STARTER MOTOR | See A020 STARTER MOTOR |
| Description | Connector | |
|---|---|---|
| STARTER MOTOR | See A020 STARTER MOTOR |
- Close the access cover for the electrical connection.
Op. 0010T20 ENGINE COOLANT - CHANGE
Op. 7055B54 UNDER ENGINE PROTECTION/GUARD - R.R.
Op. 5530B52 BATTERY SUPPORT/DRIP TRAY - R.R
- Reconnect the negative battery terminal.
| Description | Connector | |
|---|---|---|
| BATTERY | See A001 BATTERY |
- Fit the upper engine protective cover.
Removing
- Open the bonnet.
- Turn the ignition key to the OFF position.
- Disconnect the negative battery terminal.
| Description | Connector | |
|---|---|---|
| BATTERY | See A001 BATTERY |
- Position the vehicle on the lift and raise it.
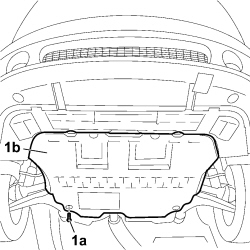
1. Undo the bolts (1a) fixing the rear part of the protection under the engine (1b) and remove the rear protection under the engine from the vehicle.
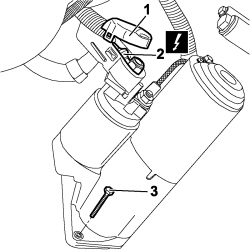
1. Open the protective cover for the starter motor electrical connection.
2. Disconnect the electrical connection for the starter motor and release it.
| Description | Connector | |
|---|---|---|
| STARTER MOTOR | See A020 STARTER MOTOR |
3. Undo the bolts securing the starter motor.
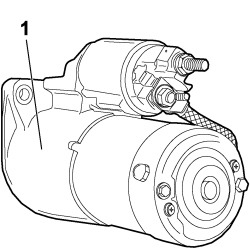
1. Remove the starter motor from the vehicle.
Refitting
- Check that the starter motor is not damaged.
- Place the starter motor in its housing and screw in the fixing bolts tightening them to the recommended torque.
| Component | Fastening | dia | Value (daNm) | Validity |
|---|---|---|---|---|
| Starter motor assembly | Bolt | M8 | 2,25 ÷ 2,75 | 1.9 JTD 8v 1.9 JTD 16v |
- Connect the electrical connection for the starter motor.
| Description | Connector | |
|---|---|---|
| STARTER MOTOR | See A020 STARTER MOTOR |
- Close the protective cover for the starter motor electrical connection.
- Position the rear protection under the engine in the vehicle and tighten the fixing bolts for the rear part of the protection under the engine.
- Lower the lift.
- Connect the negative battery terminal.
| Description | Connector | |
|---|---|---|
| BATTERY | See A001 BATTERY |
Removing
- Position the vehicle on the lift and raise it.
- Open the bonnet.
- Turn the ignition key to the OFF position.
- Disconnect the negative battery terminal.
| Description | Connector | |
|---|---|---|
| BATTERY | See A001 BATTERY |
Op. 7055B54 UNDER ENGINE PROTECTION/GUARD - R.R.
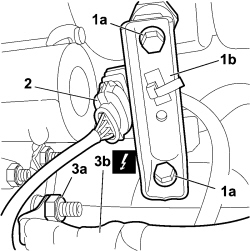
1. Undo the fixing bolts (1a) and remove the air chamber mounting bracket (1b).
2. Disconnect and release the electrical connection.
3. Undo the nut (3a) and disconnect the electrical connections (3b) from the starter motor.
| Description | Connector | |
|---|---|---|
| 3b | STARTER MOTOR | See A20 STARTER MOTOR |
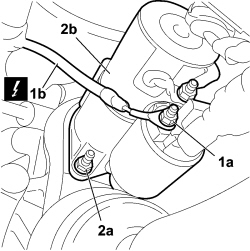
1. Undo the nut (1a) and disconnect the electrical connection (1b) from the starter motor.
| Description | Connector | |
|---|---|---|
| 1b | STARTER MOTOR | See A20 STARTER MOTOR |
2. Undo the retaining bolts (2a) and remove starter motor (2b) from the vehicle.
Refitting
- Check that the starter motor is not damaged.
- Place the starter motor in its housing and screw in the fixing bolts tightening them to the recommended torque.
| Description | Connector | |
|---|---|---|
| STARTER MOTOR | See A20 STARTER MOTOR |
- Connect the electrical connections to the starter motor and secure them using the nuts.
| Description | Connector | |
|---|---|---|
| STARTER MOTOR | See A20 STARTER MOTOR |
- Position the air intake chamber mounting bracket and tighten the bolts.
- Close the protective cover for the starter motor electrical connection.
Op. 7055B54 UNDER ENGINE PROTECTION/GUARD - R.R.
- Connect the negative battery terminal.
| Description | Connector | |
|---|---|---|
| BATTERY | See A001 BATTERY |
Remove the vehicle from the lift.
Parts & tools for this job For 2005 Fiat Croma
- TOOLBattery testerSearch: car battery tester
- TOOLDigital multimeterSearch: automotive digital multimeter
- TOOLBattery terminal cleanerSearch: battery terminal cleaner
Links open Amazon search results in a new tab. As an Amazon Associate I earn from qualifying purchases.