
Intermediate drive shaft mount - r r
- Make
- Fiat
- Model
- Stilo Factory Service Manual
- Year
- 2001–2007
- Section
- Front axle › Intermediate drive shaft mount - r r
Intermediate drive shaft mount - r r
The intermediate drive shaft bearing mount is integral with the engine oil sump.
Refer to op. 1020A26 crankcase sump - r r clean mating surfaces and apply sealant for vehicle with air conditioner
Place the car on a lift.
- 5530B56 BATTERY DRIP TRAY COVER - R.R.
Disconnect the battery negative terminal.
- 1016A10 sound-proofing cover - r + r
- 7055B54 under-engine guard - r r
- 4450B04 right front wheel r r
- 7055B42 Additional FRONT WHEEL ARCH (one), left or right - R.R. both sides
- 1092G10 single engine belt r r
- 1076B50 exhaust pipe attachment to engine - r + r
- 1084A16 oil dip stick pipe - r r
- 5530A14 alternator - r+r for versions with air conditioner
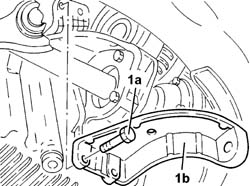
1. Undo the fixing bolts (1a) and remove the alternator upper mounting bracket (1b).
Place the car on a ramp.
- 4450B10 Front WHEEL (one) - R.R.
- 7055B54 under-engine guard - r r
- 7055B42 Additional FRONT WHEEL ARCH (one), left or right - R.R.
- 2710A10 drive shaft with joints (one), l/h or r/h - r + r
- 1076B50 exhaust pipe attachment to engine - r + r
- 1008C30 power unit lower reaction link r r
- 1008C33 BRACKET ON ENGINE FOR LOWER REACTION ROD - R.R.
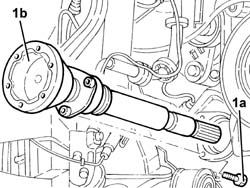
1. Undo the bolts (1a) and remove the intermediate drive shaft (1b).
Remove the dust excluder.
Place a suitable container under the differential to collect the gearbox oil.
Undo the plug and drain the gearbox oil.
Remove the oil container positioned under the differential.
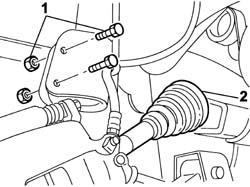
1. Unscrew the bolts securing the right drive shaft to the intermediate drive shaft.
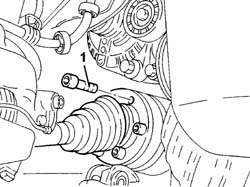
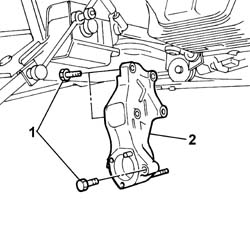
1. Undo the bolt fixing the support to the engine oil sump and the bolts securing the mount to the crankcase.
2. Remove the intermediate driveshaft bearing support.
Place a suitable container under the differential to collect the gearbox oil.
Undo the plug and drain the gearbox oil.
Remove the oil container positioned under the differential.
1. Undo the bolts securing the shock absorber strut.
2. Open the retaining band and separate the right drive shaft from the intermediate drive shaft.
Fit the intermediate drive shaft support and secure it by means of screws and bolt, to torque.
| Fastening | Component | Ø | Value (daNm) | |
|---|---|---|---|---|
| Bolt | FRONT DRIVE SHAFT BEARING MOUNT | M10 x 1.25 | 5 |
Fit the intermediate drive shaft and tighten the bolts fixing it to the support to torque.
- 1008C33 BRACKET ON ENGINE FOR LOWER REACTION ROD - R.R.
- 1008C30 power unit lower reaction link r r
- 1076B50 exhaust pipe attachment to engine - r + r
- 2710A10 drive shaft with joints (one), l/h or r/h - r + r
- 7055B42 Additional FRONT WHEEL ARCH (one), left or right - R.R.
- 7055B54 under-engine guard - r r
- 4450B10 Front WHEEL (one) - R.R.
Remove the vehicle from the lift.
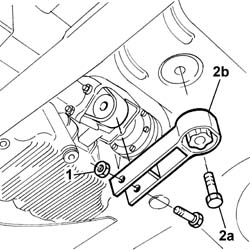
1. Undo the bolt fastening the bracket to the bodyshell with the reaction rod.
2. Undo the bolt (2a) and remove the right reaction rod (2b).
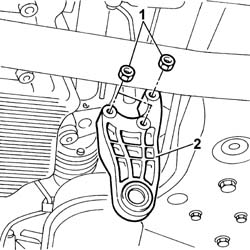
1. Undo the bolts.
2. Remove the bracket anchoring the reaction link to the engine.
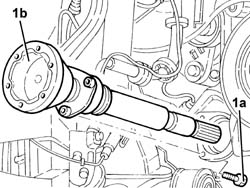
1. Undo the bolts (1a) and remove the intermediate drive shaft (1b).
Remove the dust excluder.
1. Undo the bolt fixing the support to the engine oil sump and the bolts securing the mount to the crankcase.
2. Remove the intermediate driveshaft bearing support.
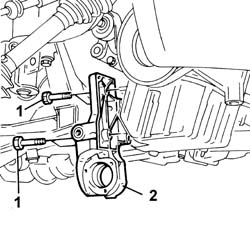
Fit the intermediate drive shaft support and secure it by means of screws and bolt, to torque.
Fit the intermediate drive shaft and tighten the bolts fixing it to the support to torque.
| Fastening | Component | Ø | Value (daNm) |
|---|
Fit the lower bracket mount to the engine and tighten the nuts to torque.
| Fastening | Component | Ø | Value (daNm) | |
|---|---|---|---|---|
| Nut | BRACKET ON ENGINE FOR LOWER ROD | M10 x 1.25 | 4 |
Fit the reaction rod in its seat and tighten the bolt securing it to the suspension beam to torque.
| Fastening | Component | Ø | Value (daNm) | |
|---|---|---|---|---|
| Bolt | LOWER ROD ON ENGINE | M12 x 1.25 | 13.5 |
Tighten the bolts fixing the reaction rod to the gearbox and engine to torque.
| Fastening | Component | Ø | Value (daNm) | |
|---|---|---|---|---|
| Nut | LOWER ROD ON ENGINE | M12 x 1.25 | 7.5 |
Connect the right drive shaft to the intermediate drive shaft using a new band.
Tighten the bolts fixing the shock absorber to the specified torque.
| Fastening | Component | Ø | Value (daNm) | |
|---|---|---|---|---|
| Nut | FRONT DAMPER | M12 x 1.25 | (Steering knuckle) 7 |
Tighten the bolts securing the right drive shaft to the intermediate drive shaft to the specified torque.
| Fastening | Component | Ø | Value (daNm) | |
|---|---|---|---|---|
| Bolt | FRONT DRIVE SHAFT COMPLETE WITH JOINTS | M6 | 1 |
Fit the alternator upper mounting bracket.
- 5530A14 alternator - r+r for versions with air conditioner
- 1084A16 oil dip stick pipe - r r
- 1076B50 exhaust pipe attachment to engine - r + r
- 1092G10 single engine belt r r
- 7055B42 Additional FRONT WHEEL ARCH (one), left or right - R.R. both sides
- 4450B04 right front wheel r r
- 7055B54 under-engine guard - r r
- 1016A10 sound-proofing cover - r + r
Connect the battery negative terminal.
- 5530B56 BATTERY DRIP TRAY COVER - R.R.
- 0010T41 MANUAL GEARBOX OIL - Check level and top up, if necessary
Remove the vehicle from the lift.
Parts & tools for this job For 2001 Fiat Stilo
- PARTFront wheel bearingSearch: Fiat Stilo 2001 front wheel bearing
- TOOLBearing puller kitSearch: wheel bearing puller kit
- PARTCV boot kitSearch: Fiat Stilo 2001 cv boot kit
Links open Amazon search results in a new tab. As an Amazon Associate I earn from qualifying purchases.