
Alternator - r+r
- Make
- Fiat
- Model
- Stilo Factory Service Manual
- Year
- 2001–2007
- Section
- Current generator › Alternator - r+r
Alternator - r+r
Removing
Place the car on the ramp.
- 1016A10 sound-proofing cover - r + r
- 5530B56 BATTERY DRIP TRAY COVER - R.R.
Disconnect the battery negative terminal.
| Name | Connector | |
|---|---|---|
| Battery | A1 |
- 7055B54 under-engine guard - r r
- 7055B42 Additional FRONT WHEEL ARCH (one), left or right - R.R.
- 4450B10 Front WHEEL (one) - R.R.
- 1092B50 alternator/air conditioner compressor drive belt - adjust tension
1. Completely undo the bolts (1a) and remove the components drive belt moving tensioner (1b).
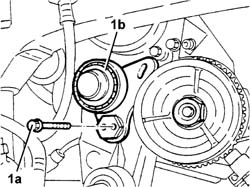
Removing
Place the vehicle on a lift.
- 4450B04 right front wheel r r
- 7055B42 Additional FRONT WHEEL ARCH (one), left or right - R.R.
- 1092G10 single engine belt r r
- 1092A10 Crankshaft services PULLEY - R.R.
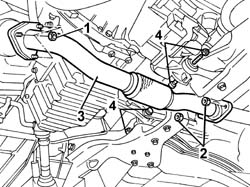
1. Undo the nuts securing the first exhaust pipe section to the catalytic preconverter.
2. Undo the nuts securing the first exhaust pipe section to the catalytic converter.
3. Remove the first section of exhaust pipe complete with gaskets.
4. Undo the bolts fixing the lower reaction rods to the gearbox and the engine.
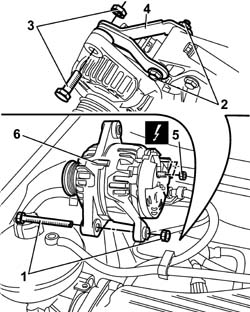
1. Undo and remove the alternator bottom bolt.
2. Slacken the bolt securing the alternator mounting bracket to the engine.
3. Undo and remove the bolt securing the alternator to the mounting bracket.
4. Rotate the alternator mounting bracket towards the engine.
5. Undo the fixing nuts and disconnect the electrical wiring.
| Name | Connector | |
|---|---|---|
| 5 | Alternator | A10 |
6. Remove the alternator
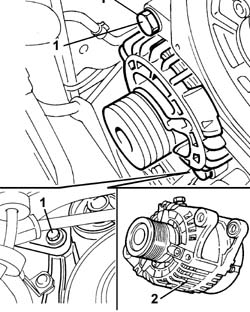
Undo the nuts and disconnect the rear wiring.
| Name | Connector | |
|---|---|---|
| Alternator | A10 |
1. Undo the bolts fixing the alternator.
2. Remove the alternator from the bottom part of the engine.
Refitting
Reconnect the alternator's electrical connections.
| Name | Connector | |
|---|---|---|
| Alternator | A10 |
Fit the alternator in its seating and secure it with the fixing bolts.
Tighten the bolts fixing the alternator to torque.
| Fastening | Component | Ø | Value (daNm) | |
|---|---|---|---|---|
| Bolt | ALTERNATOR ASSEMBLY | M12 | 7.2 - 8.9 |
Place the components drive belt moving tensioner back in its housing and secure it without tightening the bolts.
- 1092B50 alternator/air conditioner compressor drive belt - adjust tension
- 1092B54 alternator/water pump drive belt - adjust tension
- 4450B10 Front WHEEL (one) - R.R.
- 7055B42 Additional FRONT WHEEL ARCH (one), left or right - R.R.
- 7055B54 under-engine guard - r r
Connect the battery negative terminal.
| Name | Connector | |
|---|---|---|
| Battery | A1 |
- 5530B56 BATTERY DRIP TRAY COVER - R.R.
- 1016A10 sound-proofing cover - r + r
Remove the car from the ramps.
Refitting
Fit the alternator in its seating on the mounting.
Tighten the retaining nuts to torque.
| Fastening | Component | Ø | Value (daNm) | |
|---|---|---|---|---|
| Nut | ALTERNATOR ASSEMBLY | M12 x 1.25 | 7 |
Connect the electrical wiring and tighten the fixing nuts.
| Name | Connector | |
|---|---|---|
| Alternator | A10 |
Screw up and then tighten to torque the central bolts on the two bottom reaction rods.
Tighten the bolt fixing the rod to the gearbox to torque.
| Fastening | Component | Ø | Value (daNm) | |
|---|---|---|---|---|
| Nut | LOWER ROD ON GEARBOX | M12 x 1.25 | 7.5 |
Tighten the bolt securing the rod to the intermediate shaft support to torque.
| Fastening | Component | Ø | Value (daNm) | |
|---|---|---|---|---|
| Nut | LOWER ROD ON ENGINE | M12 x 1.25 | 7.5 |
Fit the exhaust pipe gasket.
Fit the front section of the exhaust pipe.
Tighten the nuts securing the exhaust pipe to the catalytic converter.
| Fastening | Component | Ø | Value (daNm) | |
|---|---|---|---|---|
| Nut | EXHAUST PIPE TO ENGINE | M8 | (Catalytic converter) 2.5 |
Tighten the nuts securing the exhaust pipe to the catalytic preconverter.
| Fastening | Component | Ø | Value (daNm) | |
|---|---|---|---|---|
| Bolt | EXHAUST PIPE TO ENGINE | M8 | (Catalytic pre-converter) 2.5 |
- 1092A10 Crankshaft services PULLEY - R.R.
- 1092G10 single engine belt r r
- 7055B42 Additional FRONT WHEEL ARCH (one), left or right - R.R.
- 4450B04 right front wheel r r
Remove the vehicle from the lift.
Parts & tools for this job For 2001 Fiat Stilo
- TOOLBattery testerSearch: car battery tester
- TOOLDigital multimeterSearch: automotive digital multimeter
- TOOLBattery terminal cleanerSearch: battery terminal cleaner
Links open Amazon search results in a new tab. As an Amazon Associate I earn from qualifying purchases.