
Fuel tank - r + r and decant fuel
- Make
- Fiat
- Model
- Stilo Factory Service Manual
- Year
- 2001–2007
- Section
- Fuel tank and pipes › Fuel tank - r + r and decant fuel
Fuel tank - r + r and decant fuel
Removing
Position the vehicle on the ramp.
- 5530B56 BATTERY DRIP TRAY COVER - R.R.
Disconnect the battery negative terminal.
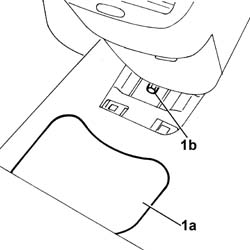
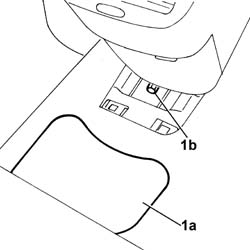
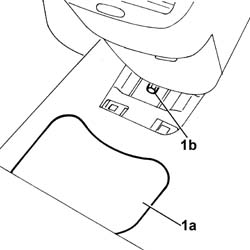
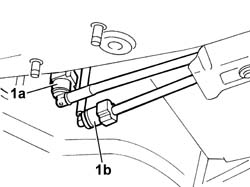
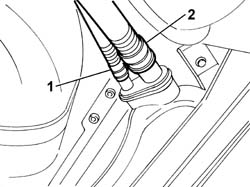
1. Remove protective cover (1a) to gain access to nut (1b) used to tension the handbrake cables and loosen it.
Removing
Position the vehicle on the ramp
- 5530B56 BATTERY DRIP TRAY COVER - R.R.
Disconnect the battery negative terminal.
1. Remove protective cover (1a) to gain access to nut (1b) used to tension the handbrake cables and loosen it.
Removing
Position the vehicle on the ramp.
- 5530B56 BATTERY DRIP TRAY COVER - R.R.
Disconnect the battery negative terminal.
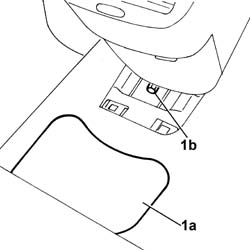
1. Remove protective cover (1a) to gain access to nut (1b) used to tension the handbrake cables and loosen it.
Removing
Position the vehicle on the ramp.
- 5530B56 BATTERY DRIP TRAY COVER - R.R.
Disconnect the battery negative terminal.
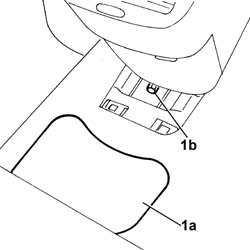
1. Remove protective cover (1a) to gain access to nut (1b) used to tension the handbrake cables and loosen it.
Removing
Position the vehicle on the ramp.
- 5530B56 BATTERY DRIP TRAY COVER - R.R.
Disconnect the battery negative terminal.
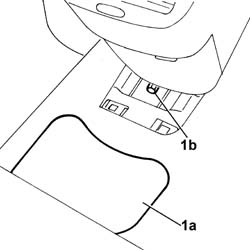
1. Remove protective cover (1a) to gain access to nut (1b) used to tension the handbrake cables and loosen it.
Removing
Position the vehicle on the ramp
- 5530B56 BATTERY DRIP TRAY COVER - R.R.
Disconnect the battery negative terminal.
Draw off the fuel from the tank using suitable equipment.
1. Remove protective cover (1a) to gain access to nut (1b) used to tension the handbrake cables and loosen it.
Removing
Remove the car from the ramps.
Disconnect the battery negative terminal.
Draw off the fuel from the tank using suitable equipment.
1. Remove protective cover (1a) to gain access to nut (1b) used to tension the handbrake cables and loosen it.
- 4450B08 right rear wheel r r
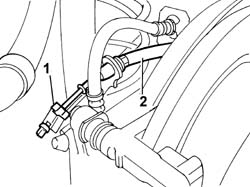
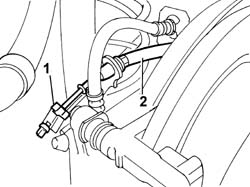
1. Remove the retaining clip.
2. Disconnect the handbrake cable from the right rear brake caliper and bands.
- 4450B08 right rear wheel r r
1. Remove the retaining clip.
2. Disconnect the handbrake cable from the right rear brake caliper and bands.
- 4450B08 right rear wheel r r
1. Remove the retaining clip.
2. Disconnect the handbrake cable from the right rear brake caliper and bands.
- 4450B08 right rear wheel r r
1. Remove the retaining clip.
2. Disconnect the handbrake cable from the right rear brake caliper and bands.
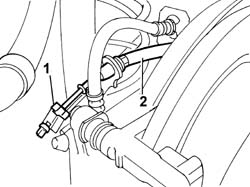
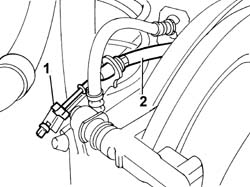
- 4450B08 right rear wheel r r
1. Remove the retaining clip.
2. Disconnect the handbrake cable from the right rear brake caliper and bands.
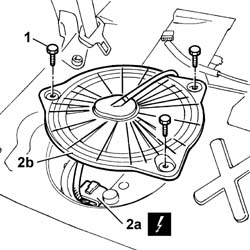
1. Tilt the back seat cushion to gain access to the submerged pump cover, then unscrew the retaining bolts and raise the protective cover.
2. Disconnect the electrical connection of submerged pump (2a) and remove protective cover (2b).
| Name | Connector | |
|---|---|---|
| 2a | Fuel level gauge | N40 |
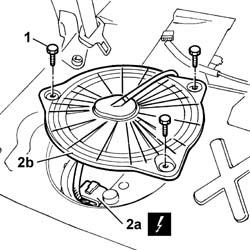
1. Tilt the back seat cushion to gain access to the submerged pump cover, then unscrew the retaining bolts and raise the protective cover.
2. Disconnect the electrical connection of submerged pump (2a) and remove protective cover (2b).
| Name | Connector | |
|---|---|---|
| 2a | Fuel level gauge | N40 |
1. Unscrew the bolts securing the rubber block to the rear exhaust pipe section.
2. Release the flexible block from the pin on the body and unscrew the bolt securing the central section coupling collar.
3. Remove rear exhaust silencer.
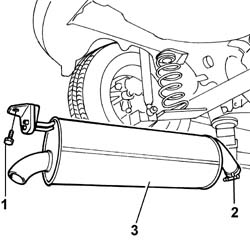
1. Unscrew the bolts securing the rubber block to the rear exhaust pipe section.
2. Release the flexible block from the pin on the body and unscrew the bolt securing the central section coupling collar.
3. Remove rear exhaust silencer.
1. Unscrew the bolts securing the rubber block to the rear exhaust pipe section.
2. Release the flexible block from the pin on the body and unscrew the bolt securing the central section coupling collar.
3. Remove rear exhaust silencer.
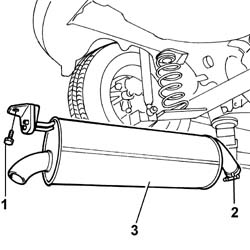
1. Unscrew the bolts securing the rubber block to the rear exhaust pipe section.
2. Release the flexible block from the pin on the body and unscrew the bolt securing the central section coupling collar.
3. Remove rear exhaust silencer.
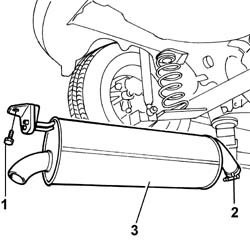
1. Unscrew the bolts securing the rubber block to the rear exhaust pipe section.
2. Release the flexible block from the pin on the body and unscrew the bolt securing the central section coupling collar.
3. Remove rear exhaust silencer.
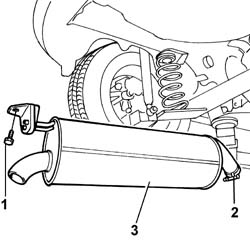
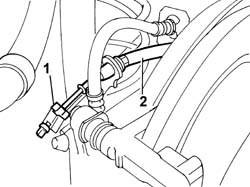
1. Remove the retaining clip.
2. Disconnect the handbrake cable from the right rear brake caliper and bands.
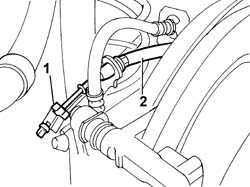
1. Remove the retaining clip.
2. Disconnect the handbrake cable from the right rear brake caliper and bands.
1. Undo bolts (1a) and remove the fuel tank right guard (1b).
Carry out the same operation on the left side.
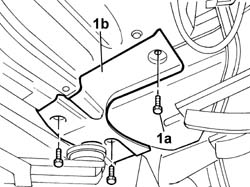
1. Unscrew retaining bolts (1a) and remove the fuel tank right guard (1b).
Carry out the same operation on the left side.
1. Unscrew retaining bolts (1a) and remove the fuel tank right guard (1b).
Carry out the same operation on the left side.
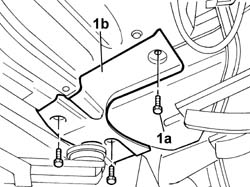
1. Undo bolts (1a) and remove the fuel tank right guard (1b).
Carry out the same operation on the left side.
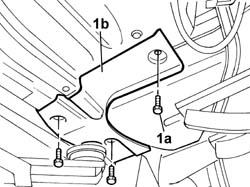
1. Undo bolts (1a) and remove the fuel tank right guard (1b).
Carry out the same operation on the left side.
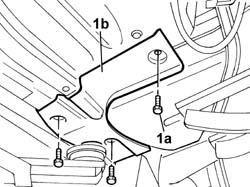
1. Unscrew retaining bolts (1a) and remove the fuel tank right guard (1b).
Carry out the same operation on the left side.
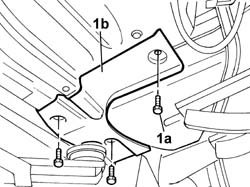
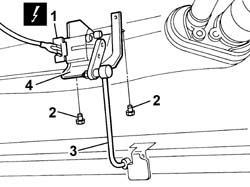
1. Disconnect the electrical connection for the headlamp alignment corrector rear potentiometer.
| Name | Connector | |
|---|---|---|
| 1 | Headlamp aglinment rear potentiometer | K2 |
2. Undo the bolts fixing the mounting bracket.
3. Disconnect the potentiometer connecting rod.
4. Remove the headlamp alignment corrector rear potentiometer.
1. Remove the retaining springs (1a), undo the bolts (1b) and remove the rear heat shield (1c).
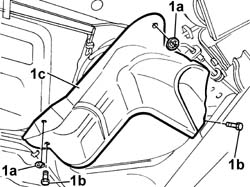
1. Remove the retaining clips (1a), undo the bolts (1b) and remove the rear heat shield (1c).
1. Remove the retaining clips (1a), undo the bolts (1b) and remove the rear heat shield (1c).
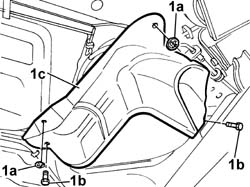
1. Remove the retaining springs (1a), undo the bolts (1b) and remove the rear heat shield (1c).
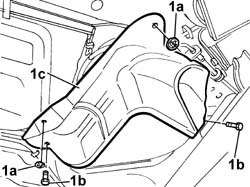
1. Remove the retaining springs (1a), undo the bolts (1b) and remove the rear heat shield (1c).
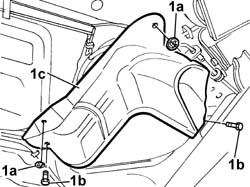
1. Disconnect the fuel outlet and return lines from quick-release fittings (1a) and (1b).
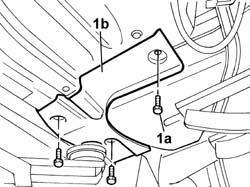
1. Unscrew retaining bolts (1a) and remove the fuel tank right guard (1b).
Carry out the same operation on the left side.
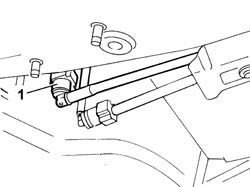
1. Disconnect the rapid attachment for the supply pipe.
1. Disconnect the rapid attachment for the supply pipe.
1. Disconnect the rapid attachment for the supply pipe.
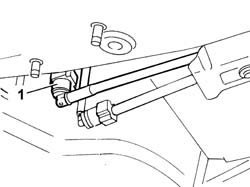
1. Disconnect the rapid attachment for the supply pipe.
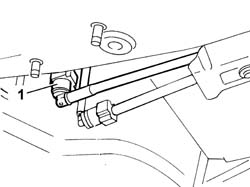
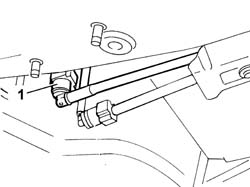
1. Disconnect the rapid attachment for the supply pipe.
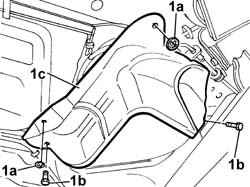
1. Remove the retaining clips (1a), undo the bolts (1b) and remove the rear heat shield (1c).
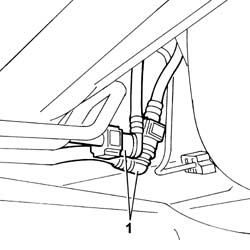
1. Disconnect from the rapid connectors and the fuel supply and return pipes.
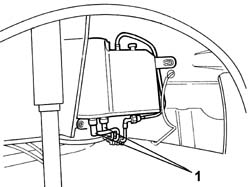
1. Disconnect the anti-evaporation system pipe from the rapid attachments on the active carbon filter.
Release the pipes from the bands on the body and tank.
1. Disconnect the anti-evaporation system pipe from the rapid attachments on the active carbon filter.
Release the pipes from the bands on the body and tank.
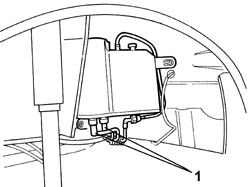
1. Disconnect the anti-evaporation system pipe from the rapid attachments on the active carbon filter.
Release the pipes from the bands on the body and tank.
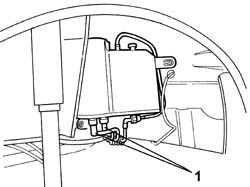
1. Disconnect the anti-evaporation system pipe from the rapid attachments on the active carbon filter.
Release the pipes from the bands on the body and tank.
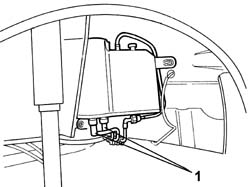
1. Disconnect the anti-evaporation system pipe from the rapid attachments on the active carbon filter.
Release the pipes from the bands on the body and tank.
1. Disconnect the fuel reflux pipe from the tank.
2. Disconnect the fuel filler pipe from the tank.
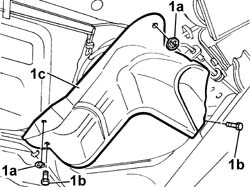
1. Remove the retaining clips (1a), undo the bolts (1b) and remove the rear heat shield (1c).
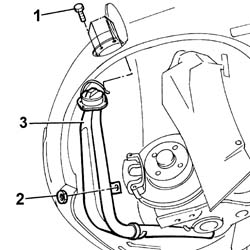
1. Undo the bolts fixing the fuel filler pipe fitting to the bodyshell.
2. Undo the nut fixing the filler pipe to the bodyshell wheel arch.
3. Lower the fuel filler pipe.
1. Undo the bolts fixing the fuel filler to the bodyshell.
2. Undo the nut fixing the filler pipe to the bodyshell wheel arch.
3. Lower the fuel filler pipe.
1. Undo the bolts fixing the fuel filler to the bodyshell.
2. Undo the nut fixing the filler pipe to the bodyshell wheel arch.
3. Lower the fuel filler pipe.
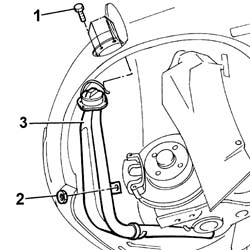
1. Undo the bolts fixing the fuel filler pipe fitting to the bodyshell.
2. Undo the nut fixing the filler pipe to the bodyshell wheel arch.
3. Lower the fuel filler pipe.
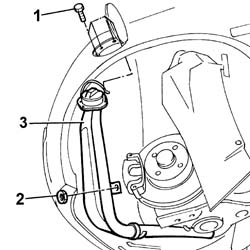
1. Undo the bolts fixing the fuel filler pipe fitting to the bodyshell.
2. Undo the nut fixing the filler pipe to the bodyshell wheel arch.
3. Lower the fuel filler pipe.
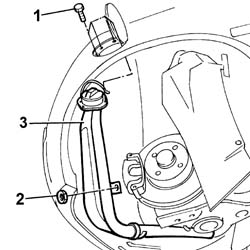
1. Position a hydraulic jack, complete with suitable support, under the fuel tank.
2. Undo the bolts (2a) and remove the fuel tank support belts (2b).
3. Lower the hydraulic jack and remove the fuel tank.
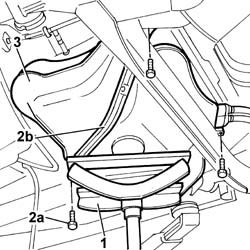
1. Disconnect the fuel reflux pipe from the tank.
2. Disconnect the fuel filler pipe from the tank.
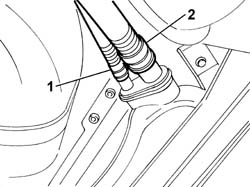
1. Position a hydraulic jack, complete with suitable support, under the fuel tank.
2. Undo the bolts (2a) and remove the fuel tank support belts (2b).
Lower the hydraulic jack.
3. Disconnect the electrical connection for the submerged pump (3a) and remove the fuel tank (3b).
| Name | Connector | |
|---|---|---|
| 3a | Fuel level gauge | N40 |
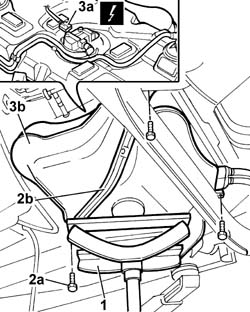
1. Position a hydraulic jack, complete with suitable support, under the fuel tank.
2. Undo the bolts (2a) and remove the fuel tank support belts (2b).
Lower the hydraulic jack.
3. Disconnect the electrical connection for the submerged pump (3a) and remove the fuel tank (3b).
| Name | Connector | |
|---|---|---|
| 3a | Fuel level gauge | N40 |
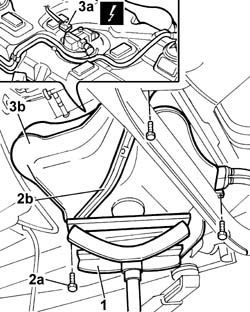
1. Position a hydraulic jack, complete with suitable support, under the fuel tank.
2. Undo the bolts (2a) and remove the fuel tank support belts (2b).
Lower the hydraulic jack.
3. Disconnect the electrical connection for the submerged pump (3a) and remove the fuel tank (3b).
| Name | Connector | |
|---|---|---|
| 3a | Fuel level gauge | N40 |
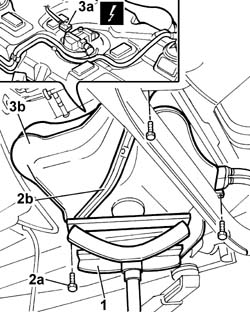
1. Position a hydraulic jack, complete with suitable support, under the fuel tank.
2. Undo the bolts (2a) and remove the fuel tank support belts (2b).
Lower the hydraulic jack.
3. Disconnect the electrical connection for the submerged pump (3a) and remove the fuel tank (3b).
| Name | Connector | |
|---|---|---|
| 3a | Fuel level gauge | N40 |
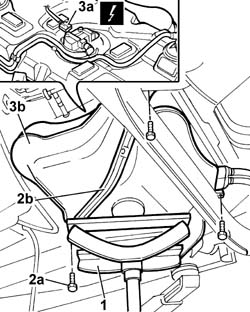
Refitting
Position the fuel tank on the stand and fit in its seat.
Tighten the bolts fixing the fuel tank support belts.
| Fastening | Component | Ø | Value (daNm) | |
|---|---|---|---|---|
| Bolt | FUEL TANK | M8 | 3.5 |
Remove the hydraulic jack, complete with support from beneath the fuel tank.
Connect the fuel filler pipe to the tank.
Connect the fuel reflux pipe to the tank.
Fit the heat shield and tighten the retaining bolts to the body.
Position the heat shield retaining clips.
Connect the quick-release fittings for the fuel supply and return pipes.
Fit the right and left fuel tank shields.
Connect the handbrake cable to the right rear brake caliper and bands and secure with the clip.
Connect the electrical connection to the submerged pump and fit the protective cover.
| Name | Connector | |
|---|---|---|
| Fuel level gauge | N40 |
Tighten the bolts securing the protective cover.
Fold down the rear seat cushion.
- 3380A04 handbrake - check travel
Connect the battery negative terminal.
- 5530B56 BATTERY DRIP TRAY COVER - R.R.
Remove the car from the ramps.
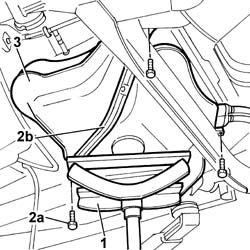
1. Position a hydraulic jack, complete with suitable support, under the fuel tank.
2. Undo the bolts (2a) and remove the fuel tank support belts (2b).
3. Lower the hydraulic jack and remove the fuel tank.
Refitting
Position the fuel tank on the stand and fit in its seat.
Connect the electrical connection for the submerged pump.
| Name | Connector | |
|---|---|---|
| Fuel level gauge | N40 |
Tighten the bolts fixing the fuel tank support belts.
| Fastening | Component | Ø | Value (daNm) | |
|---|---|---|---|---|
| Bolt | FUEL TANK | M8 | 3.5 |
Remove the hydraulic jack, complete with support from beneath the fuel tank.
Tighten the bolts fixing the filler pipe to the filler compartment.
Tighten the nut retaining the pipe to the bodyshell.
Connect the rapid attachments for the anti-evaporation pipes to the active carbon filter.
Connect the rapid attachment for the fuel supply pipe.
Fit the heat shield and tighten the retaining bolts to the body.
Position the heat shield retaining clips.
Fit the right and left fuel tank shields.
Fit the rear exhaust silencer, tighten the bolt securing the rubber block to the bodyshell.
Connect the rear silencer to the exhasut pipe and tighten the coupling collar bolt to torque.
| Fastening | Component | Ø | Value (daNm) | |
|---|---|---|---|---|
| Nut | REAR EXHAUST SILENCER | M10 x 1.25 | 5 |
Connect the handbrake cable to the right rear brake caliper and bands and secure with the clip.
- 3380A04 handbrake - check travel
Connect the battery negative terminal.
- 5530B56 BATTERY DRIP TRAY COVER - R.R.
Remove the car from the ramp.
Refitting
Position the fuel tank on the stand and fit in its seat.
Connect the electrical connection for the submerged pump.
| Name | Connector | |
|---|---|---|
| Fuel level gauge | N40 |
Tighten the bolts fixing the fuel tank support belts.
| Fastening | Component | Ø | Value (daNm) | |
|---|---|---|---|---|
| Bolt | FUEL TANK | M8 | 3.5 |
Remove the hydraulic jack, complete with support from beneath the fuel tank.
Tighten the bolts fixing the filler pipe to the filler compartment.
Tighten the nut retaining the pipe to the bodyshell.
Connect the rapid attachments for the anti-evaporation pipes to the active carbon filter.
Connect the rapid attachment for the fuel supply pipe.
Fit the heat shield and tighten the retaining bolts to the body.
Position the heat shield retaining clips.
Fit the right and left fuel tank shields.
Fit the rear exhaust silencer and tighten the bolt securing the rubber block to the bodyshell.
Connect the rear silencer to the exhasut pipe and tighten the coupling collar bolt to torque.
| Fastening | Component | Ø | Value (daNm) | |
|---|---|---|---|---|
| Nut | REAR EXHAUST SILENCER | M10 x 1.25 | 5 |
Connect the handbrake cable to the right rear brake caliper and bands and secure with the clip.
- 3380A04 handbrake - check travel
Connect the battery negative terminal.
- 5530B56 BATTERY DRIP TRAY COVER - R.R.
Remove the car from the ramps.
Refitting
Position the fuel tank on the stand and fit in its seat.
Connect the electrical connection for the submerged pump.
| Name | Connector | |
|---|---|---|
| Fuel level gauge | N40 |
Tighten the bolts fixing the fuel tank support belts.
| Fastening | Component | Ø | Value (daNm) | |
|---|---|---|---|---|
| Bolt | FUEL TANK | M8 | 3.5 |
Remove the hydraulic jack, complete with support from beneath the fuel tank.
Tighten the bolts fixing the filler pipe to the filler compartment.
Tighten the nut retaining the pipe to the bodyshell.
Connect the rapid attachments for the anti-evaporation pipes to the active carbon filter.
Connect the rapid attachment for the fuel supply pipe.
Fit the heat shield and tighten the retaining bolts to the body.
Position the heat shield retaining clips.
Fit the right and left fuel tank shields.
Fit the rear exhaust silencer, tighten the bolt securing the rubber block to the bodyshell.
Connect the rear silencer to the exhasut pipe and tighten the coupling collar bolt to torque.
| Fastening | Component | Ø | Value (daNm) | |
|---|---|---|---|---|
| Nut | REAR EXHAUST SILENCER | M10 x 1.25 | 5 |
Connect the handbrake cable to the right rear brake caliper and bands and secure with the clip.
- 3380A04 handbrake - check travel
Connect the battery negative terminal.
- 5530B56 BATTERY DRIP TRAY COVER - R.R.
Remove the car from the ramp.
Refitting
Position the fuel tank on the stand and fit in its seat.
Connect the electrical connection for the submerged pump.
| Name | Connector | |
|---|---|---|
| Fuel level gauge | N40 |
Tighten the bolts fixing the fuel tank support belts.
| Fastening | Component | Ø | Value (daNm) | |
|---|---|---|---|---|
| Bolt | FUEL TANK | M8 | 2.4 |
Remove the hydraulic jack, complete with support from beneath the fuel tank.
Tighten the bolts fixing the filler pipe to the filler compartment.
Tighten the nut retaining the pipe to the bodyshell.
Connect the rapid attachments for the anti-evaporation pipes to the active carbon filter.
Connect the rapid attachment for the fuel supply pipe.
Fit the heat shield and tighten the retaining bolts to the body.
Position the heat shield retaining clips.
Fit the right and left fuel tank shields.
Fit the rear exhaust silencer, tighten the bolt securing the rubber block to the bodyshell.
Connect the rear silencer to the exhasut pipe and tighten the coupling collar bolt to torque.
| Fastening | Component | Ø | Value (daNm) | |
|---|---|---|---|---|
| Nut | REAR EXHAUST SILENCER | M10 x 1.25 | 5 |
Connect the handbrake cable to the right rear brake caliper and bands and secure with the clip.
- 3380A04 handbrake - check travel
Connect the battery negative terminal.
- 5530B56 BATTERY DRIP TRAY COVER - R.R.
Remove the car from the ramp.
Refitting
Position the fuel tank on the stand and fit in its seat.
Tighten the bolts fixing the fuel tank support belts.
| Fastening | Component | Ø | Value (daNm) | |
|---|---|---|---|---|
| Bolt | FUEL TANK | M8 | 3.5 |
Remove the hydraulic jack, complete with support from beneath the fuel tank.
Connect the fuel filler pipe to the tank.
Connect the fuel reflux pipe to the tank.
Fit the heat shield and tighten the retaining bolts to the body.
Position the heat shield retaining clips.
Connect the quick-release fittings for the fuel supply and return pipes.
Fit the right and left fuel tank shields.
Fit the headlamp alignment correct rear potentiometer.
Tighten the bolts fixing the mounting bracket and connect the rod.
Connect the electrical connection for the headlamp alignment corrector rear potentiometer.
| Name | Connector | |
|---|---|---|
| Headlamp aglinment rear potentiometer | K2 |
Connect the handbrake cable to the right rear brake caliper and bands and secure with the clip.
Connect the electrical connection to the submerged pump and fit the protective cover.
| Name | Connector | |
|---|---|---|
| Fuel level gauge | N40 |
Tighten the bolts securing the protective cover.
Fold down the rear seat cushion.
- 3380A04 handbrake - check travel
Connect the battery negative terminal.
Remove the car from the ramps.
Parts & tools for this job For 2001 Fiat Stilo
- PARTEngine gasket setSearch: Fiat Stilo 2001 engine gasket set
- TOOLTorque wrenchSearch: 3/8 inch torque wrench
- TOOLFeeler gauge setSearch: feeler gauge set
Links open Amazon search results in a new tab. As an Amazon Associate I earn from qualifying purchases.