
NOTE: Note the positions of the Lucar (page 2 of 2)
- Make
- Land Rover
- Model
- Defender 90 Workshop Manual (NAS)
- Section
- Repair
SteeringNOTE: Note the positions of the Lucar · page 2 of 2
- Fully tighten ignition barrel bolts until heads STEERING LOWER SHAFT shear.
- Connect multiplug and Lucars to ignition barrel. Service repair no - 57.40.25
- Fit switch pack to steering column and secure with screw. Remove
- Connect multiplugs to rear of switch pack.
- Position column upper mounting bracket and tighten bolts to 22 Nm, 16 lbf ft.
- Fit clip to mounting bracket and secure harness.
- Fit rubber and clamp to upper steering column.
- Fit clamp bolts and tighten to 22 Nm, 16 lbf ft.
- Fit lower steering column bolts and tighten to 22 Nm, 16 lbf ft.
- Fit bolt securing column to upper mounting bracket and tighten to 22 Nm, 16 lbf ft.
- Fit lower half of steering column nacelle and secure to stalk grommets.
- Fit top half of steering column nacelle.
- Fit and tighten screws securing nacelle to steering column.
- Fit instrument panel. See INSTRUMENTS, Repair, instrument panel
- Reconnect battery negative lead.
- Turn indicator cancelling ring so that slots are vertical and lug with arrow points to the left.
- Fit steering wheel with finisher attachment lug at bottom, ensuring indicator cancelling forks locate in ring slots.
- Fit new washer and tighten securing nut to 50 Nm, 37 lbf ft.
- Fit centre pad to steering wheel.
- With steering lock engaged, and wheels in straight ahead position, align assembly marks and connect steering shaft universal joint to steering column.
- Tighten universal joint pinch bolts to 25 Nm, 18 lbf ft.
- Fit air inlet hose between plenum chamber and MAF sensor and tighten clips.
- Inspect universal joints for wear and excessive
- Inspect universal joints for stiffness. Lubricate if
- Set road wheels and steering wheel in straight ahead position.
- Loosen clip securing air inlet hose to MAF sensor.
- Loosen clip securing air inlet hose to Plenum chamber.
- Remove air inlet hose.
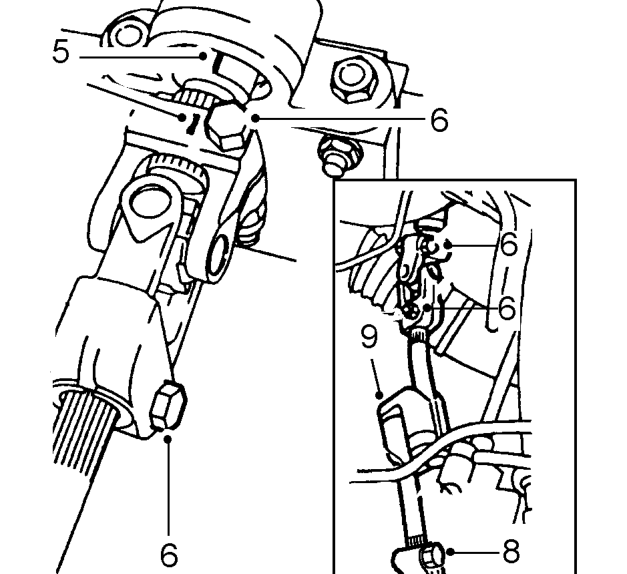
- Mark relationship of steering column inner shaft to top universal joint.
- Remove 2 bolts from top universal joint.
- Remove lower bolt from bottom universal joint.
- Loosen upper bolt from bottom universal joint.
- Remove steering shaft and collect universal joints.
play. Renew if necessary.
necessary.
Parts & tools for this job For Land Rover Defender
- TOOLTie rod end toolSearch: tie rod end puller
- TOOLBall joint separatorSearch: ball joint separator
- FLUIDPower steering fluidSearch: Land Rover power steering fluid
Links open Amazon search results in a new tab. As an Amazon Associate I earn from qualifying purchases.