
UNDER BONNET [HOOD] MAINTENANCE (page 2 of 9)
- Make
- Land Rover
- Model
- Range Rover Classic
- Section
- MAINTENANCE
MAINTENANCE
5
MAINTENANCE
Clean, adjust and renew
1. Take great care when fitting spark plugs not to
cross-thread plug, otherwise costly damage to
cylinder head will result.
2. Clean or replace spark plugs as applicable.
3. It is essential that correct type of spark plugs are
fitted.
4. Incorrect grade of plugs may lead to piston
overheating and engine failure.
Remove
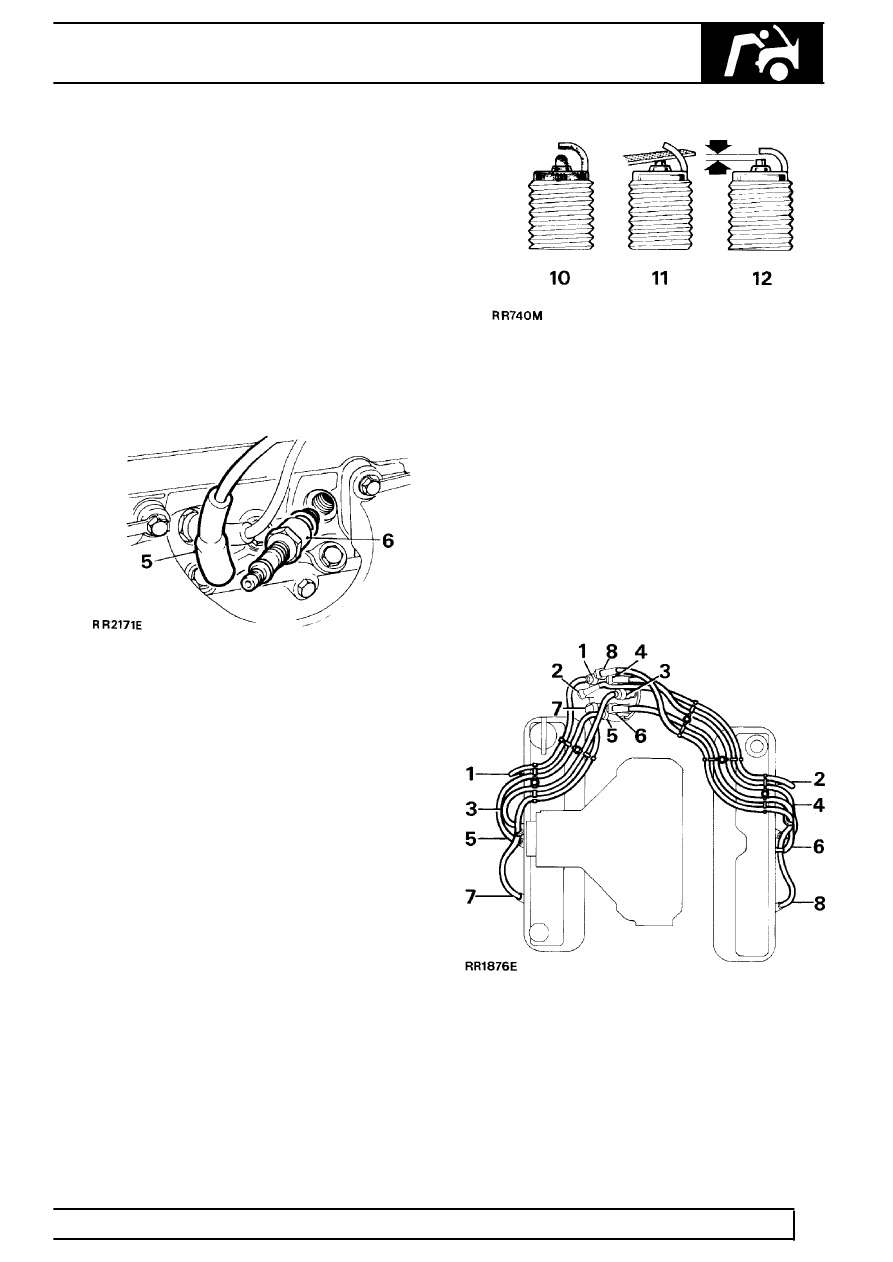
5. Disconnect battery negative lead. Remove H.T.
leads from spark plugs.
6. Remove plugs and washers.
Clean spark plugs
7. Fit plug into 14 mm adaptor of approved spark
plug cleaning equipment. Wobble plug in adaptor
with circular motion for three or four seconds
only with abrasive blast in operation. Important:
Excessive abrasive blasting will lead to severe
erosion of insulator nose. Continue to wobble
plug in adaptor with air only, blasting plug for a
minimum of 30 seconds: this will remove
abrasive grit from plug cavity.
8. Wire-brush plug threads; open gap slightly, and
vigorously file electrode sparking surfaces using
a point file. This operation is important to ensure
correct plug operation by squaring electrode
sparking surfaces.
9. Set electrode gap to recommended clearance.
10. Shows dirty plug.
11. Filing plug electrodes.
12. Clean plug, set to correct gap.
13. Test plugs in accordance with plug cleaning
machine manufacturers’ recommendations.
14. Satisfactory plugs can be refitted.
15. When pushing leads onto plugs, ensure that
shrouds are firmly seated.
Fitting H.T. leads
16. Ensure replacement H.T. leads are correctly
refitted as illustrated.
Failure to observe this instruction may result in
cross-firing between two closely fitted leads
which are consecutive in firing order.
Parts & tools for this job For Land Rover Range Rover
- PARTOil filterSearch: Land Rover Range Rover oil filter
- TOOLOil filter wrenchSearch: oil filter wrench
- FLUIDEngine oilSearch: Land Rover Range Rover engine oil
Links open Amazon search results in a new tab. As an Amazon Associate I earn from qualifying purchases.