
LOWER STEERING SHAFT AND UNIVERSAL JOINTS
- Make
- Land Rover
- Model
- Range Rover Classic
- Section
- REPAIR › LOWER STEERING SHAFT AND UNIVERSAL JOINTS
STEERING
9
REPAIR
LOWER STEERING SHAFT AND UNIVERSAL
JOINTS
Service repair no - 57.40.25
CAUTION: Before removing any parts of
steering linkage, it is imperative that road
wheels are positioned straight ahead.
Then steering wheel removed to prevent rotary
coupler being wound up or damaged.
CAUTION: After refitting steering linkage
parts follow correct procedure to ensure
that road wheels, steering box and
steering wheel are correctly positioned relative to
each other when in straight ahead condition. If
steering wheel requires repositioning, ensure that
drive pegs on rotary coupler are correctly
positioned before steering wheel is replaced.
This ensures drive pegs locate in their holes in
rear of steering wheel.
After final alignment connect rotary coupler,
tighten steering wheel securing nut and fit air bag
module - if fitted or steering wheel trim pad.
Remove
1. Ensure road wheels are straight ahead.
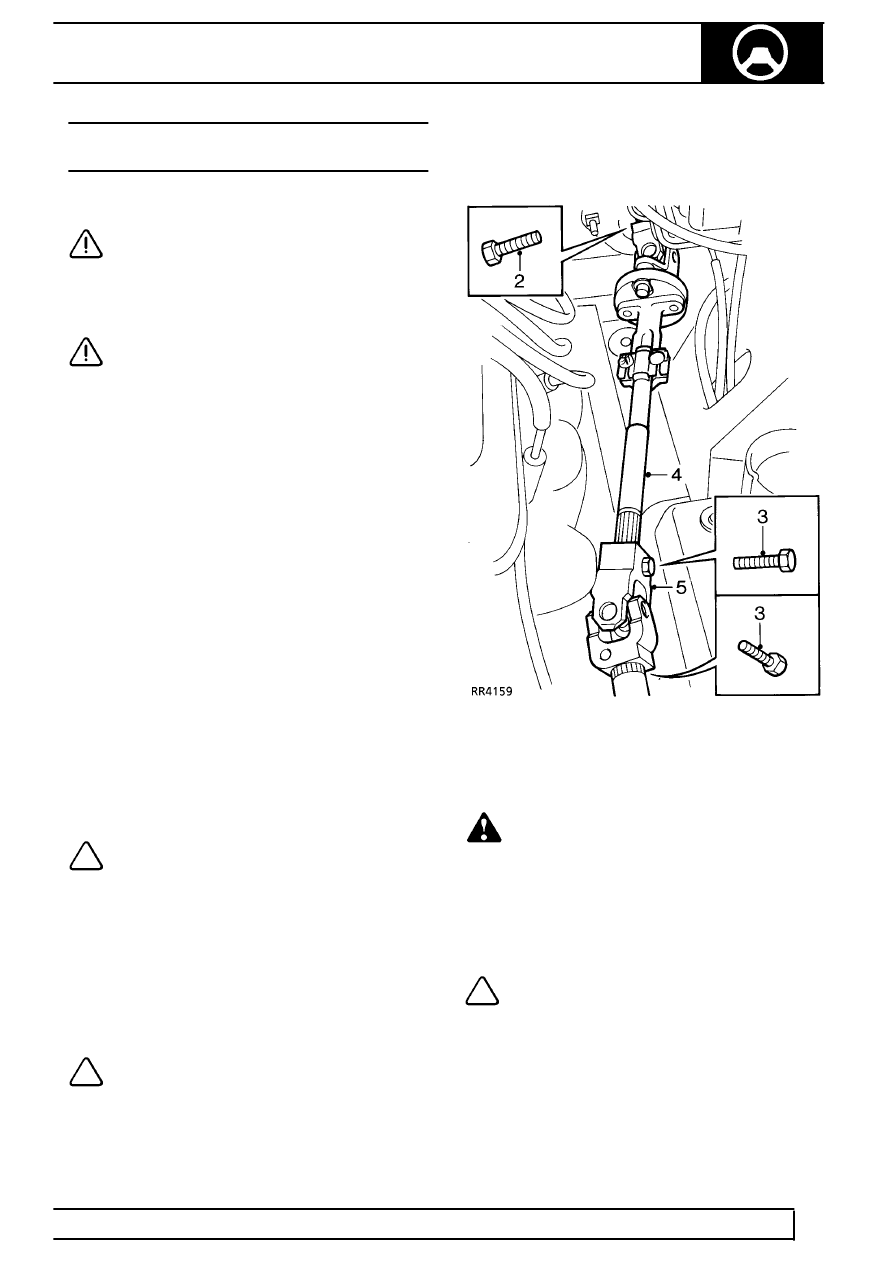
2. Remove pinch bolt securing top universal joint to
steering column.
3. Remove 2 pinch bolts securing lower universal
joint.
4. Move lower shaft up to release lower universal
joint from steering box splines. Remove lower
shaft.
5. Remove universal joint from lower shaft.
NOTE: Do not dismantle upper coupling
joint. Steering shaft, rubber coupling and
top universal joint is only available as an
assembly.
6. Inspect lower universal joint for wear and
excessive play, renew if necessary.
7. Inspect top universal joint and rubber coupling,
renew lower shaft as an assembly if necessary.
8. Inspect universal joints for stiffness, lubricate if
necessary.
NOTE: Prior to fitting a replacement
steering shaft check the following:
9. Release stud fasteners securing heat shield (if
fitted).
10. Check that indicator clip coloured red is fully
inserted under head of compression joint bolt.
WARNING: If clip is displaced, no attempt
must be made to drive clip into
engagement, a new shaft assembly must
be fitted.
11. Secure heat shield stud fasteners (if fitted).
Refit
NOTE: Fit universal joints so pinch bolt
holes line up with flat on shaft.
12. Position lower universal joint on shaft.
13. Position shaft assembly onto steering column.
Move assembly up spline to enable lower
universal joint to fit onto steering box splines.
14. Align bolt holes with grooves in splines. Fit pinch
bolts. Tighten to
25 Nm.
Parts & tools for this job For Land Rover Range Rover
- TOOLTie rod end toolSearch: tie rod end puller
- TOOLBall joint separatorSearch: ball joint separator
- FLUIDPower steering fluidSearch: Land Rover power steering fluid
Links open Amazon search results in a new tab. As an Amazon Associate I earn from qualifying purchases.