
AIRBAG HARNESS
- Make
- Land Rover
- Model
- Range Rover Classic
- Section
- REPAIR › AIRBAG HARNESS
75
SUPPLEMENTARY RESTRAINT SYSTEM
10
REPAIR
9. Carefully remove 2 screws securing face plate to
tachometer.
10. Release warning light housing from tachometer
circuit board.
11. Carefully (to avoid damage to tachometer needle
and spindle), tilt and remove warning light
housing.
12. Remove 2 warning light bulbs
Refit
13. Reverse removal procedure.
14. Fit new warning light bulbs
15. Carefully fit warning light housing, ensuring that
locating pegs engage correctly and that retaining
clips lock housing into position.
16. Ensure that tachometer needle is on the correct
side of its stop.
17. Fit instrument panel.
See ELECTRICAL,
Repair, Instrument Binnacle
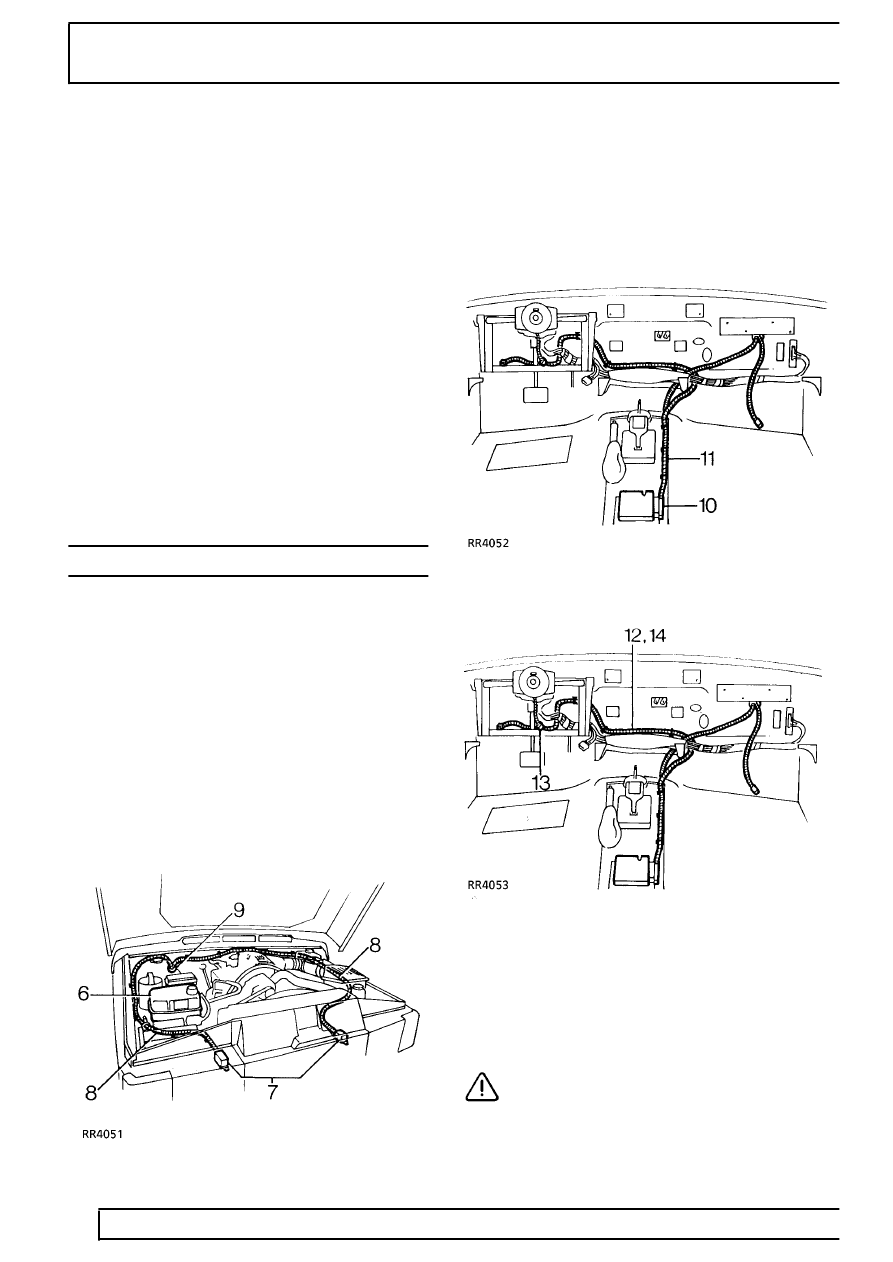
AIRBAG HARNESS
Service repair no - 76.70.63
Remove
1. Remover driver’s airbag.
See Driver’s Airbag
module
2. Remover passenger’s airbag.
See
Passenger’s Airbag Module
3. Remove fascia panel assembly.
See CHASSIS
AND BODY, Repair, Dash Panel Assembly
4. Remove heater blower unit.
See HEATING
AND VENTILATION, Repair, Blower Motor
Unit - Heater and Air Conditioning
5. Remove heater and cooler unit.
See AIR
CONDITIONING, Repair, Heater and Cooler
Unit
6. Remove 3 screws securing expansion tank and
position expansion tank aside.
7. Disconnect multiplug from each crash sensor.
8. Release airbag harness from clips and ties along
the bulkhead and each valance.
9. Displace airbag harness grommet to inside of
bulkhead and feed harness through bulkhead.
10. Disconnect multiplug from airbag control unit.
11. Release airbag harness from under carpet.
12. Release ties securing harness along toeboard.
13. Disconnect steering wheel airbag multiplug.
14. Release airbag harness from driver’s side and
remove.
Refit
15. Reverse removal procedure.
CAUTION: Ensure harness is correctly
routed in harness protector and that all
securing clips and ties are correctly
engaged and harness is undamaged. Ensure all
connections are fully engaged and retained by
their latches.
Parts & tools for this job For Land Rover Range Rover
- TOOLOBD2 scanner with SRSSearch: OBD2 scanner ABS SRS
- TOOLTrim removal tool kitSearch: trim removal tool kit
Links open Amazon search results in a new tab. As an Amazon Associate I earn from qualifying purchases.