
FRONT DOOR
- Make
- Land Rover
- Model
- Range Rover Classic
- Section
- REPAIR › FRONT DOOR
76
CHASSIS AND BODY
22
REPAIR
FRONT DOOR
Service repair no - 76.28.07
Remove
1. Disconnect battery negative lead.
2. Open door to be removed.
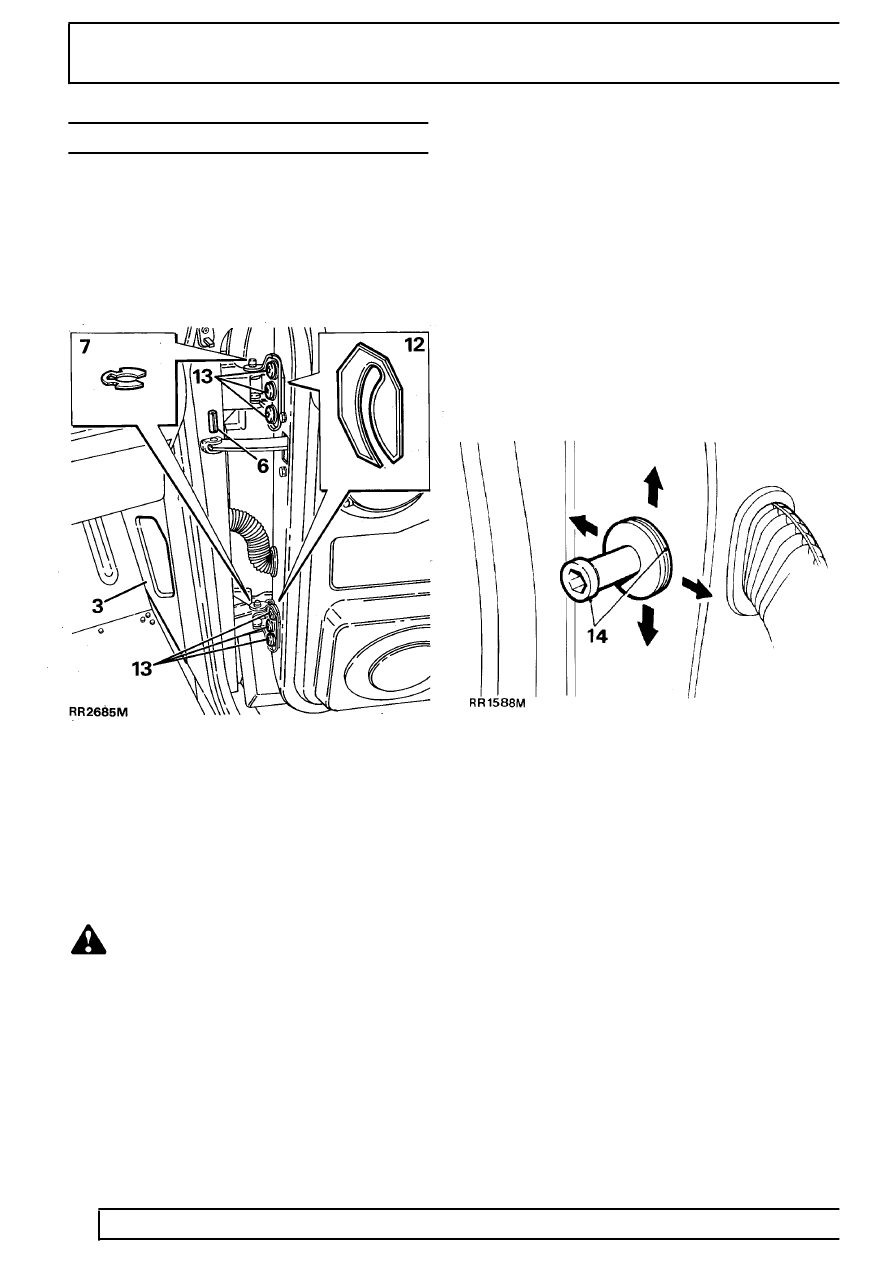
3. Remove 2 clips securing trim panel to side of
footwell.
4. Locate and disconnect door wiring plugs.
5. Disengage grommets either side of A’ post.
Feed wiring out.
6. Drive out roll pin from door check link.
7. Remove ’C’ clips from hinge pins.
WARNING: Instruction 8 MUST BE carried
out with assistance.
8. Lift opened door off hinge pins.
Refit
9. Reverse removal procedure. Renew clips if worn
or distorted.
10. Open door, connect wiring plugs. Ensure they
locate above trim panel.
11. Check operation of door and lock. If necessary,
adjust door and striker plate.
Adjust
12. Adjust door by shims between hinge and door to
move door forward or rearward in opening.
13. Loosen 6 screws securing hinges to door to
adjust door up and down or in and out of
opening. Tighten to
25Nm.
14. Adjust door lock striker by adding and
subtracting spacing washers or moving in
required direction.
15. Note: If it is necessary to remove hinges from ’A’
post. Refit in exactly same position using same
thickness of shims.
Parts & tools for this job For Land Rover Range Rover
- TOOLTrim removal tool kitSearch: trim removal tool kit
- PARTTouch-up paintSearch: Land Rover touch up paint
- PARTPanel clip assortmentSearch: Land Rover panel clips assortment
Links open Amazon search results in a new tab. As an Amazon Associate I earn from qualifying purchases.