
Rear quarter assembly - 5-door
- Make
- Rover
- Model
- 200 Body Repair Manual
- Year
- 1995–1999
- Section
- Repairs › Rear quarter assembly - 5-door
Panel repairsRear quarter assembly - 5-door · page 1 of 2
REAR QUARTER ASSEMBLY - 5-DOOR
Remove
- Disconnect battery earth lead.
- Raise side of vehicle.
WARNING: Place on safety stands.
- Disconnect all ECUs.
- Disconnect airbags and sensor system.
WARNING: See RESTRAINT SYSTEMS, Precautions.
- Disconnect alternator.
- Remove rear quarter trim casing. See BODY, Interior trim components.
- Remove rear quarter lower trim casing. See BODY, Interior trim components.
- Remove rear treadplate. See BODY, Exterior fittings.
- Remove rear bumper. See BODY, Exterior fittings.
- Remove rear seat belt. See BODY, Seats and seat belts.
- Remove headlining. See BODY, Interior trim components.
- Remove rear seat cushion. See BODY, Interior trim components.
- Remove rear seat squab. See BODY, Interior trim components.
- Remove luggage compartment side carpet. See BODY, Interior trim components.
- Remove luggage compartment trim casing. See BODY, Interior trim components.
- Remove parcel tray support panel. See BODY, Interior trim components.
- Remove parcel tray. See BODY, Interior trim components.
- Remove tail lamp. See Workshop Manual, Electrical, Repairs.
- Remove luggage compartment lamp. See Workshop Manual, Electrical, Repairs.
- Remove fuel tank. See Workshop Manual, Fuel delivery system, Repairs.
- Remove rear door.
Refit
NOTE: In this operation, the rear quarter assembly and rear body side are replaced in combination. The panel may be replaced either complete, OR as a part panel with the shaded section discarded from the new panel as shown.
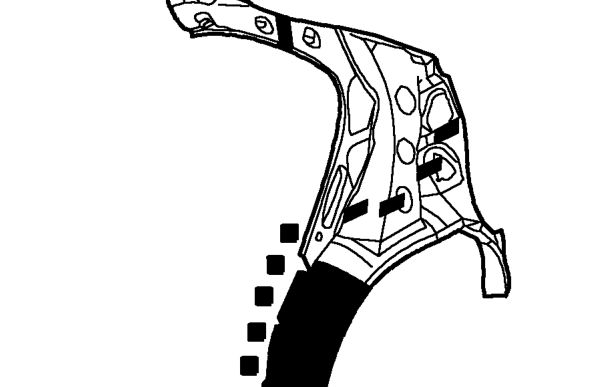
- Prepare and clean panel joint faces. Punch or drill holes in new panel for plug welding, and cut panel to form seam welded butt joints as shown. In addition to plug welds, make seam welds to inner wheelarch.
- Refit rear door.
- Refit fuel tank. See Workshop Manual, Fuel delivery systems.
- Refit luggage compartment lamp. See Workshop Manual, Electrical, Repairs.
- Refit tail lamp. See Workshop Manual, Electrical, Repairs.
- Refit parcel tray. See BODY, Interior trim components.
- Refit parcel tray support panel. See BODY, Interior trim components.
- Refit luggage compartment trim casing. See BODY, Interior trim components.
- Refit luggage compartment side carpet. See BODY, Interior trim components.
- Refit rear seat squab. See BODY, Interior trim components.
Parts & tools for this job For 1995 Rover 200
- TOOLTrim removal tool kitSearch: trim removal tool kit
- PARTTouch-up paintSearch: Rover touch up paint
- PARTPanel clip assortmentSearch: Rover panel clips assortment
Links open Amazon search results in a new tab. As an Amazon Associate I earn from qualifying purchases.