
Rear body side - 3-door
- Make
- Rover
- Model
- 200 Body Repair Manual
- Year
- 1995–1999
- Section
- Repairs › Rear body side - 3-door
Panel repairsRear body side - 3-door · page 1 of 2
REAR BODY SIDE - 3-DOOR
Remove
- Disconnect battery earth lead.
- Raise side of vehicle.
WARNING: Place on safety stands.
- Disconnect all ECUs.
- Disconnect airbags and sensor system.
WARNING: See RESTRAINT SYSTEMS, Precautions.
- Disconnect alternator.
- Remove rear quarter trim casing. See BODY, Interior trim components.
- Remove rear quarter lower trim casing. See BODY, Interior trim components.
- Remove front treadplate. See BODY, Exterior fittings.
- Remove rear quarter rubbing strip. See BODY, Exterior fittings.
- Remove rear bumper. See BODY, Exterior fittings.
- Remove rear quarter glass. See BODY, Exterior fittings.
- Remove front seat. See BODY, Seats and seat belts.
- Remove front seat belt and pre-tensioner. See RESTRAINT SYSTEMS, Repairs.
- Remove rear seat belt. See BODY, Seats and seat belts.
- Remove headlining. See BODY, Interior trim components.
- Remove rear seat cushion. See BODY, Interior trim components.
- Remove rear seat squab. See BODY, Interior trim components.
- Remove luggage compartment side carpet. See BODY, Interior trim components.
- Remove luggage compartment trim casing. See BODY, Interior trim components.
- Remove parcel tray support panel. See BODY, Interior trim components.
- Remove parcel tray. See BODY, Interior trim components.
- Remove tail lamp. See Workshop Manual, Electrical, Repairs.
- Remove luggage compartment lamp. See Workshop Manual, Electrical, Repairs.
- Remove fuel tank. See Workshop Manual, Fuel delivery system, Repairs.
- Remove door.
NOTE: BRM: It will be necessary to straighten rear wheel arch flange prior to removing panel. See Body Side Assembly - 3 Door - remove.
Refit
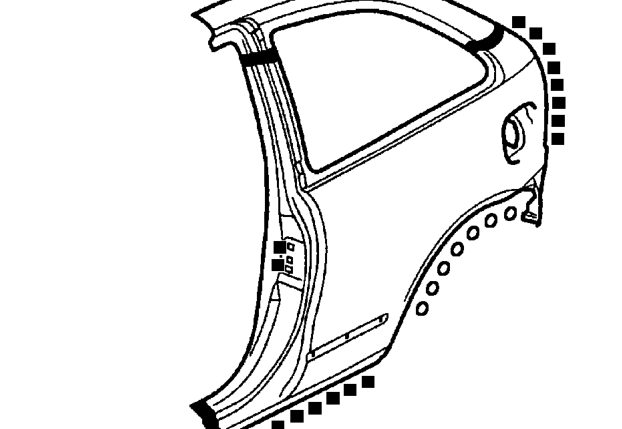
- Prepare and clean panel joint faces. Punch or drill holes in new panel for plug welding, and cut panel to form seam welded joints as shown.
WARNING: Remove ALL traces of adhesive from inner sill lower edge before plug welding.
BRM: In order to prevent a possible foul condition between the tyre and rear wheel arch, it will be necessary to dress the wheel arch flange upwards. See Body Side Assembly - 3 Door - refit.
- Refit door.
- Refit fuel tank. See Workshop Manual, Fuel delivery system, Repairs.
- Refit luggage compartment lamp. See Workshop Manual, Electrical, Repairs.
- Refit tail lamp. See Workshop Manual, Electrical, Repairs.
- Refit parcel tray. See BODY, Interior trim components.
Parts & tools for this job For 1995 Rover 200
- TOOLTrim removal tool kitSearch: trim removal tool kit
- PARTTouch-up paintSearch: Rover touch up paint
- PARTPanel clip assortmentSearch: Rover panel clips assortment
Links open Amazon search results in a new tab. As an Amazon Associate I earn from qualifying purchases.