
Airbag harness ’k’ ’l’ and ’t’ series (page 3 of 3)
- Make
- Rover
- Model
- 400 Workshop Manual
- Year
- 1995–2000
- Section
- Repairs
Restraint systemsAirbag harness ’k’ ’l’ and ’t’ series · page 3 of 3
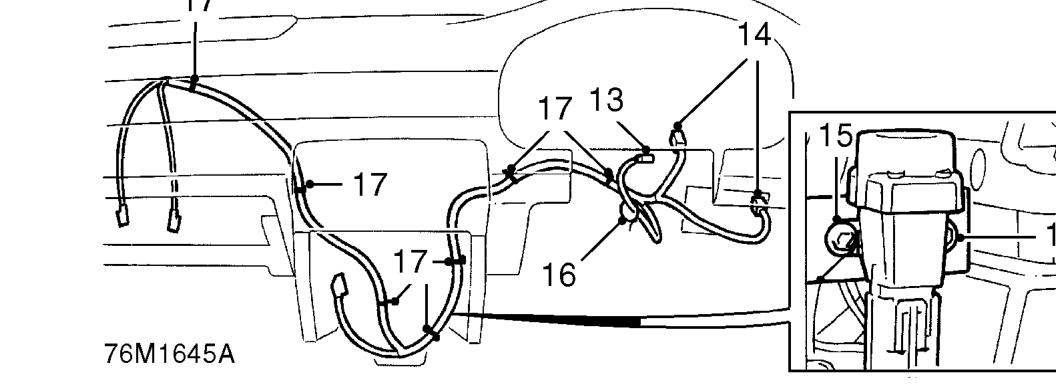
- Disconnect multiplug from rotary coupler.
- Disconnect airbag harness from main harness and fuse box.
- Remove cable strap airbag harness to column switch harness.
- Remove 2 bolts and move inertia switch and relay bracket clear of airbag harness clip.
- Release 7 clips and remove airbag harness.
Refit
- Fit new airbag harness and secure with clips.
- Fit cable strap to secure airbag harness to column switch harness.
- Position inertia switch and relay brackets and fit bolts.
- Connect airbag harness to main harness and fuse box.
- Connect multiplug to rotary coupler.
- Connect multiplugs to passenger airbag.
- Connect multiplug to control and diagnostic unit.
- Align earth wire to control and diagnostic unit bracket and tighten Torx screw to 10 Nm.
- Fit protective cover over control and diagnostic unit and fit 2 studs to secure.
- Reposition carpet over control and diagnostic unit protective cover.
- Fit foot rest and fit and tighten bolts.
- Fit front console. See BODY, Interior trim components.
- Fit glove box. See BODY, Interior trim components.
- Fit upper and lower portions of nacelle and secure with screws.
- Fit closing panel and secure with screws.
- Fit pocket to closing panel.
- Connect both battery leads, earth lead last.
- Carry out system check by turning the ignition on and checking that the SRS warning light illuminates then extinguishes after 3 seconds.
Parts & tools for this job For 1995 Rover 400
- TOOLOBD2 scanner with SRSSearch: OBD2 scanner ABS SRS
- TOOLTrim removal tool kitSearch: trim removal tool kit
Links open Amazon search results in a new tab. As an Amazon Associate I earn from qualifying purchases.