
Gear selector axle: repair
- Make
- SEAT
- Model
- Leon Mk1
- Section
- 02J 5-speed manual gearbox › Gearbox mechanics,operation, construction,diff. › Gear selector axle: repair
Power transmissionGear selector axle: repair
|
|

|
|

|
| Assembly chart |
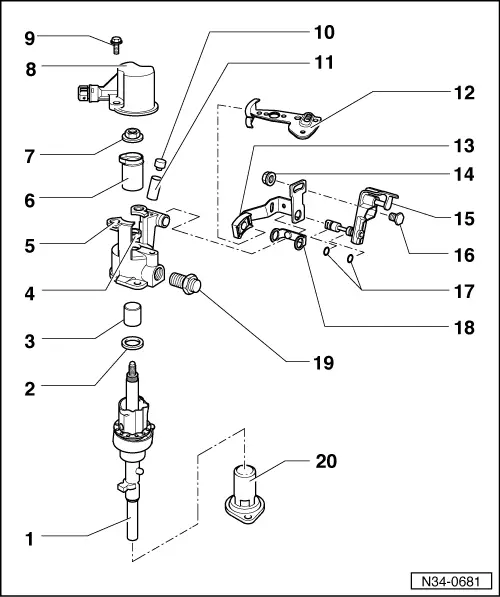
| 1 - | Selection axle |
| 2 - | Stop ring |
| 3 - | Ball bearing sleeve |
| q | Dismount → Fig. |
| q | Assemble → Fig. |
| 4 - | Seal ring |
| q | Remove by levering with a screwdriver |
| q | Assemble → Fig. |
| 5 - | Connection top |
| 6 - | Crown |
| q | The bead faces towards the switch for the reverse gear light |
| q | Apply a fine layer of -MoS2- grease onto the bead |
| 7 - | Hexagonal nut, 25 Nm |
| q | Self-blocking |
| q | Always replace |
| 8 - | Support |
| q | For the reverse gear light switch. |
| 9 - | Bolt |
| 10 - | Top |
| q | Vent top for the gearbox. |
| 11 - | Sleeve |
| q | Fit it to the end, if it comes as an individual component |
| 12 - | Selection lever |
| q | Position for assembly: The cog of the gear stick only fits in with the cog of the gear stick in one position |
| q | It can be changed with the gear stick mounted in the vehicle |
| q | Position for assembly → Chapter |
| 13 - | Return lever |
| 14 - | Nut, 15 Nm |
| 15 - | Drag part |
| q | With the axle for housing the return lever |
| q | Position for assembly → Chapter |
| 16 - | Bolt |
| q | Insert it into the drag part. |
| 17 - | O-ring seals |
| q | Assemble them on the axle of the drag parts. |
| 18 - | Separating part |
| q | Insert it on the return lever |
| 19 - | Bolt for blocking, 40 Nm |
| 20 - | Seal top |

|

|
|

|
The same page in: Leon Mk2.
Parts & tools for this job For SEAT Leon
- PARTClutch kitSearch: SEAT Leon clutch kit
- TOOLClutch alignment toolSearch: clutch alignment tool
- FLUIDGear oilSearch: SEAT Leon manual gearbox oil
Links open Amazon search results in a new tab. As an Amazon Associate I earn from qualifying purchases.