
Mig welding
- Make
- Alfa Romeo
- Model
- 145/146 Factory Service Manual
- Year
- 1994–1999
- Section
- Body - Generalities › Mig welding
BodyworkMig welding
b. Test to be carried out after welding using a hammer and chisel.
- Insert the point of a chisel between the welded sheets and lightly tap the chisel until a gap of 3-4 mm is obtained. If no warping is found then the welding is acceptable.
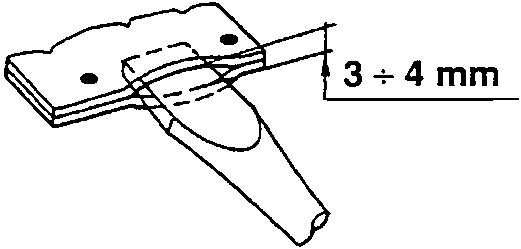
- If the gauge of the sheets in not equal the gap should be restricted to 1.5 - 2 mm.
- It should be remembered that the above values are for reference only.
- The gap can vary depending on the position of the spot-welds, length of the flange, thickness of the sheet, welding angle and other factors. To avoid breaking the spot-welds do not exceed these limits.
- Ensure that the damaged parts are repaired after testing.
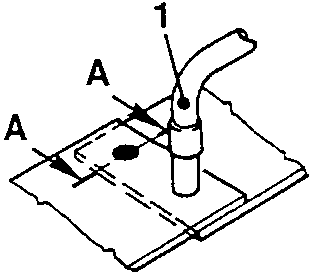
- Blowtorch
- Welding point
b. Head-welding.
- Tack the two surfaces by welding intermittently in order to align correctly and prevent buckling. Fill the empty spaces with small welding seams.
NOTE: The correct gap is approx. 1 mm.
NOTE: If welding is intermittent deformation is less. If welding is continuous deformation is greater.
- Do not weld a continuous seam as buckling may occur. In order to reduce buckling proceed as shown in the diagram.

After welding sand the weld following the shape of the part. If any holes are left in the weld fill them and then sand.
MIG WELDING
- Use MIG welding for parts where spot-welding cannot be used.
Conditions of the panel to be welded.
Remove all traces of foreign materials by sanding or brushing. Paint, rust or oil on the surface of the sheet may reduce the welding strength and cause blistering.
Welding indications.
a. Filler welding (of prepared holes).
- Drill a hole 5 to 6 mm in diameter on one of the sheets to be welded and secure the sheets together.
- Position the blowpipe at right-angles to the sheet and fill the hole. At each interruption in the welding process an oxide coating is formed on the surface which causes blistering. If this occurs remove the oxide with a brush.
- Ensure that the welding of the upper and lower sheets is perfect.
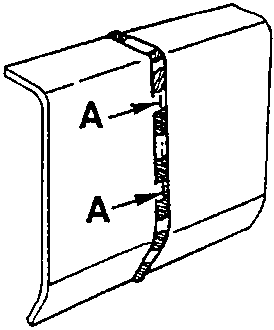
- Part of the seam-weld to be flushed.
Inspecting filler-welds
This procedure is similar to that previously described for spot-welding.
Parts & tools for this job For 1994 Alfa Romeo 145/146
- TOOLTrim removal tool kitSearch: trim removal tool kit
- PARTTouch-up paintSearch: Alfa Romeo touch up paint
- PARTPanel clip assortmentSearch: Alfa Romeo panel clips assortment
Links open Amazon search results in a new tab. As an Amazon Associate I earn from qualifying purchases.