
Exterior lighting
- Make
- Fiat
- Model
- 500 Factory Service Manual
- Year
- 2007–2024
- Section
- General › Exterior lighting
EXTERIOR LIGHTING
COMPOSITION
The vehicle components and their location are illustrated below.
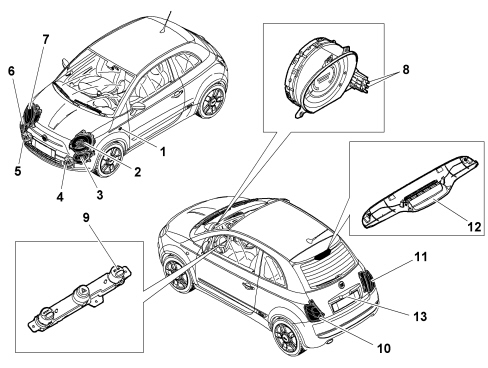
1. Front direction indicator
2. Left upper front light cluster
3. Left lower front light cluster
4. Left fog lamp
5. Right fog lamp
6. Right lower front light cluster
7. Right upper front light cluster
8. Headlamp alignment adjustment on instrument panel
9. Centre Control Panel
10. Left rear light cluster
11. Right rear light cluster
12. Third brake light
13. Number plate lights
The vehicle exterior lighting system has been designed and produced with two objectives in mind:
- guaranteeing maximum efficiency with regard to the international regulations that define the lighting technology specifications for the various components;
- being integrated with the design of the vehicle so that the various components enhance the image.
REAR LIGHT CLUSTER
The vehicle exterior lighting system has been designed and produced with two objectives in mind:
- Guaranteeing maximum efficiency with regard to the international regulations that define the lighting technology specifications for the various components.
- Being integrated with the design of the vehicle so that the various components enhance the image.
The external appearance is that of a one-piece multicoloured unit. A functional decision was taken to fit a one-piece light cluster.
The light cluster carries out the following lighting functions:
- Side light and brake light incorporating red colour.
- Orange direction indicators.
- 1 red rear fog lamp (left)
- 1 clear car reversing light (right)
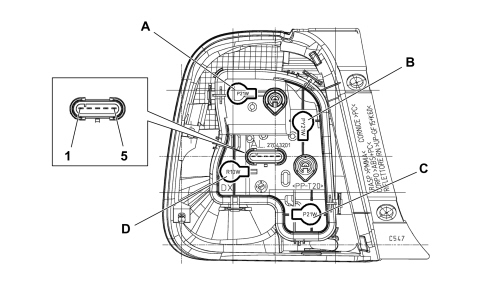
A. P21W Brake light 12W – 21W
B. PY21W Direction indicator 12W - 21W
C. P21W Reversing light 12V- 21W (right side only), Reversing light 12V-21W (left side only)
D. R10W Side lights 12V- 10W
| CONNECTOR PIN OUT | |
|---|---|
| 1 | Position |
| 2 | Brake light |
| 3 | Earth |
| 4 | Reversing light/Rear fog lamp |
| 5 | Direction indicator |
Number plate light
The number plate light function is achieved by means of two light clusters fitted using a metal clip and a reference fastened to the panel.
Each light is fitted with an all-glass C5W bulb (12V - 5W) and should be replaced by removing the light cluster from the panel and the bulb holder from the number plate light, incorporated in the wiring in the rear bumper.
Upper front light cluster structure (dipped headlights)
The unit consists of:
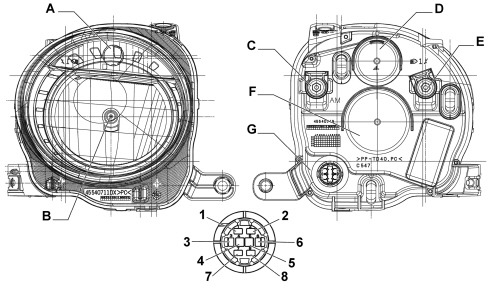
A. Direction indicators
B. Dipped beam lamps
C. Headlight horizontal axis manual adjustment screw
D. Direction indicators rear cover
E. Headlight vertical axis manual adjustment screw
F. Dipped beam lamp rear cover
G. Connector
| CONNECTOR PIN OUT | |
|---|---|
| 1 | Not connected |
| 2 | Not connected |
| 3 | Direction indicator positive |
| 4 | Dipped beam positive |
| 5 | Earth (for headlamp and light adjustment) |
| 6 | Headlamp alignment corrector positive |
| 7 | Headlamp alignment corrector signal |
| 8 | Not connected |
Bulbs present:
- H7LL halogen bulb for dipped headlights function 12V-55W
- WY21W for direction indicators function 12V-21W
The front light cluster is a lamp constructed from a fixed lens reflection technology for all the functions (dipped headlight and main beam headlight).
The headlight includes the dipped beam function and the direction indicator. The corrector is located inside the body. The bulb is accessed by removing the cap at the rear of the headlight body.
The lens cover is made from colourless lacquered CR 120-600 polycarbonate that has undergone scratch-resistant treatments; it is fastened to the casing by means of butyl sealant which should ensure a water-tight seal. It has the task of guaranteeing uniform, standardized brightness without light seeping outside of the dedicated area.
The frame is made from metallic PA80-100.
The headlight body is made from black PP 70-20 polypropylene with a 40% talc content, treated in the drip channel area to allow bonding between body and lens. The cap seat, the connector seat, the light beam adjustment systems seats, and the breather plug seats are located at the rear.
Inside are the seats for the alignment corrector, reflector fastenings, and various hooks.
The fastening system is made up of three brackets with slots on the metallic inserts. The type approval mark and customer logo are stamped on the headlight upper bracket.
The dipped beam and direction indicator reflector is made from BMC LPR 20 with aluminium reflecting surface.
The dipped beam and direction indicator reflector is made from metallic BMC LPR20 thermosetting material with a clear protective coating or equivalent treatment. It is equipped with connections for the fixed point and for horizontal/vertical adjustment so that the light beam does not vibrate even when the road surface is uneven.
Seats for the bulb holders with retaining clips are provided. The bulb holder seat is polarised to prevent incorrect positioning of the bulb.
2 bolts are used for adjustment. Adjustments can be made with the bonnet open using a size 12 jointed hexagonal wrench. The adjustment angles are: manual vertical ± 3° (to compensate for light beam body tolerances), electrical vertical to compensate for alignment variations (2° 30''), horizontal ±1° 30''.
Electrically controlled headlamp alignment corrector
The headlamp alignment device is designed to adjust dipped light beam correctly in a vertical direction irrespective of the load on the axles.
When the ignition key is turned to the MAR position the instrument panel (NQS) does not display either the position (0, 1, 2, 3) or the symbol until the dipped headlights are switched on.
The condition that appears is the last value memorized when the key was turned from MAR to STOP.
With the dipped headlamps on, using the buttons on the side of the instrument panel, it is possible to alter the angle/direction of the light cluster in 4 standard positions: the following loads correspond to the four positions:
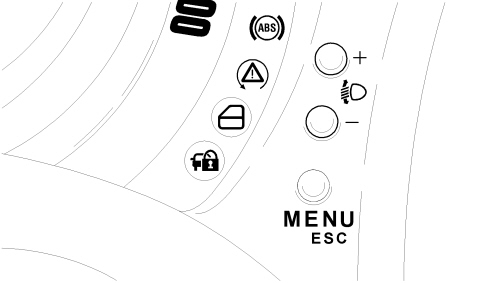
Position 0. one or two persons on the front seats.
Position 1. four persons.
Position 2. four persons + load in the luggage compartment.
Position 3. driver + maximum permitted load stowed in the luggage compartment.
The maximum load refers to: the maximum permitted load on the rear axle or: the total permitted load for the vehicle. The weight of a person is taken as 75 kg.
The instrument panel display shows the position in relation to the adjustment set.
See descriptions 5560 INSTRUMENTS
The headlamp incorporates an electric motor: the latter controls the position by means of a pinion and an adjustment screw suitably tilting the dipped headlamp reflector.
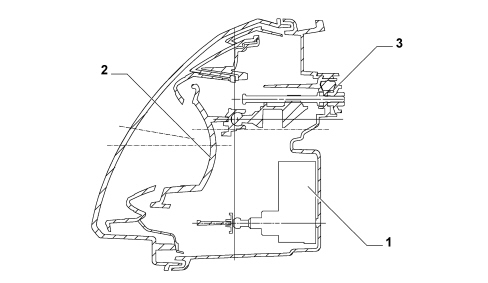
1. Headlamp alignment correction electric motor
2. Dipped headlamp reflector
3. Headlight vertical axis manual adjustment screw
Operation and adjustment (headlamp alignment)
When the key is turned to MAR (key on) and the dipped beam headlights are on, pressing the two adjustment buttons on the frame of the instrument panel alters the angle/direction of the light cluster in 4 standard positions. The positions are stored and displayed on the instrument panel display together with the respective symbol.
In practice, when the instrument panel node receives the increase (CAF+) or decrease (CAF-) signal from the buttons, it checks, by means of a control and adjustment module, whether there is a positive power supply for the dipped headlamps and if this is the case it produces and sends an adjustment signal to the electronics for the headlamp alignment motors. The output signal from the instrument panel (NQS) electronics is a maximum voltage value for position (0) decreasing for the subsequent positions (1-2-3) with an identification level that makes it possible to operate the actuator incorporated in the light cluster for moving the parabola.
Voltage values are shown below according to the selected position:
- Position 0: 90% of power supply voltage
- Position 1: 85% of power supply voltage
- Position 2: 82% of power supply voltage
- Position 3: 79% of power supply voltage
No adjustments can be made with the ignition key in the STOP position (key off).
Prolonged pressing of the adjustment buttons does not cause a progressive change.
Disconnecting the battery or resetting the system causes the value memorized to be lost and the value predefined by the manufacturer, in this case zero (0) is adopted (predefined = default = standard).
Lower front light cluster structure (main beam headlamp)
The unit consists of:
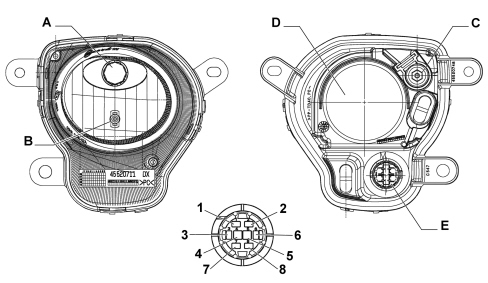
A. Main beam headlights
B. Side light
C. Headlight vertical axis manual adjustment screw
D. Lights rear cover
E. Connector
| CONNECTOR PIN OUT | |
|---|---|
| 1 | Not connected |
| 2 | Not connected |
| 3 | DLR positive for side light |
| 4 | Main beam positive |
| 5 | Earth |
| 6 | Side light positive |
| 7 | Not connected |
| 8 | Not connected |
Bulbs present:
- H1 halogen bulb for main beam headlights function 12V-55W
- W21 for side lights function 12V-5W
Adjustment of light beam orientation is via a screw. Adjustments can be made from the front wheel compartment using a size 12 jointed hexagonal wrench.
The manual vertical adjustment angle is ± 3°.
SIDE DIRECTION INDICATOR LIGHT
The side repeater is illustrated below.
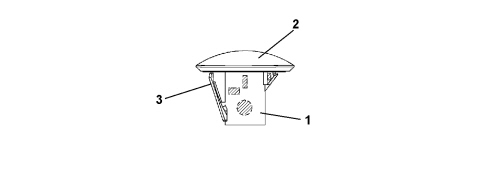
1. Case
2. Colourless lens cover
3. Securing spring
The side light is fitted with the following bulb type: 5W5 12V- 5W in orange.
To replace the small bulb, push the lens cover manually in the opposite direction to the vehicle''s direction of travel in order to compress fastening clip (3). Release the front section and extract the unit. Rotate the bulb holder in an anti-clockwise direction and extract it from the lens cover
ADDITIONAL BRAKE LIGHT
The additional brake light function is performed by a multi-bulb light and a light beam emerging from the rear window screen printing on the upper part of the tailgate trim to create a lit area.
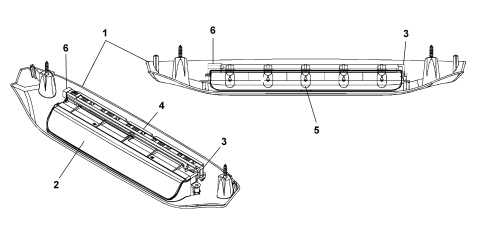
1. Case
2. Lens cover
3. Clip
4. Bulb holder body
5. All-glass bulb W5W 12V- 5W
6. Connector seat
The outer casing is made from a grey coloured plastic material and contains the bulb holder which is in one piece and fastened to the lamp casing. The internal current strips are in brass and supply 5 small all-glass 12V - 5W bulbs when powered.
The lamp is secured to the tailgate by two bolts; the light casing is secured to the outer shell by two bolts.
SWITCHING ON BRAKE LIGHTS (LEFT/RIGHT)
Brake light switch PIN OUT.
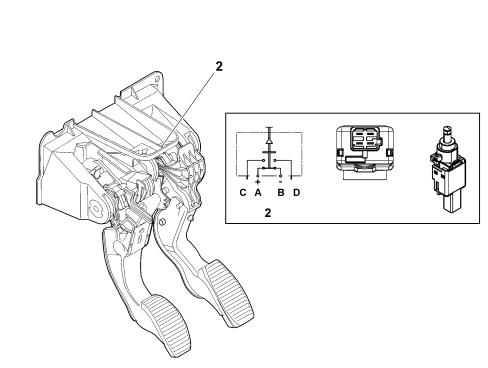
A. Signal for Body Computer (n.o.) connector M001B pin 27 and third brake light power supply
B. From dashboard control unit fuse F37 (key switch) (from M001C pin 7)
C. From dashboard control unit fuse F51 (key switch) (from M001C pin 25) (for versions with robotized gearbox)
D. Signal for Body Computer (n.c.) connector M001B pin 34 (for versions with robotized gearbox)
1. Brake switch seat on pedal unit
2. Electrical diagram of connector with pedal pressed
The brake light function is activated with the ignition key in the MAR position (INT) with voltage.
Position of switch C-D normally closed (n.c.) with pedal released
Position of switch A - B normally open (n.o.) with pedal released
When the pedal is pressed:
- a voltage signal is supplied to the Body Computer Node, which thereby recognizes that the brake pedal is not in the rest position (pedal released) and it supplies the brake lights
- the third brake light is powered directly when the brake pedal switch contact is closed
The Body Computer Node is capable of recognizing the following faults:
- Open circuit (at key-on when command issued): absence of bulb is indicated,
- Short circuit to +VB (at key-on when command issued): bulb fault is indicated.
FOG LAMPS
The fog lights are located in the lower part of the front bumper. The unit has a screw for adjusting the direction of the light beam.
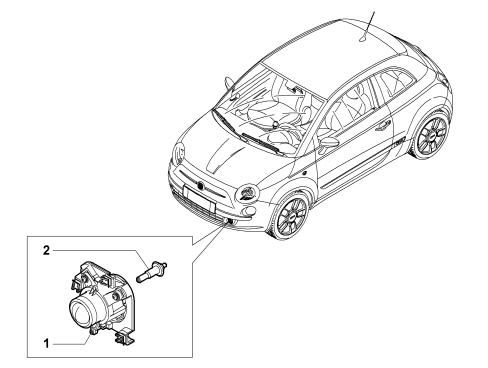
1. Fog lamp light cluster
2. HI 12V 55W bulb
CENTRE CONTROL SWITCH UNIT PANEL
The central control panel is a control module located on the centre console and connected to the dashboard cable, which supplies the power to illuminate the icons, and it houses the following controls:
- Sport (where supplied) / City for electrical guide
- emergency and direction indicator lights
- fog lights (where fitted) rear fog lights
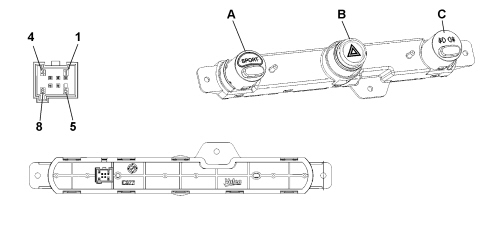
A. Sport/CITY function engagement button
B. Hazard warning lights control button with indicator light
C. Fog and rear fog lamp control button
H090 Connector
| H090 CONNECTOR PIN OUT | |
|---|---|
| 1 | Hazard warning lights on control |
| 2 | Fog lamps and rear fog lamps on control |
| 3 | Earth |
| 4 | n.c. |
| 5 | wiring |
| 6 | +15 power supply icon |
| 7 | City/Sport on control |
| 8 | n.c. |
DIRECTION INDICATORS ON WITH WARNING LIGHTS
The direction indicators function is activated by the following enablements:
- Ignition key in MAR position (INT) with voltage
- The body computer node receives commands in the form of earth signals when the left or the right direction indicator is switched on using the steering wheel interface lever
- It is always the body computer node that manages the frequency (around 90 cycles +/- 15 per minute) that is sent to all the bulbs of the activated branch.
The function activated involves displaying the two left and right direction indicator warning light bulbs located in the instrument panel: the instrument panel (NQS) controls the warning lights in tune with the message status coming from the body computer node.
HAZARD WARNING LIGHT ON WITH WARNING LIGHT
The body computer node (NBC) receives the command to activate the hazard warning lights from the rocker button in the centre panel. It is an earth signal. The frequency of the light flashing; the flashing mode of the warning lights in the instrument panel (NQS) is identical to the description of the direction indicators function with the difference of simultaneously activating all the direction indicators.
An LED at the back of the (HAZARD) control button also comes on synchronized with the flashing of the exterior lights.
ACOUSTIC SIGNALLING OF DIRECTION INDICATORS / HAZARD WARNING LIGHTS
In conjunction with the flashing of the direction indicator warning lights in the instrument panel (NQS) the system provides a low frequency acoustic signal capable of producing a sound with an intensity of around 50dB (decibels) at 100 cm.
SWITCHING ON FOG LIGHTS (RELAY T14)
The fog lamps control function is managed by the Body Computer Node and is activated by the following enablements:
- Ignition key in MAR position (INT/A)
- Switch the side lights on (from steering wheel interface)
- Press the fog lights control button for at least 50 msecs.
- Earth signal sent by the body computer node to the coil for the relay (T14) located in the engine compartment control unit which, on closing, turns on the fog lamps.
When the fog lamps are turned on the NQS receives the associated signal via the B-CAN and so indicates "fog lamps on" by switching on the associated warning light.
The fog lights can be switched off if there is no signal (INT/A) or side lights signal or by pressing the fog lights control button again for at least 50 msecs.
LEFT REAR FOG LAMP ON WITH WARNING LIGHT
The rear fog lamp function is activated by the following enablements:
- Ignition key in MAR position (INT) with voltage
- Switch the side lights on (from steering column interface)
- Activate the head lights (dipped or main beam) or the fog lights
- Press the rear fog lamp control button for at least 50 msecs.
- The Body Computer Node receives the earth signal from the fog lamp button and activates the light on the left lamp and transmits the fog lamp command status via the B-CAN to activate/deactivate the indicator on the instrument panel.
- The instrument panel node downloads the fog lamp status signal from the B-CAN and indicates the "fog lamps on" by illuminating the associated warning light on the control panel.
The Body Computer Node is capable of recognizing the following faults:
- Open circuit (at key-on when command issued): absence of bulb is indicated,
- Short circuit at GND (at key-on when command issued): bulb short circuit indicated,
- Short circuit to +VB (at key-on when command issued): bulb fault is indicated,
- Bulb check (at key-on when command issued): if the 21W bulb is replaced with a 5W bulb, bulb absence is indicated.
REVERSE GEAR ENGAGEMENT
The reversing light function is only activated with:
- Ignition key in MAR position (INT) with voltage
- The bulb is supplied directly by the reversing light switch via the Engine Compartment Control Unit.
LIGHTS OPERATION
All the controls for operating the lighting system are located on the steering wheel interface. The user should use the main switch (ring nut) to turn the side lights on and the one on the left lever for the main beam/dipped headlights (both stable and flashing position).
The fog lights are switched on by pressing the special button in the centre switch panel in the dashboard.
For more details on the operation of the side lights, main beam/dipped headlamps, fog lights and direction indicators for changing lane, see
See descriptions 5550 WARNING AND MANOEUVRING INDICATORS
AUTOMATIC SWITCHING ON AND OFF OF SIDE LIGHTS/DIPPED HEADLAMPS (FOLLOW ME HOME FUNCTION)
This function allows the side lights and dipped beam to be switched on after turning the car off (Key-OFF).
Activation of the function
The function can only be activated within 2 minutes of Key-OFF (transition from Key-ON), via the light flash command from steering wheel interface ("follow me home" activation).
Following this command, the Body Computer Node switches the side lights and the main beam headlights on for 30 seconds and sends the associated signal via the B-CAN.
The NQS reads the flashing light command on the B-CAN and sets the time for the "follow me home" indicator at 30 seconds.
Increase in follow me home time
Each time a light flash command is issued using the steering wheel interface, the NBC further increases the time the lights remain on by 30 seconds up to a maximum of 210 seconds (7 commands) when the function is active (side lights and dipped beam on) for up to 2 minutes from Key-OFF. At every flashing light command with follow me home active, the NBC sends the associated signal independent of the number of controls already received, via the B-CAN.
Every time the signal is read, the NQS increases the follow me home indicator time by 30 seconds. Like the NBC, the NQS can accept a maximum of 7 commands and ignores later commands.
Every time the lever is operated, the side lights warning light switches on, on the instrument panel and on the display, for the time that the function remains active.
The warning light comes on when the stalk is pulled for the first time and stays lit until the function switches itself off automatically. Each time the lever is activated the time the lights are on increases.
Deactivating the function
When the light flash command is kept on for more than 2 seconds, the NBC will switch off the side lights and dipped beam and will reset the time counter governing the time the lights remain on and the 7 valid commands counter. The command to switch off the function does not necessarily need to be given within 2 minutes of Key-OFF, it can be one of the 7 valid commands for increasing the time that the lights remain on.
The follow me home function only needs to be active for the command to be valid.
Consequently, the NQS resets the time for the follow me home indicator, and the received commands counter.
After deactivation, the follow me home function can be activated again using the flasher lever within 2 minutes of the Key OFF.
Completing the function
At the end of the lights-on time, timed by the NBC, the follow me home function is deactivated and the NBC turns off the side lights and dipped beam and resets the 7 valid commands counter. Consequently, the NQS resets the time for the follow me home indicator and the received commands counter.
All the times described above have a tolerance of 5%
Key-ON: Switching from Key-OFF to Key-ON with follow me home active deactivates the function and all lights are turned off. After deactivation, the follow me home function can be activated again using the flasher lever within 2 minutes of the Key OFF.
Follow me home indicator
Each activation of the function that falls within the 7 valid commands for activation/increase of the follow me home period, causes the NQS to activate the follow me home indicator and to display the lights activation time in seconds, stored and updated when the control logic was executed. This indicator remains active for 20 seconds.
During these 20 seconds the indicator will switch off if the command to deactivate the follow me home is given.
Upon timed deactivation of the function (lights-on time counter reset by the NBC) the follow me home indicator is already off because the time it remains on (20 seconds) is less than the minimum lights-on time (30 seconds).
ACTIVATING SIDE LIGHTS AND WARNING LIGHT ON PANEL
The side lights function is activated by two enablements:
- Ignition key in MAR position (INT) and (POS) with voltage
- Steering wheel interface wheel turned from position (0) to side lights/dipped beam on position.
The Body Computer Node separately powers the right and left side (front and rear) side lights as well as the two number plate lights.
The side lights warning light located in the instrument panel is activated or deactivated by the Body Computer Node via the CAN and the instrument panel (NQS) also has the task of activating the night-time lighting of the screen-printing.
Since the side light branches are all separate the Body Computer Node is capable of recognizing the following problems:
- Open circuit or missing bulb
- Short circuit to earth (bulb s.c. or wiring s.c. to earth)
- Short circuit to +VB (wiring short circuited to Vbatt)
- Replacement of 5W bulb with 21W bulb
- Replacement of 21W bulb with 5W bulb
ACTIVATING PARKING LIGHTS
The parking lights function uses the side light bulbs as a load and is activated by switching on the side lights (wheel on the steering wheel interface) with Key-OFF as described below:
- turning the wheel on the right lever of the steering wheel interface to the side lights/low beam on position. If the left and right direction inputs on the stalk are deactivated the side/parking lights on both sides will come on including the number plate lights and the warning light in the instrument panel (NQS).
- on the stalk: input "right direction indicator not activated" and "left direction indicator activated" input, only the left side/parking lights, the instrument panel warning light (NQS) are lit and the number plate lights remain off.
- on the stalk: input "left direction indicator not activated" and "right direction indicator activated", only the right side/parking lights, the warning light in the instrument panel (NQS) are lit and the number plate lights remain off.
If the user has left the side lights on at Key-OFF, the parking lights will not switch on. To switch them on, the user must turn the wheel to OFF and then to the side lights on position.
The command has one position.
At the next key-on, the side lights come on when a parking light control is given. The parking lights are switched on independently of the period of time from Key-OFF and of the presence of the key in the ignition.
DAYTIME LIGHTS (D.R.L.)
With the left lever wheel turned to the position shown in the figure
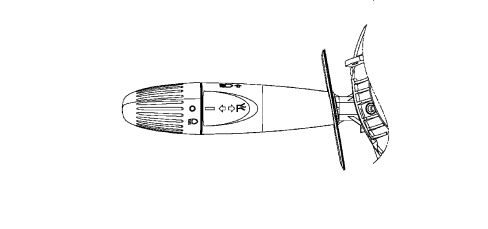
The Body Computer Node activates the front daytime bulbs (side light bulbs: 5W filament), while the rear bulbs and the interior lighting remain switched off. When the dipped beam is activated, the daytime lights are switched off and the side lights and dipped beam are switched on.
The daytime lights can be activated/deactivated via the menu on the display
The daytime lights function is activated by two enablements:
- Ignition key to MAR (INT).
- Steering wheel interface wheel turned to position (0). The Body Computer Node separately powers the right and left side daytime lights.
Since the daytime light branches are all separate the Body Computer Node is capable of recognizing the following problems:
- Open circuit or missing bulb
- Short circuit to earth (bulb s.c. or wiring s.c. to earth)
- Short circuit to +VB (wiring short circuited to Vbatt)
- Replacement of 5W bulb with 21W bulb
See descriptions 5560 INSTRUMENTS
If the daytime lights are deactivated when the wheel is turned to the position illustrated above, no lights will turn on.
ACTIVATING NUMBER PLATE LIGHTS
At the side lights on command, the Body Computer Node simultaneously switches on the number plate lights, and when the side lights on command stops, the number plate lights are immediately switched off.
At the parking lights on command and with no right or left direction command from the steering wheel interface, the Body Computer Node immediately switches the number plate lights on; when the parking lights on command stops, the number plate lights are immediately turned off.
The number plate lights are diagnosed independently after the fault warning is given, when one bulb is also not working, or is not working correctly, the Body Computer Node is able to detect the following faults:
- Open circuit at key-on and when command is issued: bulb absence warning.
- Short circuit at GND at key-on and when command is issued: bulb short circuit warning.
- Short circuit to +VB at key-on and when command is issued: faulty bulb warning
ACTIVATING DIPPED BEAM LIGHTS AND WARNING LIGHT ON PANEL
The dipped headlamps function is activated by the following enablements:
- Ignition key in MAR position (15/54) with voltage
- Steering wheel interface wheel turned from symbol (0) to the dipped beam position (earth signal sent by steering wheel interface to Body Computer Node)
- Electronic earth signal sent from the Body Computer Node to the built-in relay on the same node that switches on the dipped beam lights when it closes.
When the main beams are turned on, the Body Computer Node keeps the dipped beams on. Similarly, when the main beam headlights are turned off, the Body Computer Node keeps the dipped beams on (unless there is a specific off-command).
SWITCHING ON MAIN BEAM HEADLAMPS (RELAY T02)
The main beam headlamps function is activated by the following enablements:
- Ignition key in MAR position (15/54) with voltage.
- With the wheel at the dipped beam symbol position, the switch from dipped beam to main beam headlamps takes place by pushing the lever towards the dashboard (stable position), which generates an earth signal that is sent by the steering wheel interface to the Body Computer Node. The main beam headlights warning light located on the instrument panel is activated and deactivated from the instrument panel node (NQS) according to the signal sent from the NBC via the CAN.
Earth signal sent by the Body Computer Node P (NBC) to the coil for the relay (T02) located in the engine compartment junction unit which, on closing, turns on the main beams.
The same function described above is produced by pulling the steering wheel interface lever towards the steering wheel (lever in flashing or unstable position) irrespective of the position of the wheel. (flashing takes place with the main beams).
Types of bulbs installed
Different types of bulbs are installed on the car:
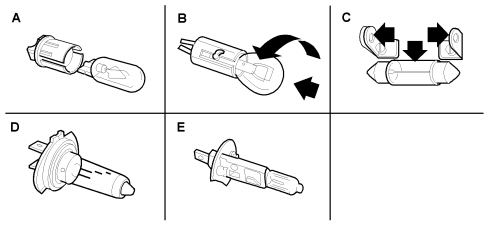
A. All-glass bulbs: are pressure fitted. Pull to extract them.
B Bayonet bulbs: to remove from the bulb holder, press the bulb and rotate it in an anti-clockwise direction, then extract it.
C Cylindrical bulbs: disconnect it from the contacts to extract it.
D. Halogen bulbs: disconnect the locking spring from its seat to remove the bulb.
E. Halogen bulbs: disconnect the locking spring from its seat to remove the bulb.
Bulbs that are not working properly should be replaced with ones of the same type and power. Check the alignment of the headlamps after this operation.
Halogen bulbs should only be handled by the metal part. Touching the transparent part of the bulb with your hands reduces the intensity of the light produced by the bulb and could actually adversely affect the life of the bulb. In the case of accidental contact, rub the bulb with a cloth soaked in alcohol and leave to dry.
Halogen bulbs contain pressurized gas and if they break shards of glass could be produced.
Parts & tools for this job For 2007 Fiat 500
- PARTReplacement bulbsSearch: Fiat 500 2007 bulbs
- TOOLDigital multimeterSearch: automotive digital multimeter
Links open Amazon search results in a new tab. As an Amazon Associate I earn from qualifying purchases.