
Engine - dismantle and reassemble following operation 1004e10 - wash and check dismantled parts - refit cylinder head an
- Make
- Fiat
- Model
- 500 Factory Service Manual
- Year
- 2007–2024
- Section
- Engine and power unit › Engine - dismantle and reassemble following operation 1004e10 - wash and check dismantled parts - refit cylinder head an
ENGINE - DISMANTLE AND REASSEMBLE FOLLOWING OPERATION 1004E10 - WASH AND CHECK DISMANTLED PARTS - REFIT CYLINDER HEAD AND OIL SUMP - DOES NOT INCLUDE REPAIRS TO CYLINDER HEAD AND AUXILIARY UNIT
Removing
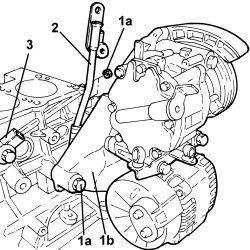
1. Undo the fastenings (1a) and remove the support complete with compressor and alternator (1b).
2. Remove the engine oil dipstick tube.
3. Undo the bolt and remove the knock sensor.
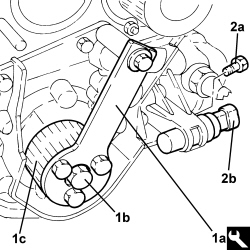
1. Fit the tool (1a), unscrew the bolt (1b) and remove the crankshaft gear (1c).
| Tool | Description | Function | Validity |
|---|---|---|---|
| 2.000.004.500 | Template | Locking drive pulley | 1.2 8V 1.4 16V |
2. Undo the bolt (2a) and remove the rpm sensor (2b).
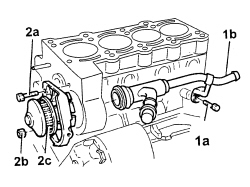
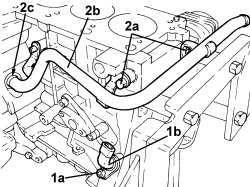
1. Undo the bolts (1a) and remove the rigid water return pipe to the pump (1b).
2. Undo the bolts (2a), nuts (2b) remove the water pump (2c).
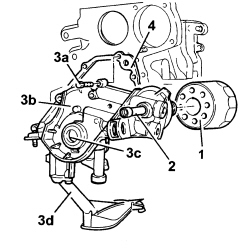
1. Remove the oil filter cartridge.
2. Remove the minimum engine oil pressure switch.
3. Undo the bolts (3a) and remove the engine block front cover (3b) with the built-in oil pump complete with crankshaft front oil seal (3c) and intake chamber (3d).
4. Remove the engine block front cover gasket.
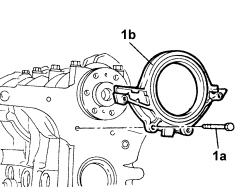
1. Undo the bolts (1a) and remove the crankshaft rear cover (1b).
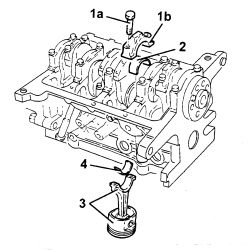
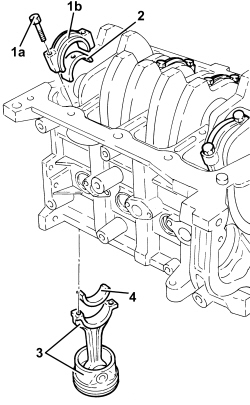
1. Undo bolts (1a) and remove connecting rod cap (1b).
2. Remove the lower connecting rod half-bearings.
3. Remove the connecting rod - piston assemblies.
4. Remove the upper connecting rod half-bearings.
- Carry out the same operations for removing the remaining pistons.
1. Check that the crankshaft endfloat is within specified limits.
| Measurement | Value | Validity |
|---|---|---|
| Crankshaft endfloat (mm) | 0.055 ÷ 0.265 | 1.2 8V 1.3 Mjet |
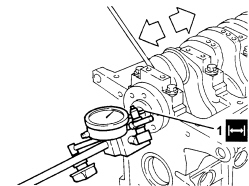
- If the value for the crankshaft endfloat does not correspond with the recommended figures, when refitting, regrind the crankcase seat and use suitable thrust washers (fastened to the central main bearing half) oversized by 0.127 mm.
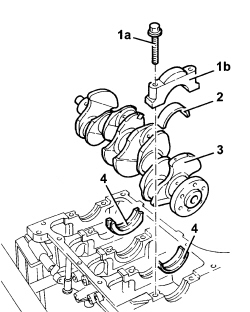
1. Undo the bolts (1a) and remove the connecting rod caps (1b).
2. Remove the lower main half-bearings.
3. Remove the crankshaft.
4. Remove the upper main half-bearings.
The centre main bearing half incorporates the crankshaft thrust ring halves.
Op. 1084B18 ENGINE OIL PUMP, REMOVED - CHECK AT BENCH
- Unscrew the coolant chamber plugs from the crankcase.
- Remove the lubrication duct plug from the crankcase.
- Check the condition of the piston cooling oil sprays.
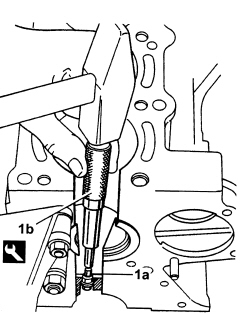
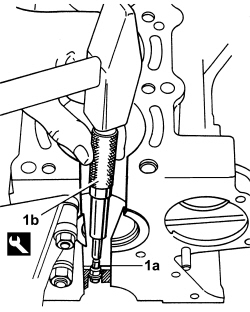
1. If the oil sprays (1a) are blocked, remove them using tool (1b).
Insert the drift guide hole on the nozzle surface to prevent the drift from slipping and damaging the cylinder liner during the removal operation.
| Tool | Description | Function | Validity |
|---|---|---|---|
| 1.860.395.000 | Striker | Engine oil jet removal | 1.2 8V 1.4 16V |
Refitting
- Wash and check the appearance of all components removed.
- Tighten the water/oil sealing plugs to the upper crankcase.
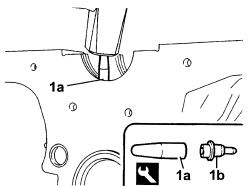
1. Use the tool (1a) to fit the new oil sprays (1b).
| Tool | Description | Function | Validity |
|---|---|---|---|
| 1.860.313.000 | Fitting tool | Engine oil jet fitting | 1.2 8V 1.4 16V |
- Check that the planarity of the cylinder head support surface corresponds to the recommended figure; if this is not the case, regrind the cylinder head support surface.
| Measurement | Value | Validity |
|---|---|---|
| Cylinder head support surface flatness (mm) | < 0.1 | 1.2 8V 1.4 16V |
- Measure the diameter of the cylinder liners and check that they correspond to the recommended figures.
| Measurement | Value | Validity |
|---|---|---|
| Cylinder liner diameter - Grade A (mm) | 70.800 ÷ 70.810 | 1.2 8V |
| Measurement | Value | Validity |
|---|---|---|
| Cylinder liner diameter - Grade B (mm) | 70.810 ÷ 70.820 | 1.2 8V |
| Measurement | Value | Validity |
|---|---|---|
| Cylinder liner diameter - Grade C (mm) | 70.820 ÷ 70.830 | 1.2 8V |
- Check that the ovality of the cylinder liners/bores is within the recommended limits.
| Measurement | Value | Validity |
|---|---|---|
| Cylinder liner ovality (mm) | ± 0.05 | 1.2 8V 1.4 16V |
- Check that the taper of the cylinder liners is within the recommended limits.
| Measurement | Value | Validity |
|---|---|---|
| Cylinder liner taper (mm) | ± 0.005 | 1.2 8V 1.4 16V |
- If the cylinder bore, taper or ovality measurements are not within the recommended limits, ream the cylinder bores following the recommended oversizes.
If reaming, ensure all the liners have the same oversize.
| Measurement | Value | Validity |
|---|---|---|
| Cylinder liner diameter oversize (mm) | 0.1 | all versions |
- Check that the diameter of the main journals is within the recommended limits.
| Measurement | Value | Validity |
|---|---|---|
| Main journal diameter - Category A (mm) | 47.994 ÷ 48.000 | 1.2 8V |
| Measurement | Value | Validity |
|---|---|---|
| Main journal diameter - Category B (mm) | 47.988 ÷ 47.994 | 1.2 8V |
| Measurement | Value | Validity |
|---|---|---|
| Main journal diameter - Category C (mm) | 47.982 ÷ 47.988 | 1.2 8V |
- If the diameter of the main journals does not fall within the recommended values, they should be reground to the recommended undersize.
Because the crankshaft has undergone nitriding, this treatment should be repeated and the size re-checked if it is ground.
| Measurement | Value | Validity |
|---|---|---|
| Main journal diameter undersize (mm) | 0.127 | 1.2 8V 1.4 16V |
- Check that the diameter of the crankpins is within the recommended limits.
| Measurement | Value | Validity |
|---|---|---|
| Crankpin diameter (mm) | 41.990 ÷ 42.008 | 1.2 8V 1.4 16V |
- If the diameter of the crankpins is not correct, they should be reground to the recommended undersize.
Because the crankshaft has undergone nitriding, this treatment should be repeated and the size re-checked if it is ground.
| Measurement | Value | Validity |
|---|---|---|
| Crankpin diameter undersize (mm) | 0.127 | 1.2 8V 1.4 16V |
- Fit the crankshaft into its seat on the crankcase.
- Fit the calibrated wire (plastigage) for measuring the main journal backlash.
- Refit the connecting rod caps complete with half-bearings and secure them by tightening the bolts to the recommended torque.
| Component | Fastening | dia | Value (daNm) | Validity |
|---|---|---|---|---|
| Bearing caps | Bolt | M10x1.25x63 | 2.0 + 90° | 1.2 8V |
- Check that the diameter of the main journals is within the recommended limits.
| Measurement | Value | Validity |
|---|---|---|
| Main journal seat diameter - Category 1 (mm) | 51.705 ÷ 51.709 | 1.2 8V |
| Measurement | Value | Validity |
|---|---|---|
| Main journal seat diameter - Category 2 (mm) | 51.709 ÷ 51.713 | 1.2 8V |
| Measurement | Value | Validity |
|---|---|---|
| Main journal seat diameter - Category 3 (mm) | 51.713 ÷ 51.717 | 1.2 8V |
- The size of the main half-bearings is given.
| Measurement | Value | Validity |
|---|---|---|
| Main half-bearings - Category 1 (red) (mm) | 1.836 ÷ 1.840 | 1.2 8V 1.4 16V |
| Measurement | Value | Validity |
|---|---|---|
| Main half-bearings thickness - Category 2 (blue) (mm) | 1.843 ÷ 1.847 | 1.2 8V 1.4 16V |
| Measurement | Value | Validity |
|---|---|---|
| Main half-bearings thickness - Category 3 (yellow) (mm) | 1.848 ÷ 1.852 | 1.2 8V 1.4 16V |
| Measurement | Value | Validity |
|---|---|---|
| Main journal half-bearing thickness oversize (mm) | 0.254 ÷ 0.508 | 1.2 8V |
- Remove the main bearing caps and check the main journal backlash. Use an appropriate gauge to measure the width of the plastigage.
Check one main journal at a time, without rotating the crankshaft.
| Measurement | Value | Validity |
|---|---|---|
| Clearance between main bearings - crankshaft main journals (mm) | 0.025 ÷ 0.040 | 1.2 8V 1.4 16V |
- After checking all the main journals, refit the main bearing caps with half-bearings and secure by tightening the bolts to the specified torque.
| Component | Fastening | dia | Value (daNm) | Validity |
|---|---|---|---|---|
| Bearing caps | Bolt | M10x1.25x63 | 2.0 + 90° | 1.2 8V |
Op. 1028H54 PISTON WITH CONNECTING ROD - DISMANTLING AT THE BENCH
- Clean any carbon residues carefully from the pistons.
- Check that the outer diameter of the pistons corresponds to the recommended figures; if not, replace the piston complete with piston rings and gudgeon pin.
| Measurement | Value | Validity |
|---|---|---|
| Piston outer diameter -Grade A (mm) | 70.760 ÷ 70.770 | 1.2 8V |
| Measurement | Value | Validity |
|---|---|---|
| Piston outer diameter - Grade B (mm) | 70.770 ÷ 70.780 | 1.2 8V |
| Measurement | Value | Validity |
|---|---|---|
| Piston outer diameter - Grade C (mm) | 70.780 ÷ 70.790 | 1.2 8V |
Measure perpendicular to the gudgeon pin axis, 6 mm from the lower edge of the skirt.
- Position the piston in the cylinder liner and use a feeler gauge to measure the specified clearance.
- Check that the pin seat bore diameter is within specified values, otherwise replace the pin with an oversized pin.
| Measurement | Value | Validity |
|---|---|---|
| Piston pin housing diameter in pistons (mm) | 17.982 ÷ 17.986 | 1.2 8V |
| Measurement | Value | Validity |
|---|---|---|
| Piston gudgeon pin diameter oversize (mm) | 1.2 8V |
- Check that the outer diameter of the gudgeon pins is within the recommended limits; if not, replace the worn gudgeon pins.
| Measurement | Value | Validity |
|---|---|---|
| Gudgeon pin outer diameter (mm) | 17.970 ÷ 17.974 | 1.2 8V 1.4 16V |
- Check that the piston ring seats are within the recommended values.
| Measurement | Value | Validity |
|---|---|---|
| Sealing ring seat in piston - 1st groove (mm) | 1.230 ÷ 1.250 | 1.2 8V |
| Measurement | Value | Validity |
|---|---|---|
| Sealing ring seat in piston - 2nd groove (mm) | 1.210 ÷ 1.230 | 1.2 8V |
| Measurement | Value | Validity |
|---|---|---|
| Sealing ring seat in piston - 3rd groove (mm) | 2.510 ÷ 2.530 | 1.2 8V |
- Check that the thickness of the piston rings is within the recommended limits.
| Measurement | Value | Validity |
|---|---|---|
| Cylinder compression 1st sealing ring thickness (mm) | 1.175 ÷ 1.190 | 1.2 8V |
| Measurement | Value | Validity |
|---|---|---|
| Cylinder compression 2nd sealing ring thickness (mm) | 1.170 ÷ 1.190 | 1.2 8V |
| Measurement | Value | Validity |
|---|---|---|
| Cylinder compression 3rd sealing ring thickness (mm) | 2.475 ÷ 2.490 | 1.2 8V |
| Measurement | Value | Validity |
|---|---|---|
| Sealing ring oversize (mm) | 0.1 | 1.2 8V 1.4 16V |
- Fit the sealing rings in the cylinder liner and check the gap between the seal ends is within specified limits. Otherwise replace the sealing rings.
| Measurement | Value | Validity |
|---|---|---|
| Cylinder compression 1st sealing ring gap (mm) | 0.20 ÷ 0.40 | 1.2 8V |
| Measurement | Value | Validity |
|---|---|---|
| Cylinder compression 2nd sealing ring gap (mm) | 0.25 ÷ 0.70 | 1.2 8V |
| Measurement | Value | Validity |
|---|---|---|
| Cylinder compression 3rd sealing ring gap (mm) | 0.20 ÷ 0.45 | 1.2 8V |
- Check that the mating clearance between the piston rings and the grooves on the piston is within specified limits.
| Measurement | Value | Validity |
|---|---|---|
| Cylinder compression 1st sealing ring endfloat (mm) | 0.020 ÷ 0.060 | 1.2 8V |
| Measurement | Value | Validity |
|---|---|---|
| Cylinder compression 2nd sealing ring endfloat (mm) | 0.020 ÷ 0.060 | 1.2 8V |
| Measurement | Value | Validity |
|---|---|---|
| Cylinder compression 3rd sealing ring endfloat (mm) | 0.020 ÷ 0.055 | 1.2 8V |
Op. 1028H54 PISTON WITH CONNECTING ROD - DISMANTLING AT THE BENCH
Op. 1084B18 ENGINE OIL PUMP, REMOVED - CHECK AT BENCH
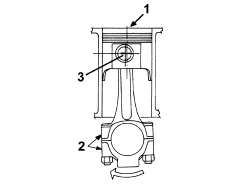
- Fit the connecting rod-piston assemblies and align in accordance with the following references.
1. Piston class and arrow indicating timing side.
2. Area where the number of the cylinder liner matching the connecting rod is stamped.
3. Piston pin offset
- Fit the connecting rod-piston assemblies with half-bearings using the tool to compress the piston rings and then fit the piston into the liner.
- Rotate the engine through 180° on the overhaul stand.
- Apply the calibrated wire (plastigate) for measuring the crankpin clearance.
- Refit the connecting rod caps complete with half-bearings and secure them by tightening the bolts to the recommended torque.
The connecting rod caps are fracture type. If replaced, they are supplied pre-fractured by the manufacturer.
Check that the parts are free of burrs, blisters, scratches or any other surface defect. Before installation, parts must be thoroughly washed, cleaned and dried. Fit the connecting rod caps so that the number stamped on each cap faces towards the same side as the number stamped on the big end.
Each connecting rod must be paired with its cap, respecting the numerical references stamped on the parts. Connecting rods and connecting rod caps are not interchangeable.
| Component | Fastening | dia | Value (daNm) | Validity |
|---|---|---|---|---|
| Connecting rod | Bolt | M8x1x37.7 | 2.0 + 40° | 1.2 8V |
| Component | Fastening | dia | Value (daNm) | Validity |
|---|---|---|---|---|
| Connecting rod | Bolt | M8x1x40.7 | 2.0 + 40° | 1.2 8V |
- Check that the diameter of the crankpins corresponds to the recommended figures.
| Measurement | Value | Validity |
|---|---|---|
| Crankpin seat diameter (mm) | 45.128 ÷ 45.138 | 1.2 8V |
- The size of the connecting rod half-bearings is given.
| Measurement | Value | Validity |
|---|---|---|
| Connecting rod half-bearing thickness (mm) | 1.544 ÷ 1.548 | 1.2 8V 1.4 16V |
| Measurement | Value | Validity |
|---|---|---|
| Connecting rod half-bearing thickness oversize (mm) | 0.254 ÷ 0.508 | 1.2 8V |
- Remove the connecting rod caps and check the crankpin backlash. Use an appropriate gauge to measure the width of the plastigage.
| Measurement | Value | Validity |
|---|---|---|
| Clearance between connecting rod bearings - crankpin bearings (mm) | 0.021 ÷ 0.060 | 1.2 8V |
Check one crankpin at a time, without rotating the crankshaft.
- If the value measured is not within the recommended figures, replace the connecting rod bearings.
- Refit the connecting rod caps complete with half-bearings and secure them by tightening the bolts to the recommended torque.
| Component | Fastening | dia | Value (daNm) | Validity |
|---|---|---|---|---|
| Connecting rod | Bolt | M8x1x37.7 | 2.0 + 40° | 1.2 8V |
| Component | Fastening | dia | Value (daNm) | Validity |
|---|---|---|---|---|
| Connecting rod | Bolt | M8x1x40.7 | 2.0 + 40° | 1.2 8V |
- Position a new oil pump gasket.
- Fit the front crankcase cover with built-in oil pump complete with intake chamber and secure by tightening bolts to the specified torque.
- Fit the engine oil filter.
- Fit the minimum engine oil pressure switch.
- Fit the oil seal on the crankshaft front cover using the tool.
| Tool | Description | Function | Validity |
|---|---|---|---|
| 1.860.903.000 | Fitting tool | Fitting oil seal | 1.2 8V |
- Fit the crankcase rear cover and secure by tightening the bolts to the specified torque.
| Component | Fastening | dia | Value (daNm) | Validity |
|---|---|---|---|---|
| Crankshaft front and rear cover | Bolt | M6x1x22 | 0.9 | 1.2 8V |
| Component | Fastening | dia | Value (daNm) | Validity |
|---|---|---|---|---|
| Crankshaft front and rear cover | Bolt | M6x1x32 | 0.9 | 1.2 8V |
| Component | Fastening | dia | Value (daNm) | Validity |
|---|---|---|---|---|
| Crankshaft front and rear cover | Bolt | M6x1x20 | 0.9 | 1.2 8V |
- Fit a new rear camshaft oil seal using the tools.
| Tool | Description | Function | Validity |
|---|---|---|---|
| 1.860.879.000 | Grip | Fitting rear oil seal on crankshaft | 1.2 8V |
| Tool | Description | Function | Validity |
|---|---|---|---|
| 1.860.881.000 | Fitting tool | Fitting flywheel side oil seal cover | 1.2 8V |
- Fit the water pump and secure with the bolts and nut.
- Fit the rigid coolant return pipe to the pump and secure to the crankcase with the bolt.
- Fit the crankshaft gear.
- Position the tool and tighten the crankshaft gear bolt to the specified torque.
| Tool | Description | Function | Validity |
|---|---|---|---|
| 2.000.004.500 | Template | Locking drive pulley | 1.2 8V 1.4 16V |
| Component | Fastening | dia | Value (daNm) | Validity |
|---|---|---|---|---|
| Toothed drive pulley (on crankshaft) | Bolt | M11x1x44.3 (left) | 2.0 + 90° | 1.2 8V |
- Remove the tool fitted previously.
- Rotate the engine on the overhaul stand.
- Clean the crankcase and oil sump contact surfaces, removing the silicon sealant residues.
- Apply the silicone sealant continuously without any breaks over the entire perimeter of the crankcase sump.
Join the end to the beginning seamlessly.
- Fit the crankcase sump and secure it by tightening the bolts and the nuts to the specified torque.
When positioning the crankcase sump, avoid significant sideways movements that could remove the sealant.
| Component | Fastening | dia | Value (daNm) | Validity |
|---|---|---|---|---|
| Engine oil sump (on lower crankcase) | Bolt | M8x1.25x25 | 2.5 | 1.2 8V |
| Component | Fastening | dia | Value (daNm) | Validity |
|---|---|---|---|---|
| Engine oil sump (with engine oil pump) | Nut | M6x1 | 0.9 | all versions |
- Clean the contact surfaces between the cylinder head and engine block.
- Fit the locating bushes for the crankcase.
- Position the cylinder head gasket on the cylinder block/crankcase.
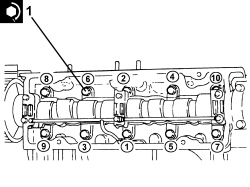
1. Fit the cylinder head and tighten the fixing bolts to the recommended torque.
| Component | Fastening | dia | Value (daNm) | Validity |
|---|---|---|---|---|
| Cylinder head (on engine block) | Bolt | M9x1.25x96 | 3.0 + 90° + 90° | 1.2 8V 1.4 16V |
Follow the order illustrated below for the tightening of the cylinder head bolts.
- Fit the intake chamber and tighten the nuts to the specified torque.
| Component | Fastening | dia | Value (daNm) | Validity |
|---|---|---|---|---|
| Intake manifold (on cylinder head) | Nut | M8x1.25 | 2.5 | 1.2 8V |
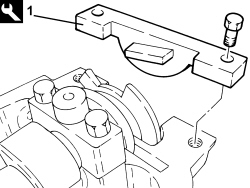
1. Fit the template to the camshaft rear shank.
| Tool | Description | Function | Validity |
|---|---|---|---|
| 2.000.004.400 | Template | Locking camshaft | 1.2 8V |
- Fit the timing belt.
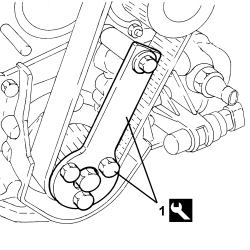
1. Fit the crankshaft timing template to the drive pulley.
| Tool | Description | Function | Validity |
|---|---|---|---|
| 2.000.004.500 | Template | Locking drive pulley | 1.2 8V 1.4 16V |
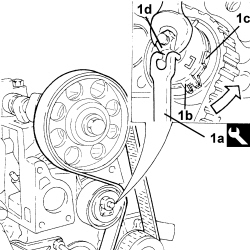
1. Using the tool (1a) place the automatic tensioner fork (1b) in the end of travel position (1c) and tighten the nut (1d). in this way, the timing belt will be as taut as possible.
| Tool | Description | Function | Validity |
|---|---|---|---|
| 1.860.987.000 | Spanner | Tensioning toothed timing drive belt | 1.2 8V 1.4 16V |
- Screw in the driven toothed pulley fixing bolt and tighten it to the recommended torque.
| Component | Fastening | dia | Value (daNm) | Validity |
|---|---|---|---|---|
| Toothed driven pulley | Bolt | M10x1.25x35 | 7.0 | 1.2 8V |
- Remove both templates and the reaction tool fitted previously and turn the engine through a couple of revolutions to settle the timing belt.
- Loosen the belt tensioner nut and adjust the front fork until it is aligned with the rear fork.
- Tighten the belt tensioner nut to the recommended torque.
| Component | Fastening | dia | Value (daNm) | Validity |
|---|---|---|---|---|
| Toothed driven pulley | Bolt | M12x1.25x40 | 12.0 | 1.4 16V |
- Fit the templates removed previously to check the engine timing adjustment.
- Position the cam cover on the cylinder head and secure it using the fixing bolts.
| Component | Fastening | dia | Value (daNm) | Validity |
|---|---|---|---|---|
| Tappet cover | Bolt | M6x1x25 | 0.9 | 1.2 8V |
- Fit the injection control unit mount.
- Fit the rpm sensor and tighten the bolt.
- Fit the knock sensor and tighten the bolt to the specified torque.
| Component | Fastening | dia | Value (daNm) | Validity |
|---|---|---|---|---|
| Knock sensor | Bolt | M8x1.25x40 | 2.5 | 1.2 8V |
- Fit the engine oil dipstick tube.
- Fit the mount with compressor and alternator and secure the fastenings.
| Component | Fastening | dia | Value (daNm) | Validity |
|---|---|---|---|---|
| Alternator/compressor mounting (side on crankcase) | Nut | M10x1.25 | 5.0 | 1.2 8V |
| Component | Fastening | dia | Value (daNm) | Validity |
|---|---|---|---|---|
| Alternator/compressor mounting (side on crankcase) | Nut | M8x1.25 | 2.5 | 1.2 8V |
| Component | Fastening | dia | Value (daNm) | Validity |
|---|---|---|---|---|
| Alternator/compressor mounting | Bolt | M10x1.25x105 | 5.0 | 1.2 8V |
| Component | Fastening | dia | Value (daNm) | Validity |
|---|---|---|---|---|
| Alternator/compressor mounting | Bolt | M10x1.25x70 | 5.0 | 1.2 8V |
| Component | Fastening | dia | Value (daNm) | Validity |
|---|---|---|---|---|
| Alternator/compressor mounting | Bolt | M10x1.25x75 | 5.0 | 1.2 8V |
- Fit the timing belt protective covers and secure them using the bolts.
- Fit the crankshaft pulley and tighten the bolts to the recommended torque.
| Component | Fastening | dia | Value (daNm) | Validity |
|---|---|---|---|---|
| Toothed drive pulley (on crankshaft) | Bolt | M12x1x46 (left) | 2.0 + 90° | 1.2 8V |
- Fit the auxiliary drivebelt by adjusting the automatic belt tensioner.
- Fit the timing side rigid power unit mount and tighten the bolts to the specified torque.
| Component | Fastening | dia | Value (daNm) | Validity |
|---|---|---|---|---|
| Timing side engine support | Bolt | M10x1.25x55 | 6.0 | 1.2 8V 1.4 16V |
- Attach the electrical connection for the water temperature sensor.
- Secure the electrical connection for the timing sensor.
- Connect the electrical connection of the ignition coil module.
- Connect the electrical connection for the throttle body.
- Connect the electrical connection for the detonation sensor.
- Connect the air conditioning compressor electrical connection.
- Connect the earth lead to the crankcase.
- Connect the electrical connection for the air pressure/temperature sensor.
- Remove the engine from the overhaul stand.
Removing
1. Undo bolt (1a) and remove rpm sensor (1b).
2. Undo bolts (2a) and remove the rigid coolant inlet pipe to water pump (2b) complete with O-Ring (2c).
- Undo the bolts and remove the engine oil heat exchanger protection.
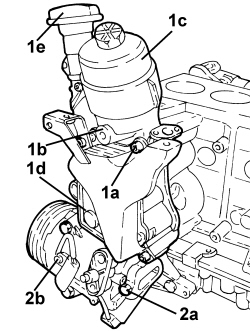
1. Undo bolts (1a) and remove engine oil filter mounting (1b) complete with engine oil filter (1c), engine oil heat exchanger (1d) and engine oil filler fitting (1e).
- Remove the gasket.
2. Undo bolts (2a) and remove air conditioner compressor (2b).
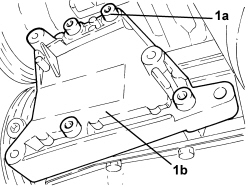
1. Undo bolts (1a) and remove air conditioner compressor mounting (1b).
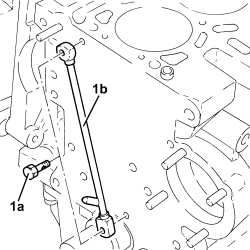
1. Undo connectors (1a) and remove engine oil pipe (1b).
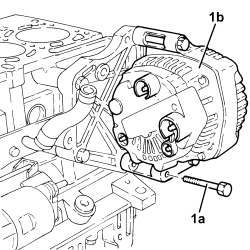
1. Undo bolts (1a) and remove alternator (1b).
1. Undo bolts (1a) and remove alternator mounting (1b).
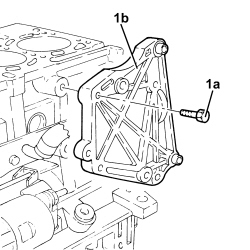
1. Undo bolts (1a) and remove vacuum reservoir (1b).
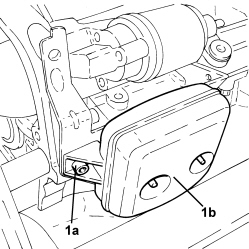
1. Undo bolts (1a) and remove engine oil recovery manifold (1b).
2. Undo bolts (2a) and remove starter motor (2b).
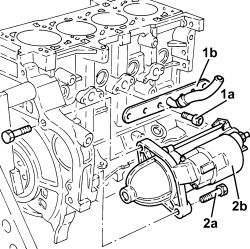
- Rotate the engine through 180° on the overhaul stand.
1. Undo the lower crankcase retaining bolts.
2. Cut the lower crankcase sealant using the tool.
| Tool | Description | Function | Validity |
|---|---|---|---|
| 1.870.718.000 | Blade | Cut sealant | all versions |
3. Remove the lower crankcase.
- Remove the lower main half-bearings.
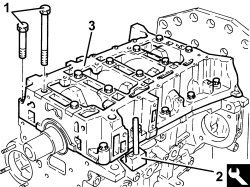
1. Undo bolts (1a) and remove connecting rod caps (1b).
2. Remove the lower connecting rod half-bearings.
3. Remove the connecting rod - piston assemblies.
4. Remove the upper connecting rod half-bearings.
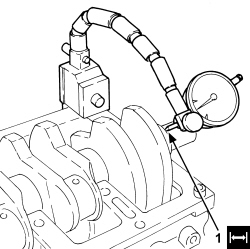
1. Check that the crankshaft endfloat corresponds to the recommended figures using a magnetic base and dial gauge.
| Measurement | Value | Validity |
|---|---|---|
| Crankshaft endfloat (mm) | 0.055 ÷ 0.265 | 1.2 8V 1.3 Mjet |
- If the value for the crankshaft endfloat is not within the recommended limits, when refitting regrind the crankcase seat and use suitable oversize thrust half-washers.
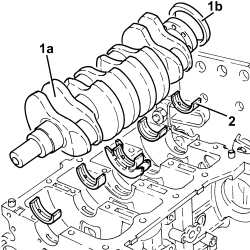
1. Remove crankshaft (1a) complete with rear oil seal (1b).
2. Remove the upper main half-bearings.
The central main bearing half is joined to the thrust half-washers. Press the ends of the half-bearing to separate.
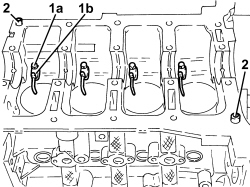
1. Undo bolts (1a) and remove engine oil jets (1b).
2. Remove the lower engine block locating bushes.
- Use an appropriate tool to support the upper engine block.
- Unscrew the retaining bolts and separate the upper crankcase from the overhaul stand plate.
- Position the upper crankcase on a suitable workbench.
Op. 1084B18 ENGINE OIL PUMP, REMOVED - CHECK AT BENCH
- Drill and remove the water/oil sealing plugs from the crankcase to allow for washing the ducts.
Refitting
- Clean sealant residues off the mating surfaces between: cylinder head extension/lower cylinder head, upper crankcase/lower crankcase and lower crankcase/crankcase sump.
- Clean the parts removed thoroughly and check their condition visually.
- Fit the water/oil sealing plugs in the crankcase using suitable fitting tools.
- Lubricate all the mechanical coupling components with engine oil.
1. Measure the cylinder liner diameter according to the diagram shown in the figure.
| Measurement | Value | Validity |
|---|---|---|
| Cylinder liner diameter - Grade A (mm) | 69.600 ÷ 69.610 | 1.3 Mjet |
| Measurement | Value | Validity |
|---|---|---|
| Cylinder liner diameter - Grade B (mm) | 69.610 ÷ 69.620 | 1.3 Mjet |
| Measurement | Value | Validity |
|---|---|---|
| Cylinder liner diameter - Grade C (mm) | 69.6200 ÷ 69.630 | 1.3 Mjet |
- Check that the taper of the cylinder liners is within the recommended limits.
| Measurement | Value | Validity |
|---|---|---|
| Cylinder liner taper (mm) | ± 0.010 | 1.3 Mjet |
- Check that the ovality of the cylinder liners is within the recommended limits.
| Measurement | Value | Validity |
|---|---|---|
| Cylinder liner ovality (mm) | ± 0.005 | 1.3 Mjet |
- If the cylinder bore measurements are not within the recommended limits, ream the cylinder bores following the recommended oversizes.
If reaming, ensure all the liners have the same oversize.
| Measurement | Value | Validity |
|---|---|---|
| Cylinder liner diameter oversize (mm) | 0.1 | all versions |
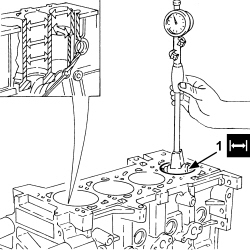
- Use an appropriate support tool to replace the upper crankcase on the overhaul stand.
- Refit the lower crankcase locating bushes in their seats.
- Provisionally fit the lower engine block on the upper engine block to measure the main journal seats and then remove it.
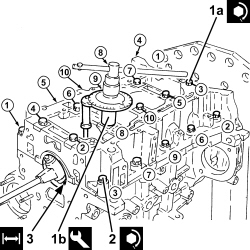
1. Loosen central bolts (1a) securing the lower crankcase to the specified torque, following the order shown in the figure. Use angular tightening tool (1b).
| Component | Fastening | dia | Value (daNm) | Validity |
|---|---|---|---|---|
| Lower crankcase (on engine block) | Bolt | M10x1.25x96 | 2.0 + 80° | 1.3 Multijet 1.4 16V |
| Tool | Description | Function | Validity |
|---|---|---|---|
| 1.860.942.000 | Torque wrench | Tighten bolts to torque plus angle | 1.3 Mjet |
2. Tighten the lower crankcase side bolts to the specified torque, following the order shown in the figure.
| Component | Fastening | dia | Value (daNm) | Validity |
|---|---|---|---|---|
| Lower crankcase (on engine block) | Bolt | M8x1.25x40 | 3.0 | 1.3 Multijet 1.4 16V |
3. Check that the diameter of the main journal seats is within specified limits (without fitting the half-bearings).
| Measurement | Value | Validity |
|---|---|---|
| Main journal seat diameter - Category A (mm) | 54.710 ÷ 54.714 | 1.3 Mjet |
| Measurement | Value | Validity |
|---|---|---|
| Main journal seat diameter - Category B (mm) | 54.714 ÷ 54.718 | 1.3 Mjet |
| Measurement | Value | Validity |
|---|---|---|
| Main journal seat diameter - Category C (mm) | 54.718 ÷ 54.722 | 1.3 Mjet |
- Check that there are no deposits or blockages in the crankshaft lubrication ducts.
- Check that the diameter of the main journals is within the recommended limits.
| Measurement | Value | Validity |
|---|---|---|
| Main journal diameter - Category A (mm) | 50.994 ÷ 51.000 | 1.3 Mjet |
| Measurement | Value | Validity |
|---|---|---|
| Main journal diameter - Category B (mm) | 50.988 ÷ 50.994 | 1.3 Mjet |
| Measurement | Value | Validity |
|---|---|---|
| Main journal diameter - Category C (mm) | 50.982 ÷ 50.988 | 1.3 Mjet |
- If the diameter of the main journals is not correct, they should be reground to the recommended undersize.
| Measurement | Value | Validity |
|---|---|---|
| Main journal diameter undersize (mm) | 0.127 | 1.2 8V 1.4 16V |
Crankpin undersizes higher than the value mentioned will adversely affect the structural resistance of the crankshaft (following contact between the tool and rolled connectors). As far as the above is concerned, if the regrinding requires undersizes greater than 0.127 mm, then the crankshaft must be replaced and a new one ordered from the Parts Dept. The half-bearings used for undersizes of more than 0.127 mm should not be ordered from the Parts Dept. (even if the number is still quoted).
- Check that the diameter of the crankpins is within the recommended limits.
| Measurement | Value | Validity |
|---|---|---|
| Crankpin diameter - Category A (mm) | 42.591 ÷ 42.600 | 1.3 Mjet |
| Measurement | Value | Validity |
|---|---|---|
| Crankpin diameter - Category B (mm) | 42.582 ÷ 42.591 | 1.3 Mjet |
- If the diameter of the crankpins is not correct, they should be reground to the recommended undersize.
| Measurement | Value | Validity |
|---|---|---|
| Crankpin diameter undersize (mm) | 0.127 | 1.2 8V 1.4 16V |
Crankpin undersizes higher than the value mentioned will adversely affect the structural resistance of the crankshaft (following contact between the tool and rolled connectors). As far as the above is concerned, if the regrinding requires undersizes greater than 0.127 mm, then the crankshaft must be replaced and a new one ordered from the Parts Dept. The half-bearings used for undersizes of more than 0.127 mm should not be ordered from the Parts Dept. (even if the number is still quoted).
- Check the crankshaft and connecting rod bearings, keeping in mind that no adjustment operations should be carried out on the half-bearings. Replace them if scoring or signs of binding are noted.
- The size of the main half-bearings is given.
| Measurement | Value | Validity |
|---|---|---|
| Main half-bearings - Category 1 (red) (mm) | 1.836 ÷ 1.841 | 1.3 Mjet |
| Measurement | Value | Validity |
|---|---|---|
| Main half-bearings thickness - Category 2 (blue) (mm) | 1.841 ÷ 1.846 | 1.3 Mjet |
| Measurement | Value | Validity |
|---|---|---|
| Main half-bearings thickness - Category 3 (yellow) (mm) | 1.846 ÷ 1.851 | 1.3 Mjet |
| Measurement | Value | Validity |
|---|---|---|
| Main journal half-bearing thickness oversize (mm) | 0.127 | 1.3 Mjet |
- The size of the connecting rod half-bearings is given.
| Measurement | Value | Validity |
|---|---|---|
| Crankpin half-bearings - Category A (red) (mm) | 1.546 ÷ 1.552 | 1.3 Mjet |
| Measurement | Value | Validity |
|---|---|---|
| Crankpin half-bearings - Category B (blue) (mm) | 1.550 ÷ 1.556 | 1.3 Mjet |
| Measurement | Value | Validity |
|---|---|---|
| Main journal half-bearing thickness oversize (mm) | 0.127 | 1.3 Mjet |
- Place the upper main bearing halves in their seats taking great care over cleanliness.
Half-bearings of different categories may be fitted to the same journal to reduce the clearance. In the above case, observe the following installation requirements. Fit the thickest half-bearing to the main bearing cap and the thinnest to the crankcase.
If the crankshaft has been ground, fit new oversize half-bearings to restore the initial tolerance conditions. The thrust half-washers are built into the central main bearing half.
- The thrust half-washer thickness is given.
| Measurement | Value | Validity |
|---|---|---|
| Thrust half-washer thickness (mm) | 2.310 ÷ 2.360 | 1.3 Mjet |
The thrust half-washer undersize is 0.127 mm.
- Fit the crankshaft into its seat on the upper crankcase.
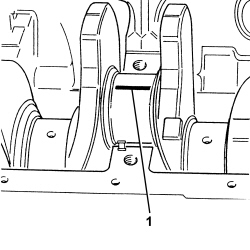
1. Fit the calibrated wire (plastigage) for measuring the main journal clearance.
1. Refit the lower crankcase with lower main bearing halves in its seat.
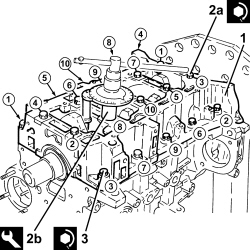
2. Tighten central bolts (2a) securing the lower crankcase to the specified torque, following the order shown in the figure. Use angular tightening tool (2b).
| Component | Fastening | dia | Value (daNm) | Validity |
|---|---|---|---|---|
| Lower crankcase (on engine block) | Bolt | M10x1.25x96 | 2.0 + 80° | 1.3 Multijet 1.4 16V |
| Tool | Description | Function | Validity |
|---|---|---|---|
| 1.860.942.000 | Torque wrench | Tighten bolts to torque plus angle | 1.3 Mjet |
3. Tighten the lower crankcase side bolts to the specified torque, following the order shown in the figure.
| Component | Fastening | dia | Value (daNm) | Validity |
|---|---|---|---|---|
| Lower crankcase (on engine block) | Bolt | M8x1.25x40 | 3.0 | 1.3 Multijet 1.4 16V |
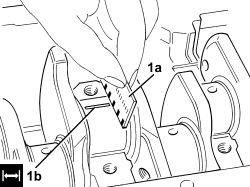
1. Remove the lower crankcase with main bearing halves and, using a suitable graduated measuring instrument (1a), measure the clearance shown by calibrated wire (1b).
Check one journal at a time, without rotating the crankshaft.
| Measurement | Value | Validity |
|---|---|---|
| Clearance between main bearings - crankshaft main journals (mm) | 0.028 ÷ 0.048 | 1.3 Mjet |
If the figure measured is outside of the tolerance, replace the main half-bearings with ones of the correct size and category.
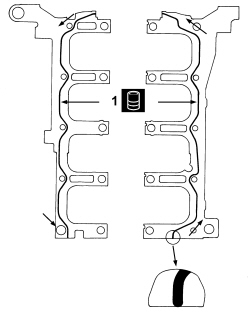
1. After checking all the main journals, apply a strip of specified silicone sealant to the contact surfaces between the lower crankcase and the upper crankcase as shown in the diagram in the figure.
The sealant strip must be unbroken. The sealant strip diameter must be 2.5 - 3.5 mm.
- After applying the sealant clean the crankshaft lower oil seal seat.
- Fit the lower crankcase to the upper crankcase permanently by tightening the bolts as shown previously.
- Check that the small end bush bore diameter is within the recommended limits; if not, replace the connecting rod assemblies.
| Measurement | Value | Validity |
|---|---|---|
| Small end bush inner diameter (mm) | 23.006 ÷ 23.012 | 1.3 Mjet |
- Check that the diameter of the piston pin housing in the piston is within the recommended values.
| Measurement | Value | Validity |
|---|---|---|
| Piston pin housing diameter (mm) | 22.990 ÷ 22.996 | 1.3 Mjet |
- If the piston pin bore diameter is not within specified values, replace the piston complete with its piston pin and retaining rings.
- Check that the outer diameter of the piston pins is within the recommended limits; if not, replace the worn piston pins.
| Measurement | Value | Validity |
|---|---|---|
| Piston pin outer diameter (mm) | 22.892 ÷ 22.987 | 1.3 Mjet |
- Fit the sealing rings in the cylinder liner and check that the opening between the ends is within the recommended values; if this is not the case, replace the retaining rings.
| Measurement | Value | Validity |
|---|---|---|
| Cylinder compression 1st sealing ring gap (mm) | 0.20 ÷ 0.30 | 1.3 Mjet |
| Measurement | Value | Validity |
|---|---|---|
| Cylinder compression 2nd sealing ring gap (mm) | 1.0 ÷ 1.5 | 1.3 Mjet |
| Measurement | Value | Validity |
|---|---|---|
| Cylinder compression 3rd sealing ring gap (mm) | 0.25 ÷ 0.50 | 1.3 Mjet |
- Check that the thickness of the sealing rings is within the recommended limits.
| Measurement | Value | Validity |
|---|---|---|
| Cylinder compression 1st sealing ring thickness (mm) | 1.970 ÷ 1.995 | 1.3 Mjet |
| Measurement | Value | Validity |
|---|---|---|
| Cylinder compression 2nd sealing ring thickness (mm) | 1.470 ÷ 1.490 | 1.3 Mjet |
| Measurement | Value | Validity |
|---|---|---|
| Cylinder compression 3rd sealing ring thickness (mm) | 1.970 ÷ 1.990 | 1.3 Mjet |
- Check that the piston ring seats are within the recommended values.
| Measurement | Value | Validity |
|---|---|---|
| Sealing ring seat in piston - 1st groove (mm) | 2.08 ÷ 2.10 | 1.3 Mjet |
| Measurement | Value | Validity |
|---|---|---|
| Sealing ring seat in piston - 2nd groove (mm) | 1.53 ÷ 1.55 | 1.3 Mjet |
| Measurement | Value | Validity |
|---|---|---|
| Sealing ring seat in piston - 3rd groove (mm) | 2.02 ÷ 2.04 | 1.3 Mjet |
- Check that the outer diameter of the pistons corresponds to the recommended figures; if not, replace the piston complete with sealing rings and piston pin.
| Measurement | Value | Validity |
|---|---|---|
| Piston outer diameter -Grade A (mm) | 69.520 ÷ 69.530 | 1.3 Mjet |
| Measurement | Value | Validity |
|---|---|---|
| Piston outer diameter - Grade B (mm) | 69.530 ÷ 69.540 | 1.3 Mjet |
| Measurement | Value | Validity |
|---|---|---|
| Piston outer diameter - Grade C (mm) | 69.540 ÷ 69.550 | 1.3 Mjet |
Measure perpendicular to the piston pin axis, 12 mm from the lower edge of the skirt.
- Check that the axial clearance between the first ring and the housing in the piston corresponds to the recommeded figures.
| Measurement | Value | Validity |
|---|---|---|
| Cylinder compression 1st sealing ring endfloat (mm) | 0.09 ÷ 0.13 | 1.3 Mjet |
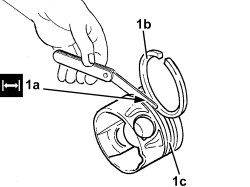
1. Check that endfloat (1a) between second ring (1b) and the housing in piston (1c) corresponds to the recommended figure.
| Measurement | Value | Validity |
|---|---|---|
| Cylinder compression 2nd sealing ring endfloat (mm) | 0.04 ÷ 0.08 | 1.3 Mjet |
- Check that the endfloat between the oil scraper ring and the housing in the piston corresponds to the recommended figures.
| Measurement | Value | Validity |
|---|---|---|
| Oil scraper ring endfloat (mm) | 0.030 ÷ 0.070 | 1.3 Mjet |
1. Fit caps (1b) on connecting rods (1a) and secure them by tightening bolts (1c) to the recommended torque.
The connecting rods are pre-set fracture rods and are supplied already fractured by Parts together with the cap bolts. The connecting rod caps are not interchangeable because the fracture profile differs from part to part.
| Component | Fastening | dia | Value (daNm) | Validity |
|---|---|---|---|---|
| Connecting rod | Bolt | M8x1x37.7 | 2.0 + 40° | 1.2 8V |
| Component | Fastening | dia | Value (daNm) | Validity |
|---|---|---|---|---|
| Connecting rod | Bolt | M8x1x40.7 | 2.0 + 40° | 1.2 8V |
- Use the tool for the angular tightening of the connecting rod cap bolts.
| Tool | Description | Function | Validity |
|---|---|---|---|
| 1.860.942.000 | Torque wrench | Tighten bolts to torque plus angle | 1.3 Mjet |
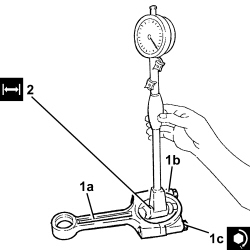
2. Check that the big end diameter (without fitting the half-bearings) is within the recommended limits; if not, replace the connecting rods.
| Measurement | Value | Validity |
|---|---|---|
| Big end diameter (mm) | 45.734 ÷ 45.774 | 1.3 Mjet |
Op. 1084B18 ENGINE OIL PUMP, REMOVED - CHECK AT BENCH
- Check that there are no signs of seizing on the flywheel ring gear teeth; if this is not the case, replace it.
- Place the engine oil jets in their housings and secure with the bolts.
The crankshaft supplied by the Parts Dept. comes without half-bearings and the main journals and crankpins are the normal size; the half-bearings to be fitted must therefore be selected identifying the class of each main journal and crankpin for the new crankshaft.
The letter code stamped on the timing side counter-weight is required for selecting the grade.
Below is an example of identification of the main journal and crankpin grade referring to an engine with nominal diameter main journals (51.000 mm).
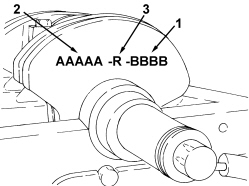
1. Crankpin alphabetical identification code - B B B B (the same for all bearings): the first letter from the left refers to the first timing side bearing.
2. Main journal alphabetical identification code - A A A A A (the same for all bearings): the first letter from the left refers to the first timing side bearing.
3. Alphabetical identification code for thrust washers - R.
Only use the alphabetical codes for references 1, 2 and 3 in the diagram, all the other codes on the counter-weight should not be used.
For the identification of the main journal grade, refer to the alphabetical code 2 shown in the diagram.
In the case of the diagram, for example, the letter code A A A A A (Grade A - Normal) indicates that all five bearings are prepared for the fitting of half-bearings with a Red coloured paint mark on the edge; as a result, specific half-bearings should be identified for different alphabetical codes (bearing grade).
Normal grades are usually used on new engines with undersizes only used in exceptional cases.
ALLOCATION OF HALF-BEARINGS TO MAIN JOURNALS
Having defined the grade for each crankshaft bearing (to which a specific diameter corresponds according to the grade), it is necessary to select the pair of bearings which are the same colour; by consulting the Parts CD-ROM it is possible to find the order number for the pair of half-bearings required.
The above is designed to guarantee the optimum operational clearances for all the bearings.
- Main journal grade A (normal), diameter 51.000 - 50.994 mm, RED paint mark
- Main journal grade B (normal), diameter 50.994 - 50.988 mm, BLUE paint mark
- Main journal grade C (normal), diameter 50.988 - 50.982 mm, YELLOW paint mark
- Main journal grade AM (0.127 undersize), diameter 50.873 - 50.867mm, BROWN paint mark
- Main journal grade BM (0.127 undersize), diameter 50.867 - 50.861mm, GREEN paint mark
- Main journal grade CM (0.127 undersize), diameter 50.861 - 50.855mm, BLACK paint mark
Lastly, we wish to point out that, generally, the clearance between the main journal and the half-bearing, obtained through the selection method indicated above, should be within the following values:
Minimum: 0.025 mm - Maximum: 0.052 mm; this value can be measured, as a final check, using the calibrated wire (plastigage).
CLASSIFICATION OF CRANKPINS AND ALLOCATION OF HALF-BEARINGS
The procedure described for the main half-bearings should also be carried out for selecting the crankpin half-bearings.
- Crankpin grade A (normal), diameter 42.600 - 42.5914 mm, RED paint mark
- Crankpin grade B (normal), diameter 42.591 - 42.582 mm, BLUE paint mark
- Crankpin grade AM (0.127 undersize), diameter 42.473 - 42.464 mm, BROWN paint mark
- Crankpin grade BM (0.127 undersize), diameter 42.464 - 42.455 mm, GREEN paint mark
By way of example, if the alphabetical code identified is the one indicated by reference 1 in the diagram, i.e. - B B B B, this means that the four crankpins are all Grade B (to which a specific diameter belongs) and are therefore ready for the fitting of half-bearings with a blue coloured paint mark on the edge.
The first letter on the left - B of the alphabetical code is always related to the first timing side crankpin.
Refer to the instructions above for the pair of half-bearings to be allocated to each bearing.
The order number for the half-bearings to be fitted which are identified by the colour can be obtained by consulting the Parts CD ROM.
CLASSIFICATION AND ALLOCATION OF THRUST WASHERS
The selection of thrust half-washers for the centre main journal should be made using reference 3 in the diagram (i.e. R for the normal size, RM for a 0.127 mm oversize), therefore the selection should be made using the crankshaft endfloat measured previously.
- Half-ring grade R (normal ), thickness 2.310 - 2.360 mm
- Half-ring grade RM (0.127 mm oversize), thickness 2.437 - 2.487 mm
It is advisable to keep stocks of the main journal and crankpin half-bearings currently in use in all workshop parts departments to ensure they are immediately available if required.
1. Fit the tool.
| Tool | Description | Function | Validity |
|---|---|---|---|
| 1.860.815.000 | Flange | Crankshaft rotation | 1.3 Mjet 1.4 16V |
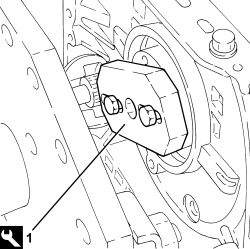
- Turn the crankshaft using the tool fitted previously.
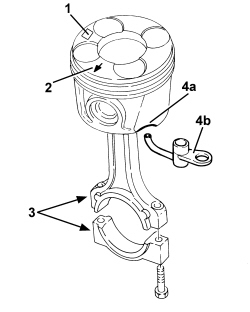
- Fit the connecting rod-piston assemblies and align in accordance with the following references.
1. Piston grade code that may be: A - B - C or AM - BM - CM for oversize pistons
2. The arrow shows the timing side.
3. Area where the number of the cylinder liner matching the connecting rod is stamped.
4. Exhaust (4a) on the piston skirt which should be aligned with oil jet (4b).
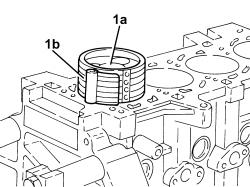
1. Refit piston-connecting rod assemblies (1a) in their housings complete with upper connecting rod bearing halves using tool (1b).
The connecting rod bearing halves may be identified as follows:
- upper connecting rod bearing half, connecting rod side, trimetallic and dark in colour;
- lower connecting rod bearing half, cap side bimetallic, light coloured with a hole.
Never reverse the positioning of the connecting rod bearing halves under any circumstances.
- Rotate the engine through 180° on the overhaul stand.
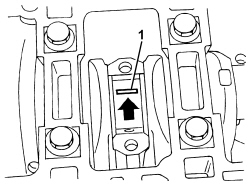
1. Fit the calibrated wire (plastigage) for measuring the bearing clearance.
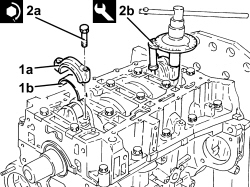
1. Refit connecting rod cap assemblies (1a) in their seats with upper connecting rod bearing halves using tool (1b).
The connecting rod bearing halves may be identified as follows:
- upper connecting rod bearing half, connecting rod side, trimetallic and dark in colour;
- lower connecting rod bearing half, cap side bimetallic, light coloured with a hole.
Never reverse the positioning of the connecting rod bearing halves under any circumstances.
2. Tighten connecting rod cap bolts (2a) to the recommended torque using angular tightening tool (2b).
| Component | Fastening | dia | Value (daNm) | Validity |
|---|---|---|---|---|
| Connecting rod | Bolt | M8x1x38.5 | 2.0 + 40° | 1.3 Multijet 1.4 16V |
| Tool | Description | Function | Validity |
|---|---|---|---|
| 1.860.942.000 | Torque wrench | Tighten bolts to torque plus angle | 1.3 Mjet |
- Undo the bolts and remove the connecting rod caps with the half-bearings fitted previously.
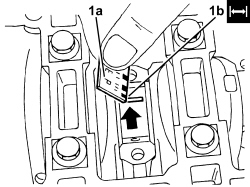
1. Use an appropriate graduated measuring tool (1a) to measure the clearance indicated by plastigage (1b).
Check one journal at a time, without rotating the crankshaft.
| Measurement | Value | Validity |
|---|---|---|
| Clearance between connecting rod bearings - crankpin bearings (mm) | 0.030 ÷ 0.062 | 1.3 Mjet |
If the figure measured is outside of the tolerance, replace the connecting rod half-bearings with ones of the correct size and category.
- Fit the connecting rod caps permanently by tightening the bolts as shown previously.
- Remove the tool.
| Tool | Description | Function | Validity |
|---|---|---|---|
| 1.860.815.000 | Flange | Crankshaft rotation | 1.3 Mjet 1.4 16V |
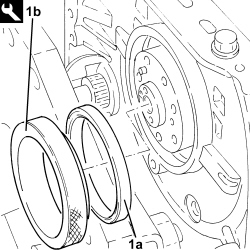
1. Refit crankshaft rear oil seal (1a) in its housing using tool (1b).
| Tool | Description | Function | Validity |
|---|---|---|---|
| 1.870.900.200 | Fitting tool | Fitting crankshaft rear oil seal | 1.3 Mjet |
- Rotate the engine through 180° on the overhaul stand.
- Place the starter motor in its housing and secure it by tightening the bolts to the recommended torque.
| Component | Fastening | dia | Value (daNm) | Validity |
|---|---|---|---|---|
| Starter motor | Bolt | M8x1.25x45 | 2.5 | all versions |
- Place the separator condensed oil manifold in its housing and secure it by tightening the bolts to the recommended torque.
| Component | Fastening | dia | Value (daNm) | Validity |
|---|---|---|---|---|
| Oil vapour separator (on intake manifold) | Bolt | M6x1x20 | 0.9 | 1.3 Multijet |
- Place the vacuum reservoir back in its housing and secure it using the bolt.
- Place the alternator mounting in its housing and secure it by tightening the bolts to the recommended torque.
| Component | Fastening | dia | Value (daNm) | Validity |
|---|---|---|---|---|
| Alternator mounting | Bolt | M8x1.25X45 | 2.1 | 1.3 Multijet |
- Refit the alternator in position and secure it by tightening the bolts to the recommended torque.
| Component | Fastening | dia | Value (daNm) | Validity |
|---|---|---|---|---|
| Alternator | Bolt | M8x1.25X85 | 2.1 | 1.3 Multijet |
- Refit the engine oil pipe in its seat on the crankcase and secure with the connectors.
- Place the air conditioner compressor mounting in its housing and secure it by tightening the bolts to the recommended torque.
| Component | Fastening | dia | Value (daNm) | Validity |
|---|---|---|---|---|
| Compressor support | Bolt | M8x1.25X35 | 2.2 | 1.3 Multijet |
- Place the air conditioning compressor in its housing and secure it by tightening the bolts to the recommended torque.
| Component | Fastening | dia | Value (daNm) | Validity |
|---|---|---|---|---|
| Compressor | Bolt | M8x1.25X80 | 2.2 | 1.3 Multijet |
- Refit the engine oil filter mounting complete with the engine oil filter and engine oil filler fitting and secure by tightening the bolts.
Ensure the gasket is present, undamaged and correctly positioned.
- Place the water pump rigid inlet pipe, complete with O-ring in position and secure it using the bolts.
Fit the rigid pipe in the crankcase very carefuly to ensure the O-ring is correctly positioned.
- Refit the rpm sensor in its housing and tighten the bolt.
- Fit the engine oil heat exchanger protection.
1. Measure the piston projection in two places at 180° on the piston pin axis using the tool and take the average of the two values measured for each piston.
| Tool | Description | Function | Validity |
|---|---|---|---|
| 1.870.404.001 | Dial gauge mount | Piston projection from cylinder head support plane check | 1.3 Mjet |
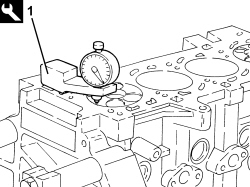
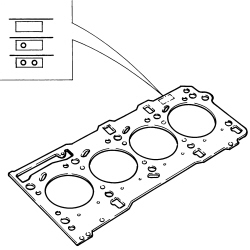
- Select the correct size cylinder head gasket, according to the maximum value of the averages for the protrusion for each individual piston.
| Measurement | Value | Validity |
|---|---|---|
| Cylinder head gasket size with average maximum piston projection (mm) | projection 0.028 - 0.127 thickness (no opening) 0.67 - 0.77 | 1.3 Mjet |
| Measurement | Value | Validity |
|---|---|---|
| Cylinder head gasket size with average maximum piston projection (mm) | projection 0.128 - 0.227 thickness (no opening) 0.77- 0.87 | 1.3 Mjet |
| Measurement | Value | Validity |
|---|---|---|
| Cylinder head gasket size with average maximum piston projection (mm) | projection 0.228 - 0.327 thickness (no opening) 0.87 - 0.97 | 1.3 Mjet |
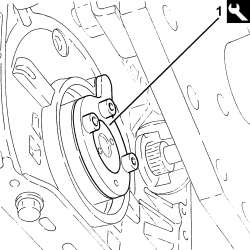
1. Fit the crankshaft timing tool.
| Tool | Description | Function | Validity |
|---|---|---|---|
| 1.870.900.300 | Template | Crankshaft tuning | 1.3 Mjet |
1. Fit the lower cylinder head centring bushes on the engine block.
Before fitting the locating bushes, check that the height is 10 mm.
2. Fit the new cylinder head gasket selected.
3. Position the cylinder head on the crankcase.
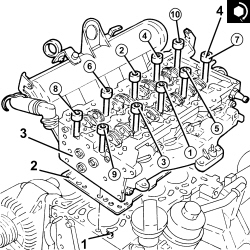
4. Tighten the cylinder head bolts to the recommended torque using the angular tightening tool.
Follow the order shown in the diagram for each tightening sequence. The nominal tightening of 4.0 daNm is performed in two stages: a pretightening to 2.0 daNm followed by an additional tightening of 2.0 daNm.
There is a tolerance of approximately 3° for the two angular tightenings.
| Component | Fastening | dia | Value (daNm) | Validity |
|---|---|---|---|---|
| Cylinder head (on engine block) | Bolt | M10x1.25,119 | 4.0 +90° + 90° | 1.3 Multijet |
| Tool | Description | Function | Validity |
|---|---|---|---|
| 1.860.942.000 | Torque wrench | Tighten bolts to torque plus angle | 1.3 Mjet |
- Check the cylinder head - crankcase misalignment.
It is only possible for the crankcase to protrude.
| Measurement | Value | Validity |
|---|---|---|
| Misalignment between cylinder head extension - cylinder head (mm) | 0.10 | 1.3 Mjet |
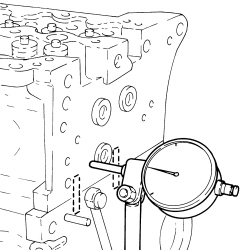
- Connect the condensed engine oil recovery pipe, oil vapour separator side, and tighten the band.
- Tighten the bolt securing the water/exhaust gas heat exchanger for the EGR to the engine block.
- Connect the coolant supply pipe to the engine oil heat exchanger and secure it using the band and the bolts.
Fold over the gasket safety tabs.
- Connect the E.G.R. pipe to the thermostat and secure it using the band.
1. If not already done during cylinder head overhaul, remove plugs (1a) and fit camshaft timing adjustment tools (1b) to the cylinder head extension.
Fit the tools and position with their millings horizontal. Ensure they fit into the seats on the camshafts.
| Tool | Description | Function | Validity |
|---|---|---|---|
| 1.870.896.900 | Templates | Engine tuning | 1.3 Mjet |
- Remove the intake side camshaft timing tool and tighten the plug.
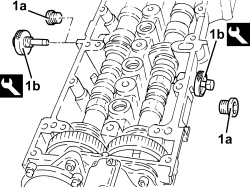
- Place the cylinder head extension centring bushes on the cylinder head.
Before fitting the locating bushes, check that the height is 13 mm.
- Place the cylinder head extension complete with gasket in position.
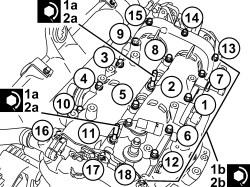
1. Tighten the single cylinder head extension M8 bolts (1a) to a pre-torque of 1.5 daNm and M7 (1b) to a pre-torque of 1.2 daNm
2. Tighten bolts (2a) and (2b) securing the single cylinder head extension to the specified torque.
Follow the order shown in the diagram for each tightening sequence.
| Component | Fastening | dia | Value (daNm) | Validity |
|---|---|---|---|---|
| Camshaft housing (on cylinder head) | Bolt | M8x1.25x40 | 2.5 | 1.3 Multijet |
| Component | Fastening | dia | Value (daNm) | Validity |
|---|---|---|---|---|
| Camshaft housing (on cylinder head) | Bolt | M7x1x78 | 1.8 | 1.3 Multijet |
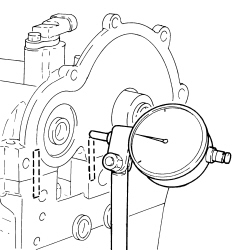
- Check the misalignment between the cylinder head extension - cylinder head.
It is only possible for the cylinder head extension to protrude.
| Measurement | Value | Validity |
|---|---|---|
| Misalignment between cylinder head extension - cylinder head (mm) | 0.10 | 1.3 Mjet |
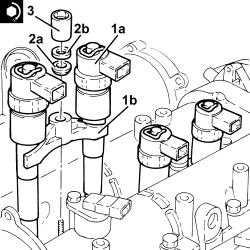
- Refit the new injector dust seals into their seats in the cylinder head extension.
1. Refit the injectors (1a) complete with brackets (1b) in their seats.
Before refitting, replace the copper seal on the injectors.
2. Refit tapered washer (2a) and washer (2b) in their seats.
3. Tighten the nut securing the injector bracket to the specified torque.
| Component | Fastening | dia | Value (daNm) | Validity |
|---|---|---|---|---|
| Injector brackets | Nut | M8 | 2.0 | 1.3 Multijet |
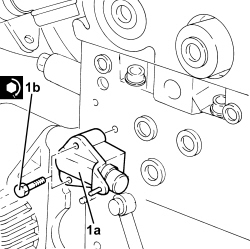
- Use a suitable tool (e.g. vice) to set the chain tensioner and hold it fully back with a retaining pin.
1. Place chain tensioner (1a) in its housing and secure it by tightening bolts (1b) to the recommended torque.
| Component | Fastening | dia | Value (daNm) | Validity |
|---|---|---|---|---|
| Auxiliary belt moving tensioner | Bolt | M6x1x32 | 0.9 | 1.3 Multijet |
- Refit the exhaust side camshaft toothed drive pulley together with chain and toothed drive pulley.
Fit the exhaust side camshaft toothed drive pulley and the toothed drive pulley according to the position marked on disassembly. If the pulleys are replaced, fit with the wording facing outwards.
- Place the timing chain moving pad back in its housing and secure it using the pin.
- Place the timing chain fixed pad back in its housing and secure it using the bolts.
- Tighten the bolt securing the exhaust side camshaft toothed pulley to the recommended torque.
| Component | Fastening | dia | Value (daNm) | Validity |
|---|---|---|---|---|
| Toothed driven pulley | Bolt | M12x1.25x33 | 15.0 | 1.3 Multijet |
- Remove the chain tensioner retaining pin and check that the piston is in contact with the mobile pad.
- Refit the support bracket complete with single fuel manifold pipe, fuel pressure regulator, fuel pressure sensor and secure using the bolts.
- Connect the fuel return pipe to the single fuel manifold and tighten the band.
- Fit new pipes from the fuel manifold to the injectors and secure with connectors without tightening.
- Tighten the connectors for the pipes from the fuel manifold to the injector side injectors to the recommended torque using an appropriate commercial wrench.
| Component | Fastening | dia | Value (daNm) | Validity |
|---|---|---|---|---|
| Fuel supply pipes to the injectors | Connector | M12x1.5 | 2.4 | 1.3 Multijet |
- Tighten the connectors for the pipes from the fuel manifold to the fuel manifold side injectors to the recommended torque using an appropriate commercial wrench.
| Component | Fastening | dia | Value (daNm) | Validity |
|---|---|---|---|---|
| Pipe from fuel manifold to injectors - fuel manifold side | Bolt | M14 | 2.8 | 1.3 Multijet |
Clean the threaded pipe seats on the manifold and injectors with heptane.
- Place a new pipe from the pressure pump to the single fuel manifold in its housing and secure it using the connectors without tightening them.
- Tighten the connector for the pipe from the pressure pump to the single fuel manifold, pump side, to the recommended torque using an appropriate commercial wrench.
| Component | Fastening | dia | Value (daNm) | Validity |
|---|---|---|---|---|
| Fuel supply pipe to single fuel manifold (on pump) | Connector | M12x1.5 | 2.4 | 1.3 Multijet |
- Tighten the connector for the pipe from the pressure pump to the single fuel manifold, fuel manifold side, to the recommended torque using an appropriate commercial wrench.
| Component | Fastening | dia | Value (daNm) | Validity |
|---|---|---|---|---|
| Fuel supply pipe to single fuel manifold (on manifold - 75 CV, 85 CV, 90 CV versions) | Connector | M14x1 | 1.9 | 1.3 Multijet |
- Connect the fuel outlet pipe from the injectors, injector side and push in until the clips click into place.
- Place the timing cover gasket back in its housing.
1. Fit the tool to the timing cover.
| Tool | Description | Function | Validity |
|---|---|---|---|
| 1.870.900.600 | Hose | Timing cover centering | 1.3 Mjet |
2. Refit timing cover (2a) complete with engine oil suction head (2b) and engine oil pump.
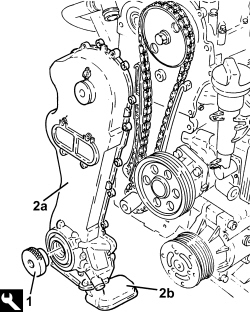
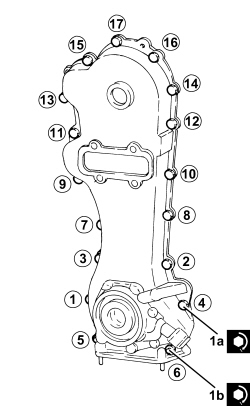
1. Undo bolts (1a) and nuts (1b) securing timing cover (1c).
Follow the order shown in the diagram for each tightening sequence. The tightening to 0.8 - 1.0 daNm is performed in two stages: a pre-tightening stage to 0.4 daNm followed by an additional tightening of 0.8 - 1.0 daNm.
- Connect the engine oil vapour recirculation pipe connector to the timing cover and tighten the bolts.
Ensure the O-ring is present and correctly positioned.
- Rotate the engine through 180° on the overhaul stand.
- Place the crankcase oil sump partition back in its housing and secure it using the bolts.
- Apply a strip of silicone sealant to the contact surfaces between the crankcase sump and lower engine block as shown in the diagram in the figure.
The sealant strip must be unbroken. The sealant strip diameter must be 3.0 - 4.0 mm.
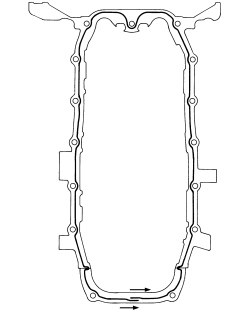
1. Position crankcase sump (1a) in its housing and secure it by tightening bolts (1b) and nuts (1c) to the recommended torque.
Follow the order shown in the figure for each tightening sequence. The tightening to 0.8 - 1.0 daNm is performed in two stages: a pretightening to 0.4 daNm followed by an additional tightening of 0.8 - 1.0 daNm.
| Component | Fastening | dia | Value (daNm) | Validity |
|---|---|---|---|---|
| Engine oil sump (on lower crankcase) | Bolt | M6x1x14 | 0.9 | 1.3 Multijet |
| Component | Fastening | dia | Value (daNm) | Validity |
|---|---|---|---|---|
| Engine oil sump (with engine oil pump) | Nut | M6x1 | 0.9 | all versions |
2. Place bracket (2a) in its housing and secure it by tightening bolts (2b) to the recommended torque.
| Component | Fastening | dia | Value (daNm) | Validity |
|---|---|---|---|---|
| Gearbox/engine reinforcement bracket (on engine block) | Bolt | M8x1.25x50 | 3.0 | 1.3 Multijet |
- Rotate the engine through 180° on the overhaul stand.
- Place the engine oil dipstick pipe back in its housing and fasten it with the bolt.
- Place the intermediate driveshaft mount in position and secure it by tightening the bolts to the recommended torque.
| Component | Fastening | dia | Value (daNm) | Validity |
|---|---|---|---|---|
| Intermediate driveshaft bearing support | Bolt | M8 | 2.2 | 1.3 Multijet |
- Remove the tool.
| Tool | Description | Function | Validity |
|---|---|---|---|
| 1.870.900.600 | Hose | Timing cover centering | 1.3 Mjet |
- Position the crankcase pulley support flange in its housing and secure it with the anti-clockwise threaded bolt without tightening it to the recommended torque.
- Place the water pump, complete with gasket in position, then tighten the bolts to the recommended torque.
| Component | Fastening | dia | Value (daNm) | Validity |
|---|---|---|---|---|
| Water pump (on engine block) | Nut | M6x1 | 0.9 | 1.3 Multijet |
- Refit the crankshaft pulley in its housing and secure it without tightening the bolts.
- Position the auxiliary drivebelt moving tensioner in its housing and secure it by tightening the bolt to the recommended torque.
| Component | Fastening | dia | Value (daNm) | Validity |
|---|---|---|---|---|
| Auxiliary drive belt moving tensioner | Bolt | M10 | 5.0 | 1.3 Multijet |
- Adjust the mobile tensioner with a wrench and fit the auxiliary drive belt.
- Place the timing side rigid engine support in its housing with the engine lift bracket and secure it by tightening the bolts to the recommended torque.
| Component | Fastening | dia | Value (daNm) | Validity |
|---|---|---|---|---|
| Timing system side engine mounting (on engine block and cylinder head) | Bolt | M10x1.25x90 | 6.0 | 1.3 Multijet |
- Place the turbocharger unit complete with catalytic converter back in its housing and secure it by tightening the nuts to the recommended torque.
| Component | Fastening | dia | Value (daNm) | Validity |
|---|---|---|---|---|
| Turbocharger (on exhaust manifold) | Nut | M8x1.25 | 2.5 | 1.3 Multijet |
- Refit the exhaust manifold heat shield with the engine lift bracket and secure with the nut and bolts.
- Position the pipe carrying engine oil to the turbocharger in its housing and secure it by tightening connectors to the recommended torque.
Replace the copper washers on the connectors.
| Component | Fastening | dia | Value (daNm) | Validity |
|---|---|---|---|---|
| Engine oil supply pipe to turbocharger | Connector | M10 | 1.5 | 1.3 Multijet |
- Position a new gasket between the crankcase and the engine oil return pipe to the turbocharger.
- Tighten the bolts securing the engine oil return pipe from the turbocharger, engine block side.
- Fit the protective strips to the oil filter and the engine oil heat exchanger.
- Place the electrical wiring in position and fasten it to the bands on the air capacity chamber.
- Connect the electrical connection to the E.G.R. solenoid valve.
- Connect the electrical connection to the fuel pressure regulator.
- Secure the electrical connection to the pressure relief sensor.
- Connect the electrical connection to the fuel pressure sensor.
- Refit the electrical wiring in its seat and secure.
- Tighten the bolts securing the wiring duct to the cylinder head.
- Connect the electrical connection for the air conditioning compressor engagement solenoid valve.
- Connect the electrical connection to the timing sensor.
- Secure the electrical connections to the injectors.
- Secure the electrical connections to the glow heater plugs.
- Connect the electrical connection to the engine oil pressure warning light switch.
- Connect the electrical connection to the engine rpm sensor.
- Secure the electrical connection to the engine coolant temperature sensor.
- Connect the electrical connection for the (pneumatic) throttle control solenoid valve.
- Remove the engine from the overhaul stand.
Removing
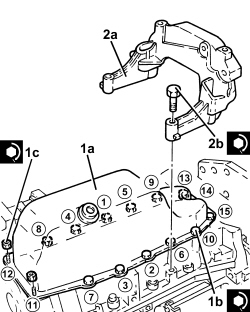
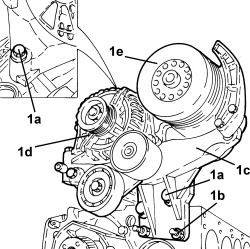
1. Undo the bolts (1a) and the nuts (1b) and remove the mounting (1c) complete with the alternator (1d) and air conditioning compressor (1e).
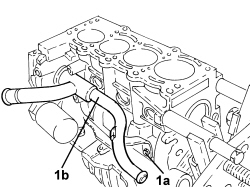
1. Undo the bolt (1a) and remove the rigid engine coolant pump inlet pipe (1b) with seal.
1. Undo bolts (1a) and nut (1b) securing the water pump to the crankcase.
2. Remove the sealant using the tool (2a) and remove the water pump (2b).
| Tool | Description | Function | Validity |
|---|---|---|---|
| 1.870.718.000 | Blade | Cut sealant | all versions |
- Clean thoroughly between the crankcase and water pump mating surfaces.
3. Using a suitable tool remove the engine oil filter cartridge.
4. Remove the minimum engine oil pressure switch.
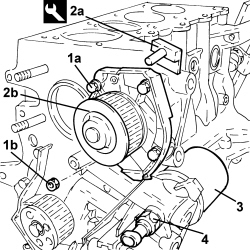
1. Undo the bolts (1a) and remove the crankcase front cover (1b) with the oil pump incorporated, complete with gasket (1c) and intake duct (1d).
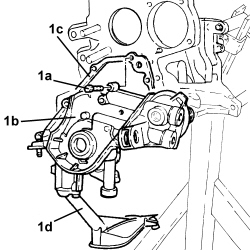
1. Fit the tool (1a) and undo the bolt (1b) securing the crankshaft gear.
| Tool | Description | Function | Validity |
|---|---|---|---|
| 2.000.004.500 | Template | Locking drive pulley | 1.2 8V 1.4 16V |
- Remove the template fitted previously.
2. Remove the crankshaft gear.
3. Undo the bolt (3a) and remove the rpm sensor (3b).
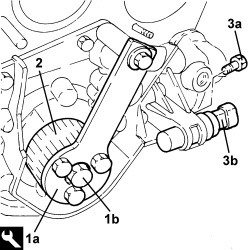
1. Undo the bolts (1a) and remove the crankshaft rear cover (1b).
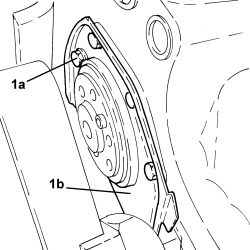
- Rotate the engine block through 180°.
1. Fit the tool for rotating the crankshaft.
| Tool | Description | Function | Validity |
|---|---|---|---|
| 1.860.815.000 | Flange | Crankshaft rotation | 1.3 Mjet 1.4 16V |
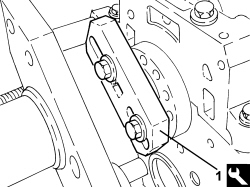
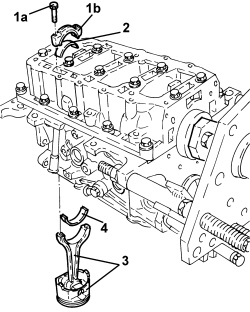
1. Undo the bolts (1a) and remove the connecting rod caps (1b).
2. Remove the lower connecting rod half-bearings.
3. Remove the connecting rod - piston assemblies.
4. Remove the upper connecting rod half-bearings.
The arrow on the piston crown facing the timing side indicates the fitting direction.
The matching of the connecting rod-cap is the "BREAKING" type therefore the position is compulsory and the number corresponding to the position of the cylinder must be present.
- Remove the flange for rotating the crankshaft fitted previously.
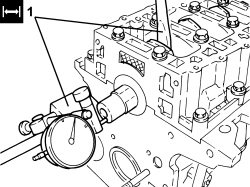
1. Using a dial gauge, check that the crankshaft endfloat is within specified limits.
| Measurement | Value | Validity |
|---|---|---|
| Crankshaft endfloat (mm) | 0.155 ÷ 0.355 | 1.4 16V |
- Remove the dial gauge.
If the value for the crankshaft endfloat does not correspond with the recommended figures, when refitting, regrind the crankcase seat and use the central main bearing half incorporating appropriately oversized crankshaft thrust half-washers.
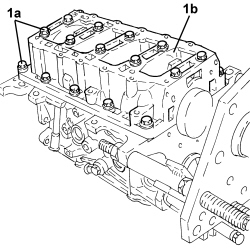
1. Undo the bolts (1a) and remove the lower crankcase (1b), complete with lower half-bearings, from the engine block.
1. Remove the lower main half bearings from the engine block.
2. Remove the crankshaft.
3. Remove the upper main half-bearings.
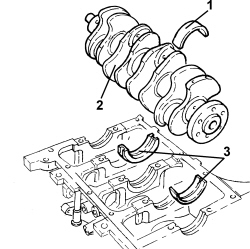
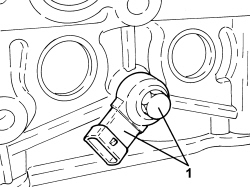
1. Undo the bolt and remove the knock sensor.
- Remove the engine block base locating bushes with the engine block.
- Raise the engine block using a hydraulic lift and place it on a suitable workbench.
Op. 1084B18 ENGINE OIL PUMP, REMOVED - CHECK AT BENCH
1. Remove the coolant chamber plugs from the crankcase using an appropriate steel striker.
2. Remove the lubrication duct plug from the crankcase using a steel striker.
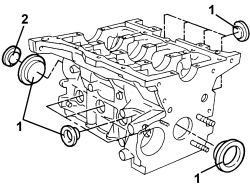
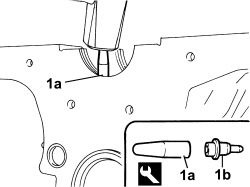
1. Remove the oil jets (1a) using the tool (1b).
| Tool | Description | Function | Validity |
|---|---|---|---|
| 1.860.395.000 | Striker | Engine oil jet removal | 1.2 8V 1.4 16V |
Insert the drift guide hole on the nozzle surface to prevent the drift from slipping and damaging the cylinder liner during the removal operation.
Use new oil jets when refitting.
Refitting
- Wash and check the appearance of all components removed.
- Place the crankcase on the overhaul stand.
- Fit the water/oil sealing plugs in the crankcase using suitable fitting tools and sealant.
- Fit the locating bushes for the crankcase.
1. Use the tool (1a) and a plastic mallet to fit the new oil jets (1b).
| Tool | Description | Function | Validity |
|---|---|---|---|
| 1.860.313.000 | Fitting tool | Engine oil jet fitting | 1.2 8V 1.4 16V |
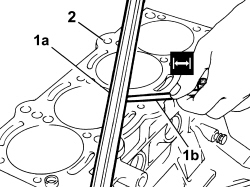
1. Using a calibrated metal rule (1a) and a feeler gauge (1b), check the flatness of the cylinder head - engine block support surface.
2. If the measurement does not correspond to the recommended values, regrind the cylinder head support surface.
| Measurement | Value | Validity |
|---|---|---|
| Cylinder head support surface flatness (mm) | < 0.1 | 1.2 8V 1.4 16V |
- Measure the diameter of the cylinder liners and check that they correspond to the recommended figures.
| Measurement | Value | Validity |
|---|---|---|
| Cylinder liner diameter - Grade A (mm) | 72.000 ÷ 72.010 | 1.4 16V |
| Measurement | Value | Validity |
|---|---|---|
| Cylinder liner diameter - Grade B (mm) | 72.010 ÷ 72.020 | 1.4 16V |
| Measurement | Value | Validity |
|---|---|---|
| Cylinder liner diameter - Grade C (mm) | 72.020 ÷ 72.030 | 1.4 16V |
- Check that the ovality of the cylinder liners/bores is within the recommended limits.
| Measurement | Value | Validity |
|---|---|---|
| Cylinder liner ovality (mm) | ± 0.05 | 1.2 8V 1.4 16V |
- Check that the taper of the cylinder liners is within the recommended limits.
| Measurement | Value | Validity |
|---|---|---|
| Cylinder liner taper (mm) | ± 0.005 | 1.2 8V 1.4 16V |
- If the cylinder bore, taper or ovality measurements are not within the recommended limits, ream the cylinder bores following the recommended oversizes.
In the case of reaming, all the liners must have the same oversize.
| Measurement | Value | Validity |
|---|---|---|
| Cylinder liner diameter oversize (mm) | 0.1 | all versions |
- Check that the diameter of the main journals is within the recommended limits.
| Measurement | Value | Validity |
|---|---|---|
| Main journal diameter - Category A (mm) | 47.997 ÷ 48.003 | 1.4 16V |
| Measurement | Value | Validity |
|---|---|---|
| Main journal diameter - Category B (mm) | 47.988 ÷ 47.994 | 1.4 16V |
| Measurement | Value | Validity |
|---|---|---|
| Main journal diameter - Category C (mm) | 47.982 ÷ 47.988 | 1.4 16V |
- If the diameter of the main journals does not fall within the recommended values, they should be reground to the recommended undersize.
Because the crankshaft has undergone nitriding, this treatment should be repeated and the size re-checked if it is ground.
| Measurement | Value | Validity |
|---|---|---|
| Main journal diameter undersize (mm) | 0.127 | 1.2 8V 1.4 16V |
- Check that the diameter of the crankpins is within the recommended limits.
| Measurement | Value | Validity |
|---|---|---|
| Crankpin diameter (mm) | 41.990 ÷ 42.008 | 1.2 8V 1.4 16V |
- If the diameter of the crankpins is not correct, they should be reground to the recommended undersize.
Because the crankshaft has undergone nitriding, this treatment should be repeated and the size re-checked if it is ground.
| Measurement | Value | Validity |
|---|---|---|
| Crankpin diameter undersize (mm) | 0.127 | 1.2 8V 1.4 16V |
- Check the main bearings, noting that the half-bearings should not be adapted. Replace them if scoring or signs of binding are noted.
- Fit the main bearing halves in their seats on the upper crankcase, aligning the lubrication ports and ensuring scrupulous cleanliness. The central main bearing half incorporates thrust half-washers because it performs a load-bearing function and also acts as a thrust bearing.
- If the crankshaft has been ground, fit new oversize half-bearings to restore the initial tolerance conditions.
1. Fit the crankshaft in the special housing in the engine block with the upper half-bearings.
2. Fit the calibrated wire (plastigage) for measuring the main journal clearance.
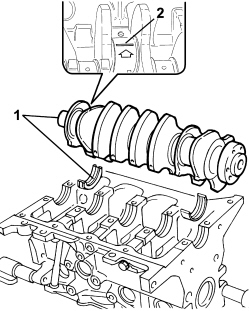
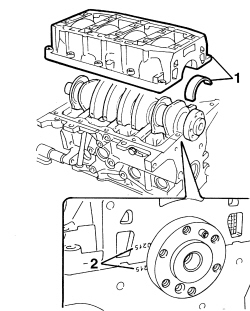
1. Fit the main half-bearings in the lower crankcase.
2. Fit the lower crankcase on the engine block, checking that the codes stamped on both parts of the crankcase correspond, because the crankcase components are not interchangeable.
- The size of the main half-bearings is given.
| Measurement | Value | Validity |
|---|---|---|
| Main half-bearings - Category 1 (red) (mm) | 1.836 ÷ 1.840 | 1.2 8V 1.4 16V |
| Measurement | Value | Validity |
|---|---|---|
| Main half-bearings thickness - Category 2 (blue) (mm) | 1.843 ÷ 1.847 | 1.2 8V 1.4 16V |
| Measurement | Value | Validity |
|---|---|---|
| Main half-bearings thickness - Category 3 (yellow) (mm) | 1.848 ÷ 1.852 | 1.2 8V 1.4 16V |
| Measurement | Value | Validity |
|---|---|---|
| Main bearing half undersize (mm) | 0.127 | 1.4 16V |
- Tighten the bolts securing the lower crankcase to the engine block to the specified torque.
| Component | Fastening | dia | Value (daNm) | Validity |
|---|---|---|---|---|
| Lower crankcase (on engine block) | Bolt | M10x1.25x96 | 2.0 + 80° | 1.3 Multijet 1.4 16V |
| Component | Fastening | dia | Value (daNm) | Validity |
|---|---|---|---|---|
| Lower crankcase (on engine block) | Bolt | M8x1.25x40 | 3.0 | 1.3 Multijet 1.4 16V |
1. Remove the lower crankcase and check the main journal clearance. Use an appropriate measuring device to measure the width of the plastigage.
Check one main journal at a time, without rotating the crankshaft.
| Measurement | Value | Validity |
|---|---|---|
| Clearance between main bearings - crankshaft main journals (mm) | 0.025 ÷ 0.040 | 1.2 8V 1.4 16V |
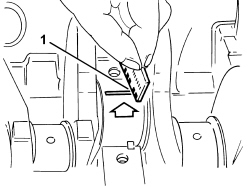
- After checking all the main journals, apply sealant to the contact surfaces between the lower crankcase and upper crankcase. Then fit the lower crankcase permanently by tightening the bolts to torque in the order described previously.
Apply a 2-mm thick continuous sealant strip to the lower crankcase surface.
- Check that the outer diameter of the pistons corresponds to the recommended figures; if not, replace the pistons complete with sealing rings and piston pins.
| Measurement | Value | Validity |
|---|---|---|
| Piston outer diameter -Grade A (mm) | 71.960 ÷ 71.970 | 1.4 16V |
| Measurement | Value | Validity |
|---|---|---|
| Piston outer diameter - Grade B (mm) | 71.970 ÷ 71.980 | 1.4 16V |
| Measurement | Value | Validity |
|---|---|---|
| Piston outer diameter - Grade C (mm) | 71.980 ÷ 71.990 | 1.4 16V |
Measure perpendicular to the gudgeon pin axis, 9 mm from the lower edge of the skirt.
- Position the pistons in the cylinder liners and use a feeler gauge to measure the specified clearance.
| Measurement | Value | Validity |
|---|---|---|
| Clearance between piston - cylinder liner (mm) | 0.030 ÷ 0.050 | 1.4 16V |
- Check that the inner bore of the piston pin housings is within the recommended limits; if not, replace the pistons.
| Measurement | Value | Validity |
|---|---|---|
| Piston pin housing diameter (mm) | 17.982 ÷ 17.986 | 1.4 16V |
- Check that the outer diameter of the piston pins is within the recommended limits; if not, replace the worn parts.
| Measurement | Value | Validity |
|---|---|---|
| Gudgeon pin outer diameter (mm) | 17.970 ÷ 17.974 | 1.2 8V 1.4 16V |
- Use a micrometer gauge to measure the thickness of the piston sealing rings.
| Measurement | Value | Validity |
|---|---|---|
| Cylinder compression 1st sealing ring thickness (mm) | 0.970 ÷ 0.990 | 1.4 16V |
| Measurement | Value | Validity |
|---|---|---|
| Cylinder compression 2nd sealing ring thickness (mm) | 1.170 ÷ 1.190 | 1.4 16V |
| Measurement | Value | Validity |
|---|---|---|
| Cylinder compression 3rd sealing ring thickness (mm) | 1.975 ÷ 1.990 | 1.4 16V |
| Measurement | Value | Validity |
|---|---|---|
| Sealing ring oversize (mm) | 0.1 | 1.2 8V 1.4 16V |
1. Fit the sealing rings (1a) in the cylinder liners/bores and use a feeler gauge (1b) to check the gap between the seal ends is within specified limits. Otherwise replace the sealing rings.
| Measurement | Value | Validity |
|---|---|---|
| Cylinder compression 1st sealing ring gap (mm) | 0.20 ÷ 0.40 | 1.4 16V |
| Measurement | Value | Validity |
|---|---|---|
| Cylinder compression 2nd sealing ring gap (mm) | 0.25 ÷ 0.45 | 1.4 16V |
| Measurement | Value | Validity |
|---|---|---|
| Cylinder compression 3rd sealing ring gap (mm) | 0.20 ÷ 0.40 | 1.4 16V |
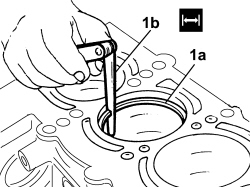
- Check that the piston ring seats are within the recommended values.
| Measurement | Value | Validity |
|---|---|---|
| Sealing ring seat in piston - 1st groove (mm) | 1.020 ÷ 1.040 | 1.4 16V |
| Measurement | Value | Validity |
|---|---|---|
| Sealing ring seat in piston - 2nd groove (mm) | 1.210 ÷ 1.230 | 1.4 16V |
| Measurement | Value | Validity |
|---|---|---|
| Sealing ring seat in piston - 3rd groove (mm) | 2.010 ÷ 2.030 | 1.4 16V |
1. Use a feeler gauge (1a) to check mating clearance between retaining rings (1b) and grooves on pistons (1c).
| Measurement | Value | Validity |
|---|---|---|
| Cylinder compression 1st sealing ring endfloat (mm) | 0.030 ÷ 0.070 | 1.4 16V |
| Measurement | Value | Validity |
|---|---|---|
| Cylinder compression 2nd sealing ring endfloat (mm) | 0.020 ÷ 0.060 | 1.4 16V |
| Measurement | Value | Validity |
|---|---|---|
| Cylinder compression 3rd sealing ring endfloat (mm) | 0.020 ÷ 0.055 | 1.4 16V |
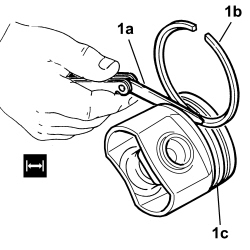
- Check that the diameters of the big ends and the small ends are within the recommended values.
| Measurement | Value | Validity |
|---|---|---|
| Big end diameter (mm) | 45.128 ÷ 45.138 | 1.4 16V |
| Measurement | Value | Validity |
|---|---|---|
| Small end diameter (mm) | 17.939 ÷17.956 | 1.4 16V |
Op. 1084B18 ENGINE OIL PUMP, REMOVED - CHECK AT BENCH
- Fit the tool for rotating the crankshaft.
| Tool | Description | Function | Validity |
|---|---|---|---|
| 1.860.815.000 | Flange | Crankshaft rotation | 1.3 Mjet 1.4 16V |
- Fit the connecting rod-piston assemblies and align in accordance with the following references.
1. Piston class and arrow indicating timing side.
2. Area where the number of the cylinder liner matching the connecting rod is stamped.
3. Gudgeon pin offset
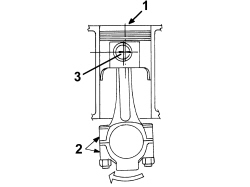
The matching of the connecting rod-cap is the "BREAKING" type therefore the position is compulsory and the number corresponding to the position of the cylinder must be present.
Letters identifying the cylinder liner classes are shown on the crankcase.
1. Fit connecting rod/piston assemblies (1a) with half-bearings, using tool (1b) to compress retaining rings and then fit the piston into the liner.
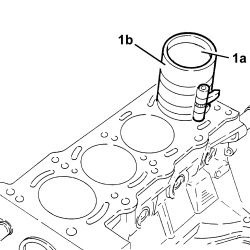
- Rotate the engine on the overhaul stand.
1. Apply the calibrated wire (plastigage) for measuring the crankpin clearance.
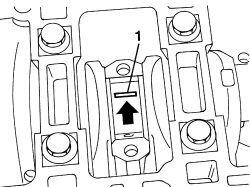
- The size of the connecting rod half-bearings is given.
| Measurement | Value | Validity |
|---|---|---|
| Connecting rod half-bearing thickness (mm) | 1.544 ÷ 1.548 | 1.2 8V 1.4 16V |
- Refit the connecting rod caps complete with half-bearings and secure them by tightening the bolts to the recommended torque.
The connecting rod caps are fracture type. If replaced, they are supplied pre-fractured by the manufacturer. Check that the parts are free of burrs, blisters, scratches or any other surface defect. Before installation, parts must be thoroughly washed, cleaned and dried. Fit the connecting rod caps so that the number stamped on each cap faces towards the same side as the number stamped on the big end.
Each connecting rod must be paired with its cap, respecting the numerical references stamped on the parts. Connecting rods and connecting rod caps are not interchangeable.
| Component | Fastening | dia | Value (daNm) | Validity |
|---|---|---|---|---|
| Connecting rod | Bolt | M8x1x38.5 | 2.0 + 40° | 1.3 Multijet 1.4 16V |
1. Remove the connecting rod caps and check the crankpin clearance. Use an appropriate gauge to measure the width of the plastigage.
Check one crankpin at a time, without rotating the crankshaft.
| Measurement | Value | Validity |
|---|---|---|
| Clearance between connecting rod bearings - crankpin bearings (mm) | 0.023 ÷ 0.060 | 1.4 16V |
- If the value measured is not within the recommended figures, replace the connecting rod bearings.
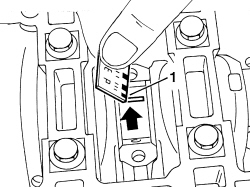
- Refit the connecting rod caps complete with half-bearings and secure them by tightening the bolts to the torque given previously.
- Rotate the engine on the overhaul stand.
- Position a new oil pump gasket.
- Fit the front crankcase cover with built-in oil pump complete with intake chamber and secure by tightening the bolts.
- Place the engine oil filter in its housing.
- Place the minimum engine oil pressure switch in position and tighten it to the recommended torque.
| Component | Fastening | dia | Value (daNm) | Validity |
|---|---|---|---|---|
| Engine oil pressure switch | M14x1.5 | 3.2 | all versions |
- Fit the oil seal on the crankshaft front cover using the tool.
| Tool | Description | Function | Validity |
|---|---|---|---|
| 1.860.990.000 | Fitting tool | Fitting oil seal on exhaust camshaft | 1.4 16V |
- Remove the flange for rotating the crankshaft fitted previously.
- Place the crankcase rear cover in position and secure it by tightening the bolts to the recommended torque.
| Component | Fastening | dia | Value (daNm) | Validity |
|---|---|---|---|---|
| Crankshaft front and rear cover | Bolt | M6x1x16 | 1.0 | 1.4 16V |
| Component | Fastening | dia | Value (daNm) | Validity |
|---|---|---|---|---|
| Crankshaft front and rear cover | Bolt | M6x1x32 | 1.0 | 1.4 16V |
| Component | Fastening | dia | Value (daNm) | Validity |
|---|---|---|---|---|
| Crankshaft front and rear cover | Bolt | M6x1x22 | 1.0 | 1.4 16V |
- Place the crankshaft gear in its housing.
1. Because the timing is adjusted with the four pistons in line, i.e. half-way along their effective strokes, it is essential to position the crankshaft in phase with the camshafts. They can be approximately positioned by turning the crankshaft gear (1a) until the locating dowel (1b) is positioned opposite to the rpm sensor seat (1c) with the first cylinder piston in descending phase, i.e. intake.
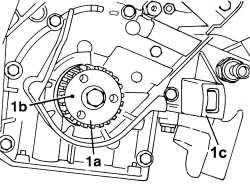
1. Position the counter-torque tool.
| Tool | Description | Function | Validity |
|---|---|---|---|
| 2.000.004.500 | Template | Locking drive pulley | 1.2 8V 1.4 16V |
2. Secure the crankshaft gear (2a) by tightening the bolt (2b) to the specified torque.
| Component | Fastening | dia | Value (daNm) | Validity |
|---|---|---|---|---|
| Toothed drive pulley (on crankshaft) | Bolt | M12x1x46 (left) | 2.0 + 110° | 1.4 16V |
3. Position the rpm sensor (3a) in its housing and secure it by tightening the bolt (3b) to the recommended torque.
| Component | Fastening | dia | Value (daNm) | Validity |
|---|---|---|---|---|
| Engine rpm sensor (on oil pump) | Bolt | M6X1X16 | 0.9 | 1.4 16V |
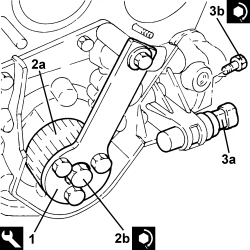
- Apply silicon sealant to the outer edge of the water pump.
- Position the water pump in its housing and secure it, tightening the bolts and the nut to the recommended torque.
| Component | Fastening | dia | Value (daNm) | Validity |
|---|---|---|---|---|
| Water pump (on engine block) | Nut | M6x1 | 1.0 | 1.4 16V |
| Component | Fastening | dia | Value (daNm) | Validity |
|---|---|---|---|---|
| Water pump (on engine block) | Nut | M6x1 | 0.9 | 1.3 Multijet |
- Place the water pump rigid inlet pipe, complete with new gasket, in position and secure it using the bolt.
- Rotate the engine through 180° on the overhaul stand.
- Clean the lower crankcase and oil sump contact surfaces, removing the silicone sealant residues.
- Apply the sealant without a break to the entire perimeter of the oil sump.
- Position the oil sump in its housing and secure it, tightening the bolts and the nuts to the recommended torque.
When positioning the oil sump, avoid significant sideways movements that could remove the sealant.
| Component | Fastening | dia | Value (daNm) | Validity |
|---|---|---|---|---|
| Engine oil sump (on lower crankcase) | Bolt | M6x1x25 | 0.9 | 1.4 16V |
| Component | Fastening | dia | Value (daNm) | Validity |
|---|---|---|---|---|
| Engine oil sump (with engine oil pump) | Nut | M6x1 | 0.9 | all versions |
- Rotate the engine through 180° on the overhaul stand.
- Fit the locating dowels in the crankcase.
- Fit a new cylinder head gasket on the cylinder block.
- Position the cylinder head on the crankcase by aligning the locating dowels.
1. Tighten the bolts securing the cylinder head to the recommended torque.
Follow the order shown in the diagram for each tightening sequence.
| Component | Fastening | dia | Value (daNm) | Validity |
|---|---|---|---|---|
| Cylinder head (on engine block) | Bolt | M9x1.25x96 | 3.0 + 90° + 90° | 1.2 8V 1.4 16V |
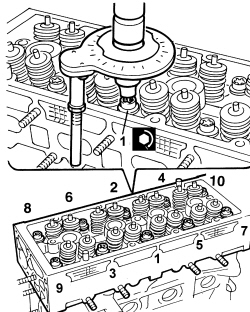
- Fit the locating dowels and position the cylinder head extension gasket on the cylinder head support plane.
- Position the tappet retaining tools beneath the camshaft housing, then place the camshaft housing on the cylinder head and withdraw the tools.
- Use the tool to tighten the camshaft housing bolts to the specified torque.
| Tool | Description | Function | Validity |
|---|---|---|---|
| 1.860.834.000 | Spanner | Loosen/tighten the cylinder head extension bolts | 1.4 16V |
| Component | Fastening | dia | Value (daNm) | Validity |
|---|---|---|---|---|
| Camshaft housing (on cylinder head) | Bolt | M8x1x50 | 1.5 | 1.4 16V |
- Refit the plugs complete with new O-rings and tighten them to the recommended torque.
| Component | Fastening | dia | Value (daNm) | Validity |
|---|---|---|---|---|
| Camshaft housing bolts sealing plug | M16x1 | 1.5 | 1.4 16V |
- Place the thermostat in its housing with the new O-ring and secure it by tightening the bolts to the recommended torque.
| Component | Fastening | dia | Value (daNm) | Validity |
|---|---|---|---|---|
| Thermostat unit (on cylinder head) | Bolt | M6x1x22 | 1.0 | 1.4 16V |
- Place the timing belt moving tensioner in its housing without tightening the nut.
- Place the driven pulley/phase transformer in its housing.
- Fit the driven pulley/phase transformer locking tool.
| Tool | Description | Function | Validity |
|---|---|---|---|
| 2.000.015.800 | Counter-torque | Locking driven pulley | 1.4 16V |
- Tighten the driven pulley/phase transformer fixing bolt to the specified torque.
| Component | Fastening | dia | Value (daNm) | Validity |
|---|---|---|---|---|
| Variable valve timing | Bolt | M12x1.25x40 | 2.0 + 50° | 1.4 16V |
- Tighten the retaining bolts for the camshaft idler gears to the recommended torque.
| Component | Fastening | dia | Value (daNm) | Validity |
|---|---|---|---|---|
| Camshsaft idler gear (inlet side) | Bolt | M12x1.25x40 | 12.0 | 1.4 16V |
| Component | Fastening | dia | Value (daNm) | Validity |
|---|---|---|---|---|
| Camshsaft idler gear (exhaust side) | Bolt | M12x1.25x40 | 12.0 | 1.4 16V |
- Loosen the bolt securing the driven pulley/phase transformer and remove the locking tool.
- Remove the tool used previously for counter-torque for tightening the bolt securing the crankshaft gear.
| Tool | Description | Function | Validity |
|---|---|---|---|
| 2.000.004.500 | Template | Locking drive pulley | 1.2 8V 1.4 16V |
1. Position the tools (1a) in the seats for the spark plug for 1st and 2nd cylinder, tightening the pins (1b) to a torque of 0.5 daNm.
| Tool | Description | Function | Validity |
|---|---|---|---|
| 1.860.992.000 | Bearings | Crankshaft timing | 1.4 16V |
2. Rotate the crankshaft in its normal direction of rotation until the tool moving pins fitted previously are aligned with one another.
Rotate the crankshaft proceeding gradually to prevent the tool pins being expelled by the compression of the pistons.
3. The camshaft timing was adjusted previously by fitting the tools illustrated.
| Tool | Description | Function | Validity |
|---|---|---|---|
| 1.860.985.000 | Locating pins | Camshaft timing | 1.4 16V |
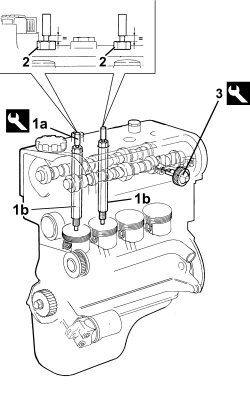
- Proceed with fitting the timing drive belt, firstly fitting it on the crankshaft gear, the water pump pulley, the driven pulley/phase transformer and lastly on the moving tensioner.
Ensure that this operation is performed with the driven pulley/phase transformer slack.
1. Tension the timing belt by turning it anticlockwise with the tool (1a) and the moving tensioner (1b) and then secure it when the reference fork (1c) is in contact (1d).
| Tool | Description | Function | Validity |
|---|---|---|---|
| 1.860.987.000 | Spanner | Tensioning toothed timing drive belt | 1.2 8V 1.4 16V |
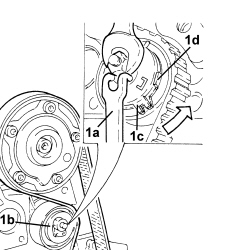
- Fit the driven pulley/phase transformer locking tool.
| Tool | Description | Function | Validity |
|---|---|---|---|
| 2.000.015.800 | Counter-torque | Locking driven pulley | 1.4 16V |
- Tighten the driven pulley/phase transformer fixing bolt to the specified torque.
| Component | Fastening | dia | Value (daNm) | Validity |
|---|---|---|---|---|
| Variable valve timing | Bolt | M12x1.25x40 | 2.0 + 50° | 1.4 16V |
- Place the driven pulley/phase transformer sealing plug in position and tighten it to the recommended torque.
| Component | Fastening | dia | Value (daNm) | Validity |
|---|---|---|---|---|
| Phase transformer sealing plug | M27x1.5 | 3.0 | 1.4 16V |
- Remove the tools positioned previously for the timing and locking of the camshafts and rotate the crankshaft through two revolutions.
1. Loosen the moving tensioner nut and adjust the front fork using the tool (1a) until it is aligned with the rear fork (1b).
2. Tighten the nut securing the moving tensioner to the recommended torque.
| Component | Fastening | dia | Value (daNm) | Validity |
|---|---|---|---|---|
| Timing system moving tensioner | Nut | M8 | 2.5 | 1.4 16v |
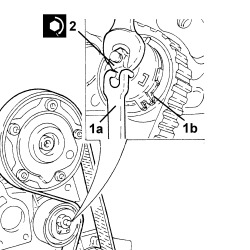
- Turn the crankshaft through two revolutions in its normal rotation direction, then reposition the tools used to adjust engine timing and check the engine is in phase.
- Remove the tools used for timing the engine.
- Place the side plugs in their seats in the cylinder head extension and tighten them to the recommended torque.
| Component | Fastening | dia | Value (daNm) | Validity |
|---|---|---|---|---|
| Camshaft housing bolts sealing plug | M16x1 | 1.5 | 1.4 16V |
- Place the flywheel side camshaft seal rear cover in its housing and secure it using the nuts.
- Position the timing sensor in its housing and secure it using the bolt.
- Refit the connector carrier bracket in its housing.
- Place the timing belt inner guard in its housing and secure it using the bolt.
- Place the oil vapour separator in its housing and secure it using the bolts and the nut.
- Fit the spark plugs and tighten them to the recommended torque.
| Component | Fastening | dia | Value (daNm) | Validity |
|---|---|---|---|---|
| Spark plugs | M12x1.2 | 1.8 | 1.4 16V |
- Fit the ignition coils and tighten them to the recommended torque.
| Component | Fastening | dia | Value (daNm) | Validity |
|---|---|---|---|---|
| Coils | Bolt | M6x1x22 | 0.9 | 1.4 16V |
- Place the intake manifold on the cylinder head and secure it tightening the bolts to the recommended torque.
| Component | Fastening | dia | Value (daNm) | Validity |
|---|---|---|---|---|
| Intake manifold (on cylinder head) | Bolt | M7x1x42 | 1.5 | 1.4 16V |
| Component | Fastening | dia | Value (daNm) | Validity |
|---|---|---|---|---|
| Intake manifold (on cylinder head) | Bolt | M7x1x47 | 1.5 | 1.4 16V |
- Connect the pipe to the oil vapour separator and secure it using the band.
- Place the engine oil dipstick pipe back in its housing and secure it with the bolt.
- Fit the upper and lower timing belt covers and secure them using the bolts.
- Place the timing side rigid engine support in position and secure it by tightening the bolts to the recommended torque.
| Component | Fastening | dia | Value (daNm) | Validity |
|---|---|---|---|---|
| Timing side engine support | Bolt | M10x1.25x55 | 6.0 | 1.2 8V 1.4 16V |
- Position the knock sensor in its housing and secure it by tightening the bolt to the recommended torque.
| Component | Fastening | dia | Value (daNm) | Validity |
|---|---|---|---|---|
| Knock sensor | Bolt | M8x1.25x28 | 2.5 | 1.4 16V |
- Place the mounting complete with alternator and air conditioning compressor in position and secure by tightening the nuts and bolts to the recommended torque.
| Component | Fastening | dia | Value (daNm) | Validity |
|---|---|---|---|---|
| Alternator/compressor mounting (side on crankcase) | Bolt | M10x1.25x35 | 5.0 | 1.2 8V 1.4 16V |
| Component | Fastening | dia | Value (daNm) | Validity |
|---|---|---|---|---|
| Alternator/compressor mounting (side on crankcase) | Bolt | M10x1.25x60 | 5.0 | 1.2 8V 1.4 16V |
| Component | Fastening | dia | Value (daNm) | Validity |
|---|---|---|---|---|
| Alternator/compressor mounting (side on crankcase) | Bolt | M10x1.25x85 | 5.0 | 1.2 8V 1.4 16V |
- Position the crankshaft pulley in its housing and secure it by tightening the bolts to the recommended torque.
| Component | Fastening | dia | Value (daNm) | Validity |
|---|---|---|---|---|
| Service pulley (on crankshaft) | Bolt | M8x1.25x18 | 2.5 | 1.2 8V |
- Fit the auxiliary drivebelt.
- Place the phase transformer solenoid guard back in its housing and secure it using the bolts.
- Connect the engine block earth lead and tighten the bolt.
- Connect the alternator earth lead and tighten the nut.
- Connect the electrical connection for the slider solenoid valve.
- Connect the electrical connection for the air conditioning compressor engagement solenoid valve.
- Connect the electrical connection for the knock sensor.
- Connect the injector wiring junction.
- Secure the electrical connection for the fuel vapour recovery solenoid.
- Connect the electrical connection for the slider position sensor.
- Connect the electrical connection for the throttle body.
- Secure the electrical connection for the timing sensor.
- Connect the electrical connection for the engine coolant temperature sensor.
- Connect the electrical connections for the ignition coils.
- Connect the electrical connection for the absolute pressure sensor.
- Connect the earth lead and tighten the bolt.
- Connect the electrical connection for the air pressure/temperature sensor.
- Connect the electrical connection for the phase transformer actuator.
- Connect the electrical connection for the rpm sensor.
- Connect the electrical connection for the engine oil pressure switch.
- Fasten the cable loom retaining duct to the camshaft housing and attach the intermediate retaining clips.
Parts & tools for this job For 2007 Fiat 500
- PARTEngine gasket setSearch: Fiat 500 2007 engine gasket set
- TOOLTorque wrenchSearch: 3/8 inch torque wrench
- TOOLFeeler gauge setSearch: feeler gauge set
Links open Amazon search results in a new tab. As an Amazon Associate I earn from qualifying purchases.