
Cylinder head - r + r and replace gasket
- Make
- Fiat
- Model
- Doblò Factory Service Manual
- Year
- 2000–2010
- Section
- Cylinder head – s › Cylinder head - r + r and replace gasket
Cylinder head - r + r and replace gasket
Removing
Position the vehicle on a lift.
Op. 7055B54 PROTECTION/GUARD UNDER ENGINE - R.R.
Op. 5530B52 BATTERY SUPPORT/DRIP TRAY - R.R.
Op. 1048A10 AIR FILTER ASSEMBLY - R.R.
Position a suitable container for collecting the coolant.
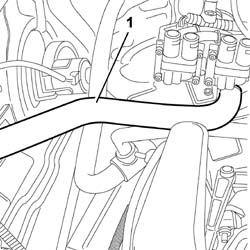
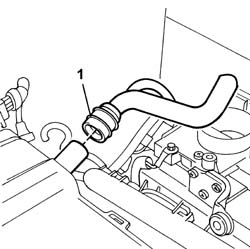
1. Disconnect the upper radiator pipe from the thermostat.
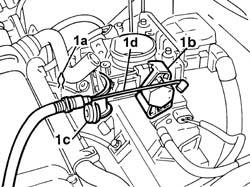
1. Lift up the clip (1a), release the cable from the connector (1b) on the throttle control and from the bracket (1c), then place the accelerator control cable (1d) at the side.
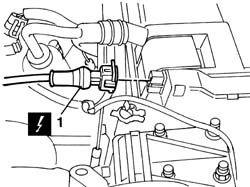
1. Disconnect the engine rpm sensor electrical connector.
| Description | Connector | |
|---|---|---|
| 1 | Rpm sensor | See K46 RPM SENSOR ( ENGINE ) |
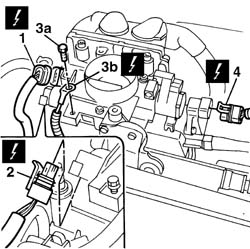
1. Disconnect the electrical connector for the throttle position sensor.
| Description | Connector | |
|---|---|---|
| 1 | Throttle position sensor | See K56 THROTTLE POSITION SENSOR ( ENGINE ) |
2. Disconnect the electrical connector for the idle speed actuator.
| Description | Connector | |
|---|---|---|
| 2 | Idle actuator | See N74 IDLE ACTUATOR |
3. Unscrew the fixing bolt (3a) and disconnect the earth on the throttle body (3b).
| Description | Connector | |
|---|---|---|
| 3b | Injection control unit earth | See C60 EARTH ON ENGINE ( ENGINE ) |
4. Disconnect the intake air pressure/temperature sensor.
| Description | Connector | |
|---|---|---|
| 4 | Integrated air temperature sensor | See K43 INTEGRATED AIR TEMPERATURE SENSOR ( ENGINE ) |
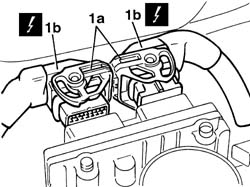
1. Adjust the fixing levers (1a) and disconnect the electrical connectors for the injection control unit (1b).
| Description | Connector | |
|---|---|---|
| 1b | Engine management control unit | See M010 ENGINE MANAGEMENT ECU |
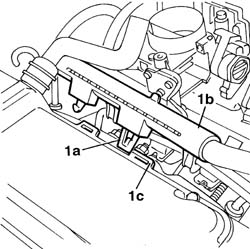
1. Adjust the fastening clip (1a), detach the cable ducting (1b) for the injector wiring from the slots (1c) on the tappet cover.
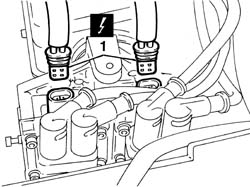
1. Disconnect the electrical connectors for the ignition coils.
| Description | Connector | |
|---|---|---|
| 1 | ignition coils | See A30 IGNITION 'COIL ( ENGINE ) |
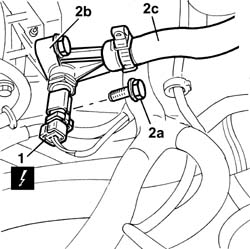
1. Disconnect the electrical connector for the coolant temperature sensor.
| Description | Connector | |
|---|---|---|
| 1 | I.E. engine temperature sensor | See K45 COOLANT TEMPERATURE SENDER UNIT ( ENGINE ) |
2. Undo the bolts (2a) fixing the plastic filler (2b), then move it away from the connector on the intake manifold complete with coolant hose (2c).
1. Disconnect the oil vapour recovery pipe from the tappet cover.
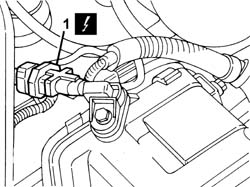
1. Disconnect the electrical connection for the timing sensor from the cover
| Description | Connector | |
|---|---|---|
| 1 | Timing sensor | See K47 TIMING SENSOR ( ENGINE ) |
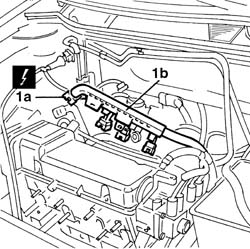
1. Disconnect the electrical connectors for the injectors (1a) and place the cable duct (1b) at the side.
| Description | Connector | |
|---|---|---|
| 1a | Injector | See N070 INJECTOR |
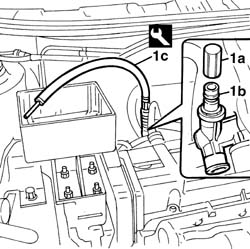
1. Remove the protective cap (1a) from the fuel manifold breather valve (1b) and use the tool (1c) to discharge the fuel pressure.
Collect the fuel in a suitable container.
| Description | Code | |
|---|---|---|
| 1c | Rapid attachment connector | 1.870.684.000 |
1. Disconnect the fuel supply pipe rapid connector.
2. Disconnect the electrical connector for the fuel vapour flow enablement solenoid valve.
| Description | Connector | |
|---|---|---|
| 2 | Fuel vapour recovery solenoid valve | See L10 FUEL VAPOUR RECOVERY SOLENOID VALVE ( ENGINE ) |
3. Disconnect the evaporation control system pipe.
4. Disconnect the brake servo vacuum pipe.
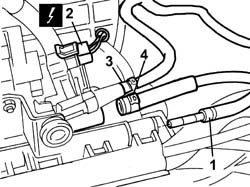
1. Undo the fixing nuts (1a), open the retaining band (1b) and remove the cable duct mounting bracket (1c).
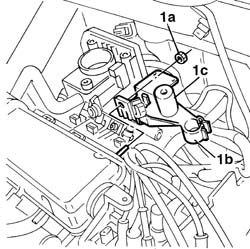
1. Undo the fixing nut and bolt.
2. Disconnect the high tension leads from the spark plugs.
3. Remove the ignition unit complete with spark plug high tension leads.
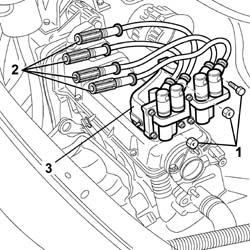
Remove the injection electrical wiring from the clips located behind the intake manifold.
1. Undo the fixing nuts (1a) and remove the intake manifold complete with throttle body (1b0.
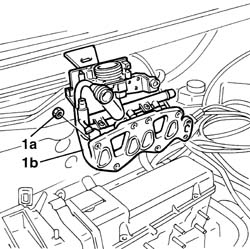
1. Undo the fixing bolts (1a) and remove the tappet cover (1b).
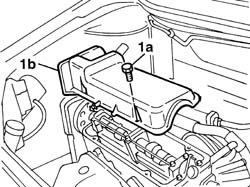
Op. 1072C44 EXHAUST MANIFOLD HEAT SHIELD R+R
1. Undo the nuts securing the exhaust manifold to the cylinder head.
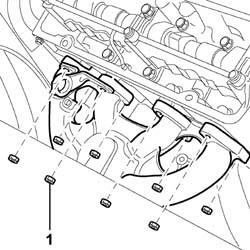
Op. 1032D12 TIMING SYSTEM PROTECTIVE COVER(S) - R + R
Raise the vehicle.
1. Undo the bolt fixing the exhaust manifold retaining bracket.
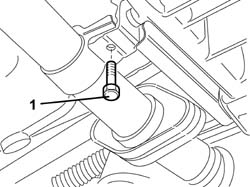
Op. 4450B04 RIGHT FRONT WHEEL - R.R.
Op. 1092B60 ALTERNATOR DRIVE BELT - R + R
Op. 1092A10 CRANKSHAFT PULLEY - R + R
Op. 1032B10 TOOTHED TIMING BELT - R + R FOR TIMING ADJUSTMENT OR REPLACEMENT
1. Undo the fixing bolts (1a) and remove the single cylinder head (1b).
2. Remove the underlying gasket.
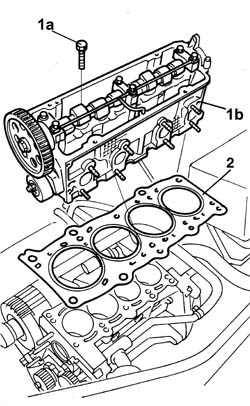
Refitting
Clean the contact surfaces between the cylinder head and engine block.
Position the cylinder head gasket with the wording "ALTO" [TOP] so that it can be read by the operator.
The cylinder head gasket is ASTADUR type.
Because the gasket is made out of special material, it undergoes a polymerisation process during engine operation and hardens considerably during usage.
In order for the polymerization process to take place the gasket must be kept in its sealed nylon container and only taken out just before fitting to prevent getting oil on it.
1. Position the cylinder head (1a) and tighten the fixing bolts (1b) to a pre-torque of 2 daNm and then to torque following the order and the figures given.
| Fastening | Component | dia | Value (daNm) | |
|---|---|---|---|---|
| 1b | Bolt | CYLINDER HEAD | M9 x 1.25 | 3 + 90° + 90° |
2. Always following the same tightening order, complete the angular tightening of the bolts using a suitable tool.
| Description | Code | |
|---|---|---|
| 2 | Torque wrench | 1.860.942.000 |
Op. 1032B10 TOOTHED TIMING BELT - R + R FOR TIMING ADJUSTMENT OR REPLACEMENT
Op. 1092A10 CRANKSHAFT PULLEY - R + R
Op. 1092B60 ALTERNATOR DRIVE BELT - R + R
Op. 4450B04 RIGHT FRONT WHEEL - R.R.
Tighten the bolt fixing the exhaust manifold retaining bracket to torque.
| Fastening | Component | dia | Value (daNm) | |
|---|---|---|---|---|
| Bolt | CATALYTIC CONVERTER (ONE) | M8 | (Collar to gearbox) 2.8 |
Lower the vehicle.
Op. 1032D12 TIMING SYSTEM PROTECTIVE COVER(S) - R + R
Tighten the nuts securing the exhaust manifold to the cylinder head to torque.
| Fastening | Component | dia | Value (daNm) | |
|---|---|---|---|---|
| Nut | CATALYTIC CONVERTER (ONE) | M8 | (Manifold to cylinder head) 3 |
Op. 1072C44 EXHAUST MANIFOLD HEAT SHIELD R+R
Fit the tappet cover and secure it using the fixing bolts.
| Fastening | Component | dia | Value (daNm) | |
|---|---|---|---|---|
| Bolt | CAM COVER | M6 | 1 |
Fit the intake manifold and secure it tightening the nuts to the recommended torque.
| Fastening | Component | dia | Value (daNm) | |
|---|---|---|---|---|
| Nut | INLET MANIFOLD | M18 x 1.25 | 2.7 |
Position the ignition coil mounting assembly and tighten the fixing nut and bolt.
Connect the high tension leads to the spark plugs.
Position the mounting bracket for the cable duct and tighten the fixing nuts.
Connect the fuel supply pipe rapid connector.
Connect the electrical connector for the fuel vapour flow enablement solenoid valve.
| Description | Connector | |
|---|---|---|
| Fuel vapour recovery solenoid valve | See L10 FUEL VAPOUR RECOVERY SOLENOID VALVE ( ENGINE ) |
Connect the evaporation control system pipe.
Connect the brake servo vacuum pipe.
Place the cable duct in position and connect the electrical connecotrs for the injectors.
| Description | Connector | |
|---|---|---|
| Injector | See N070 INJECTOR |
Connect the oil vapour recovery pipe to the tappet cover.
Connect the electrical connection for the timing sensor.
| Description | Connector | |
|---|---|---|
| Timing sensor | See K47 TIMING SENSOR ( ENGINE ) |
Fit the plastic filler complete with coolant hose.
Secure the filler to the intake manifold and tighten the fixing bolts.
Connect the electrical connector for the coolant temperature sensor.
| Description | Connector | |
|---|---|---|
| I.E. engine temperature sensor | See K45 COOLANT TEMPERATURE SENDER UNIT ( ENGINE ) |
Connect the electrical connectors for the ignition coils.
| Description | Connector | |
|---|---|---|
| Ignition coil | See A30 IGNITION 'COIL ( ENGINE ) |
Connect the electrical connectors to the junction unit.
| Description | Connector | |
|---|---|---|
| Engine management control unit | See M010 ENGINE MANAGEMENT ECU |
Connect the electrical connector for the throttle position sensor.
| Description | Connector | |
|---|---|---|
| Throttle position sensor | See K56 THROTTLE POSITION SENSOR ( ENGINE ) |
Connect the electrical connector for the idle speed actuator.
| Description | Connector | |
|---|---|---|
| Idle actuator | See N74 IDLE ACTUATOR |
Connect the earth to the throttle casing and secure it using the fixing bolt.
| Description | Connector | |
|---|---|---|
| Injection control unit earth | See C60 EARTH ON ENGINE ( ENGINE ) |
Connect the intake air pressure/temperature sensor.
| Description | Connector | |
|---|---|---|
| Integrated air temperature sensor | See K43 INTEGRATED AIR TEMPERATURE SENSOR ( ENGINE ) |
Connect the engine rpm sensor electrical connector.
| Description | Connector | |
|---|---|---|
| Rpm sensor | See K46 RPM SENSOR ( ENGINE ) |
Reposition the accelerator control cable on the mounting bracket and fit it on the throttle valve.
Connect the upper radiator pipe to the thermostat.
Op. 1048A10 AIR FILTER ASSEMBLY - R.R.
Op. 5530B52 BATTERY SUPPORT/DRIP TRAY - R.R.
Op. 1068A10 ACCELERATOR PEDAL CONTROL - CHECK, ADJUST IF NECESSARY AND LUBRICATE
Op. 0010T21 COOLANT - CHECK DENSITY AND TOP UP IF NECESSARY
Op. 7055B54 PROTECTION/GUARD UNDER ENGINE - R.R.
Remove the vehicle from the lift.
Removing
Position the vehicle on a lift.
Disconnect the negative battery terminal.
| Description | Connector | |
|---|---|---|
| Battery | See A001 BATTERY |
Op. 4450B04 RIGHT FRONT WHEEL - R.R.
Op. 7055B54 PROTECTION/GUARD UNDER ENGINE - R.R.
Op. 5530B52 BATTERY SUPPORT/DRIP TRAY - R.R.
Op. 1048A32 HOSE FROM AIR FILTER TO INTAKE MANIFOLD - R.R.
Op. 1048A10 AIR FILTER ASSEMBLY - R.R.
Op. 1056B82 INJECTION/IGNITION SYSTEM E.C.U. (ONE) - R + R
Op. 1036G48 REAR SEAL FOR CAMSHAFT FOR ONE CAMSHAFT HOUSING, LEFT OR RIGHT - R.R. AND REPLACE SEAL
Op. 1072B50 AIR INTAKE CHAMBER - R.R.
Op. 1072B14 INLET MANIFOLD - R+R AND REPLACE SEAL WITH AIR CONVEYOR/BOX REMOVED
Op. 1080B94 FRONT LAMBDA SENSOR AT CATALYTIC CONVERTER - R.R.
Op. 1072C44 EXHAUST MANIFOLD HEAT SHIELD R+R
1. Loosen the nut (1a) on the catalytic converter band, undo the bolts (1a) on the flange securing the catalytic converter.
2. Undo the nuts fixing the catalytic converter to the exhaust manifold.
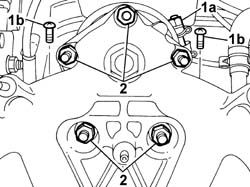
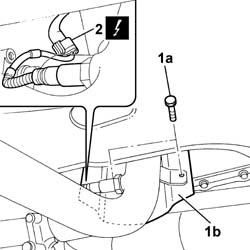
1. Raise the lift and undo the bolts (1a) fixing the lower heat shield bracket (1b) and remove it.
2. Disconnect the electrical connection for the rear Lambda sensor and move the catalytic converter away from the exhaust manifold.
| Description | Connector | |
|---|---|---|
| 2 | Lambda sensor on catalyzer | See K17 LAMBDA SENSOR ON CATALYZER ( ENGINE ) |
Op. 1088B10 ENGINE COOLING SUPPLY RESERVOIR - R.R.
Op. 4130B10 POWER STEERING FLUID RESEVOIR - R.R.
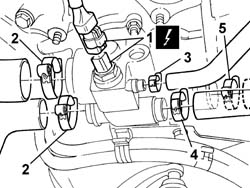
1. Disconnect the electrical connection for the engine coolant temperature sensor.
| Description | Connector | |
|---|---|---|
| 1 | I.E. engine temperature sensor | See K45 COOLANT TEMPERATURE SENDER UNIT ( ENGINE ) |
2. Disconnect the radiator coolant supply and return pipe from the thermostat, then drain any remaining coolant into the special container.
3. Disconnect the supply reservoir coolant return pipe from the thermostat.
4. Disconnect the passenger compartment heater coolant supply pipe from the thermostat.
5. Disconnect the heater coolant return pipe from the thermostat.
Op. 1092B50 ALTERNATOR/WATER PUMP DRIVE BELT - R.R.
Op. 1092B82 AUXILARY BELT MOVING TENSIONER (ONE) -R+R
Op. 1092A10 CRANKSHAFT PULLEY - R + R
Op. 1008b10 POWER UNIT FRONT SUPPORT FLEXIBLE MOUNTING (TIMING SIDE) - REPLACE
Op. 1008a46 TIMING SIDE POWER UNIT RIGID SUPPORT - R.R.
Op. 1032D12 TIMING SYSTEM PROTECTIVE COVER(S) - R + R
Op. 5510C14 IGNITION COIL/S - R+R
Op. 1032B10 TOOTHED TIMING BELT - R + R FOR TIMING ADJUSTMENT OR REPLACEMENT
Op. 1032C30 FIXED TIMING SYSTEM TENSIONER - R + R WITH TIMING BELT REMOVED
Op. 1032B40 TOOTHED DRIVEN PULLEY (ONE) - R + R WITH TIMING BELT REMOVED
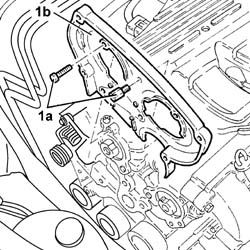
1. Undo the bolts (1a) and remove the timing belt upper rear guard (1b).
Op. 1016B26 RIGHT CAMSHAFT HOUSING - R.R. WITH TIMING BELT REMOVED - REPLACE GASKET
Op. 1016B22 LEFT CAMSHAFT HOUSING - R.R. WITH TIMING BELT REMOVED - REPLACE GASKET
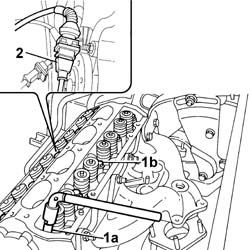
1. Using the tool (1a), loosen the bolts (1b) fixing the cylinder head to the cylinder block/crankcase.
| Description | Code | |
|---|---|---|
| 1a | Spanner | 1.852.157.000 |
2. Disconnect the electrical connection for the timing sensor.
| Description | Connector | |
|---|---|---|
| 2 | Timing sensor | See K47 TIMING SENSOR ( ENGINE ) |
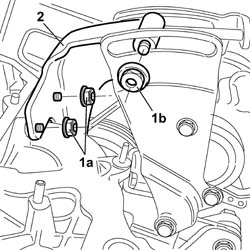
Position a hydraulic jack beneath the engine block.
Release the rod for the crossmember positioned for supporting the engine, then remove the actual crossmember. This operation is necessary to allow the extraction of the reinforcement bracket for the power assisted steering pump on the exhaust manifold.
Op. 1092C10 POWER STEERING AND/OR SELF-LEVELLING SUSPENSION PUMP DRIVE BELT - R + R
1. Undo the nuts (1a) fixing the reinforcement bracket to the exhaust manifold and undo the nut (1b) fixing it to the power steering pump mounting.
2. Remove the reinforcement bracket from the engine compartment.
Remove the engine supporting crossmember.
| Description | Code | |
|---|---|---|
| Crossmember | 1.870.595.000 |
1. Insert a spacer (1a) on the power steering pump support (1b), then secure the crossmember rod (1c) to the mounting (1d).
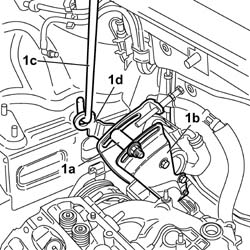
1. Position an ordinary spacer (1a) between the support for the power steering pump (1b) and the bracket (1c) on the alternator (1d). This operation is necessary to prevent the power steering pump support from rotating resulting in the unbalancing of the engine during the final removal operations of the cylinder head.
Remove the lift from underneath the vehicle.
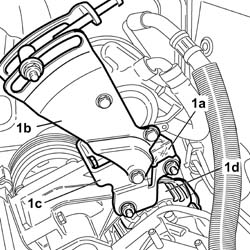
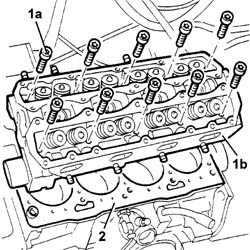
1. Remove the bolts (1a) loosened previously, then remove the head (1b).
2. Remove the underlying gasket.
Refitting
Clean the contact surfaces between the cylinder head and engine block.
Fit a new cylinder head gasket with the word ALTO stamped on it facing the operator.
The cylinder head gasket is the Astadur type. The material from which the gasket is made undergoes a polymerization process during the operation of the engine so that it becomes considerably harder during usage. In order for the polymerization process to take place, it is necessary to:
keep the gasket sealed in its casing until it is fitted
not lubricate the gasket or the contact surfaces with oil.
Place the cylinder head in position.
Tighten all the bolts fixing the cylinder head.
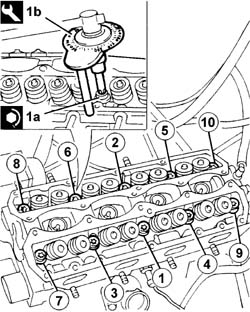
1. Tighten the cylinder head bolts (1a) to the recommended torque using the angular tightening tool (1b).
Follow the order shown in the figure for each tightening sequence.
| Fastening | Component | dia | Value (daNm) | |
|---|---|---|---|---|
| 1a | Bolt | CYLINDER HEAD | M10 | (Engine crankcase side) 4 +90° ++90° |
| Description | Code | |
|---|---|---|
| 1b | Torque wrench | 1.860.942.000 |
Position the hydraulic lift underneath the vehicle.
Remove the general shim positioned previously between the power steering pump support and the alternator.
Release the rod for the engine supporting crossmember from the mounting and remove the spacer on the power steering pump support.
Position the reinforcement bracket on the exhaust manifold and tighten the fixing nuts to the recommended torque.
| Fastening | Component | dia | Value (daNm) | |
|---|---|---|---|---|
| Nut | POWER STEERING PUMP SUPPORT/BRACKET | M10 X 1.25 | (Cylinder head) 5 |
Connect the rod for the engine supporting crossmember to the mounting on the power steering pump support.
Op. 1092C10 POWER STEERING AND/OR SELF-LEVELLING SUSPENSION PUMP DRIVE BELT - R + R
Op. 1092C12 POWER STEERING PUMP DRIVE BELT - ADJUST TENSION
Connect the electrical connection for the timing sensor.
| Description | Connector | |
|---|---|---|
| Timing sensor | See K47 TIMING SENSOR ( ENGINE ) |
Op. 1016B22 LEFT CAMSHAFT HOUSING - R.R. WITH TIMING BELT REMOVED - REPLACE GASKET
Op. 1016B26 RIGHT CAMSHAFT HOUSING - R.R. WITH TIMING BELT REMOVED - REPLACE GASKET
Position the upper rear guard for the timing belt and tighten the fixing bolts to the recommended torque.
| Fastening | Component | dia | Value (daNm) | |
|---|---|---|---|---|
| Bolt | TIMING GUARD ASSEMBLIES | M6x16 | (Camshaft housing) 0.9 |
| Fastening | Component | dia | Value (daNm) | |
|---|---|---|---|---|
| Bolt | TIMING GUARD ASSEMBLIES | M8 X 22 | (Camshaft housing) 2.5 |
| Fastening | Component | dia | Value (daNm) | |
|---|---|---|---|---|
| Bolt | TIMING GUARD ASSEMBLIES | M10 X 1.25 | (Camshaft housing) 5 |
Op. 1032B40 TOOTHED DRIVEN PULLEY (ONE) - R + R WITH TIMING BELT REMOVED
Op. 1032C30 FIXED TIMING SYSTEM TENSIONER - R + R WITH TIMING BELT REMOVED
Op. 1032B10 TOOTHED TIMING BELT - R + R FOR TIMING ADJUSTMENT OR REPLACEMENT
Op. 5510C14 IGNITION COIL/S - R+R
Op. 1032D12 TIMING SYSTEM PROTECTIVE COVER(S) - R + R
Op. 1008a46 TIMING SIDE POWER UNIT RIGID SUPPORT - R.R.
Op. 1008b10 POWER UNIT FRONT SUPPORT FLEXIBLE MOUNTING (TIMING SIDE) - REPLACE
Op. 1092A10 CRANKSHAFT PULLEY - R + R
Op. 1092B82 AUXILARY BELT MOVING TENSIONER (ONE) -R+R
Op. 1092B50 ALTERNATOR/WATER PUMP DRIVE BELT - R.R.
Op. 1092B54 ALTERNATOR/WATER PUMP DRIVE BELT - ADJUST TENSION
Connect the heater coolant return pipe to the thermostat.
Connect the heater coolant supply pipe to the thermostat.
Connect the supply reservoir coolant return pipe to the thermostat.
Connect the radiator coolant supply and return pipe to the thermostat.
Connect the electrical connection for the engine coolant temperature sensor.
| Description | Connector | |
|---|---|---|
| I.E. engine temperature sensor | See K45 COOLANT TEMPERATURE SENDER UNIT ( ENGINE ) |
Op. 4130B10 POWER STEERING FLUID RESEVOIR - R.R.
Op. 1088B10 ENGINE COOLING SUPPLY RESERVOIR - R.R.
Raise the lift and place the catalytic converter in its original position moving it closer to the exhaust manifold.
Connect the electrical connection for the rear Lambda sensor.
| Description | Connector | |
|---|---|---|
| Lambda sensor on catalyzer | See K17 LAMBDA SENSOR ON CATALYZER ( ENGINE ) |
Position the lower heat shield bracket and tighten the fixing bolts.
Lower the lift and tighten the nuts fixing the catalytic converter to the exhaust manifold to the recommended torque.
| Fastening | Component | dia | Value (daNm) | |
|---|---|---|---|---|
| Nut | EXHAUST MANIFOLD/S | M8 | (Catalytic converter) 2.5 |
Tighten the bolts fixing the catalytic converter to the retaining flange to the recommended torque.
| Fastening | Component | dia | Value (daNm) | |
|---|---|---|---|---|
| Bolt | EXHAUST MANIFOLD/S | M8 | (Catalytic converter) 3 |
Tighten the nut on the catalytic converter retaining band.
Op. 1072C44 EXHAUST MANIFOLD HEAT SHIELD R+R
Op. 1080B94 FRONT LAMBDA SENSOR AT CATALYTIC CONVERTER - R.R.
Op. 1072B14 INLET MANIFOLD - R+R AND REPLACE SEAL WITH AIR CONVEYOR/BOX REMOVED
Op. 1072B50 AIR INTAKE CHAMBER - R.R.
Op. 1036G48 REAR SEAL FOR CAMSHAFT FOR ONE CAMSHAFT HOUSING, LEFT OR RIGHT - R.R. AND REPLACE SEAL
Op. 1056B82 INJECTION/IGNITION SYSTEM E.C.U. (ONE) - R + R
Op. 1048A10 AIR FILTER ASSEMBLY - R.R.
Op. 1048A32 HOSE FROM AIR FILTER TO INTAKE MANIFOLD - R.R.
Op. 5530B52 BATTERY SUPPORT/DRIP TRAY - R.R.
Op. 7055B54 PROTECTION/GUARD UNDER ENGINE - R.R.
Op. 4450B04 RIGHT FRONT WHEEL - R.R.
Op. 0010T20 ENGINE COOLANT - CHANGE
Op. 0010T71 POWER STEERING FLUID CHECK LEVEL AND TOP UP IF NECESSARY
Connect the negative battery terminal.
| Description | Connector | |
|---|---|---|
| Battery | See A001 BATTERY |
Remove the vehicle from the lift.
Removing
Position the vehicle on a lift.
Drain the air conditioning refrigerant circuit
Op. 0010T84 COOLANT FOR AIR CONDITIONING SYSTEM - DEHYDRATE AND RECHARGE.
Carry out
Op. 4450B04 RIGHT FRONT WHEEL - R.R..
Carry out
Op. 7055B54 PROTECTION/GUARD UNDER ENGINE - R.R..
Carry out.
Carry out
Carry out
Op. 5530B52 BATTERY SUPPORT/DRIP TRAY - R.R..
Carry out
Op. 1060G90 SYSTEM CABLE LOOM - R.R..
Carry out
Op. 0010T20 ENGINE COOLANT - CHANGE.
Carry out
Op. 1016B10 SINGLE CAMSHAFT HOUSING - REPLACE GASKET.
1. Loosen the band and disconnect the upper radiator coolant inlet hose, thermostat side.
Collect the coolant that comes out in a suitable container.
2. Loosen the band and disconnect the oil vapour recircuation hose from the rigid pipe.
3. Loosen the band and remove the air intake pipe to the turbocharger.
4. Loosen the collar securing the coolant supply pipe to the engine oil heat exchanger, thermostat side.
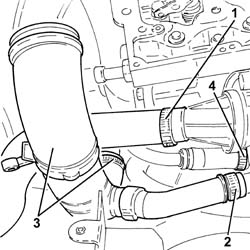
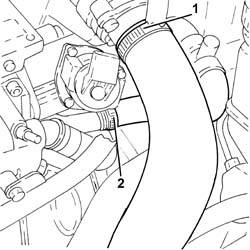
1. Loosen the collar and disconnect the pipe from the heat exchanger to the air capacity chamber, chamber side.
2. Loosen the collar and disconnect the pipe carrying coolant to the climate control system heater, on the EGR system exhaust gas/water heat changer side.
1. Undo retaining bolt (1a) and remove the engine oil dipstick tube (1b).
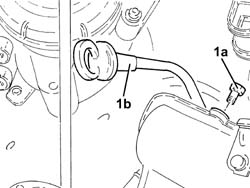
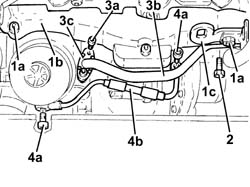
1. Undo the bolts (1a) and remove the exhaust manifold heat shield (1b) complete with engine lifting bracket (1c).
2. Undo the bolt securing the engine oil heat exchanger coolant supply pipe to the engine block.
3. Undo the bolts (3a) and remove the engine oil heat exchanger coolant supply pipe (3b) complete with gasket (3c).
4. Undo the connectors (4a) and remove the turbocharger engine oil supply pipe (4b).
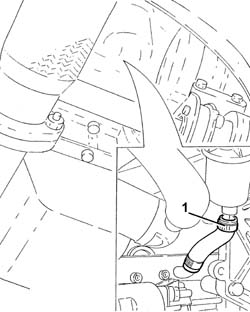
1. Loosen the collar and disconnect the condensed engine oil recovery pipe, oil vapour separator side.
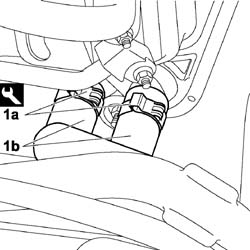
1. Loosen the bands (1a) and disconnect the coolant outlet and inlet pipes (1b) from the climate control system heater.
1. Unscrew the bolt securing the water/exhaust gas heat exchanger for the EGR to the crankcase.
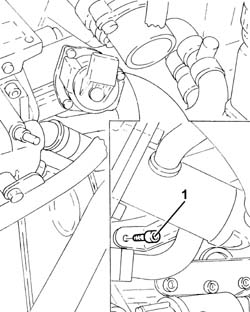
1. Working through the hole in the camshaft cover, unscrew the bolt securing the pad fastening the timing chain to the cylinder head.
2. Undo the bolts fixing the timing cover to the cylinder head.
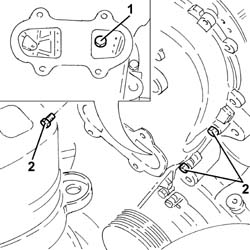
1. Undo the nuts fixing the turbocharger to the exhaust manifold.
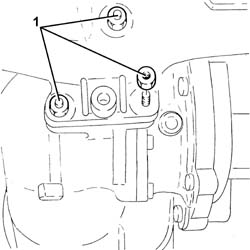
1. Undo the bolts (1a) and disconnect the air supply pipe between the turbocharger and the heat exchanger (1b), turbocharger side.
2. Remove the gasket.
3. Undo the bolts securing the engine oil return pipe from the turbocharger, crankcase side.
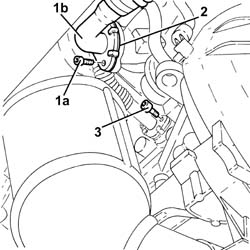
1. Undo the nut (1a) and loosen the collar securing the exhaust pipe to the catalyzer (1b).
2. Release the exhaust pipe from the flexible mountings and disconnect the pipe from the catalyzer.
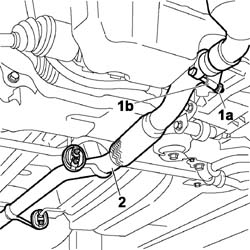
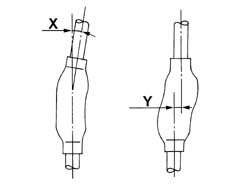
1. Do not distort the front flexible pipe beyond the angular value of X = 20° and the cutting value of Y = 25 mm.
The front hose must be protected against any mechanical damage from outside. It should not come into contact with corrosive products; the front flexible pipe cannot withstand any distortion when it is in position.
Failure to follow these precautions will result in the shortening of the life of the flexible pipe; separation or dismantling the exhaust line is compulsory for operations that require the power unit to be raised.
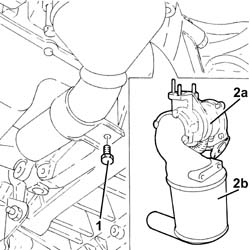
1. Undo the bolt fixing the catalytic converter mounting bracket to the manual gearbox/engine bracket.
2. Remove the turbocharger (2a) complete with catalytic converter (2b).
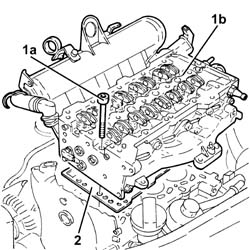
1. Undo the bolts (1a) and remove the cylinder head assembly (1b).
2. Remove the cylinder head gasket.
Refitting
1. Measure the piston projection in two places at 180° on the gudgeon pin axis using the gauge and support and take the average of the two values measured for each piston.
| Description | Code | |
|---|---|---|
| 1 | Dial gauge support | 1.870.404.001 |
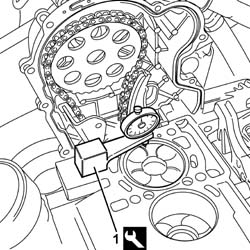
Select the correct size cylinder head gasket depending on the maximum value between of the averages of the projection for each individual piston.
| Measurement | Value | ||
|---|---|---|---|
| Cylinder head gasket size (no hole) (mm) | 0.67 ÷ 0.77 | ||
| Average - maximum piston projection (mm) | 0.028 ÷ 0.127 | ||
| Measurement | Value | ||
|---|---|---|---|
| Cylinder head gasket size (no hole) (mm) | 0.77 ÷ 0.87 | ||
| Average - maximum piston projection (mm) | 0.128 ÷ 0.227 | ||
| Measurement | Value | ||
|---|---|---|---|
| Cylinder head gasket size (no hole) (mm) | 0.87 ÷ 0.97 | ||
| Average - maximum piston projection (mm) | 0.228 ÷ 0.327 | ||
1. Apply Fiat silicon sealant 71713687 or a similar product to the contact area between the cylinder head and the timing cover.
2. Position the cylinder head gasket (2a) ofn the thickness selected previously and fit onto the locating bushes (2b).
3. Apply Fiat 71713687 type silicon sealant or a similar product to cylinder head gasket in the contact area with the timing cover.
4. Also apply a strip of the same sealant to the surface of the timing cover gasket following the black line of silicon on the actual gasket.
Apply a thin layer of sealant to the timing cover gasket so that it is not too thick and avoid excess sealant inside the timing cover.
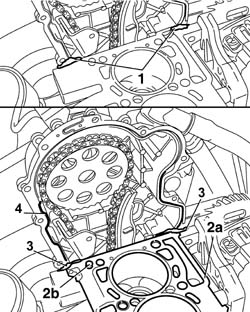
Position the cylinder head on the engine block, fitting into the locating bushes.
Before moving the cylinder head, apply grease to the belt tensioner piston to prevent it emerging accidentally during moving.
1. Screw in and tighten the bolts fixing the timing cover to the cylinder head to torque.
During this stage, do not tighten the bolt into hole (a).
| Fastening | Component | dia | Value (daNm) | |
|---|---|---|---|---|
| 1 | Bolt | TIMING COVER | M6 | 0.8 ÷ 1.0 |
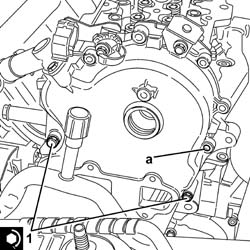
Position the cylinder head bolts in their seats and screw in partly without tightening.
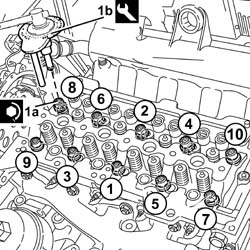
1. Tighten only the two bolts shown in the figure securing the cylinder head to the engine block to the specified torque of 2.5 daNm.
2. Loosen the bolts fixing the timing cover tightened previously.
3. Continue tightening the bolts fixing the camshaft housing to a torque of 2.5 daNm following the order illustrated working gradually towards the timing cover.
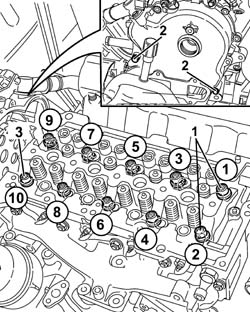
1. Tighten the cylinder head bolts (1a) to the recommended torque using the angular tightening tool (1b).
Follow the order shown in the figure for each tightening sequence.
The nominal tightening of 4.0 daNm is performed in two stages: a pretightening to 2.0 daNm followed by an additional tightening of 2.0 daNm.
| Fastening | Component | dia | Value (daNm) | |
|---|---|---|---|---|
| 1a | Bolt | CYLINDER HEAD | M10 | (Engine crankcase side) 3.8 - 4.2 +90 + 90? |
| Description | Code | |
|---|---|---|
| 1b | Torque wrench | 1.860.942.000 |
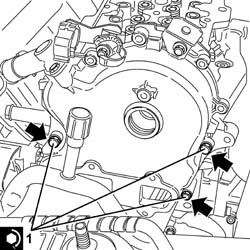
1. Insert the third bolt securing the timing cover to the cylinder head, then tighten the three bolts securing the timing cover to the cylinder head to the specified torque.
| Fastening | Component | dia | Value (daNm) | |
|---|---|---|---|---|
| 1 | Bolt | TIMING COVER | M6 | 0.8 ÷ 1.0 |
The misalignment between the cylinder head - crankcase should not exceed the recommended value.
It is only possible for the cylinder head to protrude from the crankcase.
| Measurement | Value | ||
|---|---|---|---|
| Cylinder head - crankcase misalignment (mm) | 0.1 |
Refit the turbocharger complete with catalytic converter.
Tighten the bolt fixing the catalytic converter mounting bracket to the manual gearbox/engine bracket.
Connect the exhaust pipe to the catalyzer, taking care not to distort the flexible section.
Tighten the nut for the collar securing the pipe to the catalytic converter.
Position the flexible mountings at the exhaust pipe securing points.
Position a new gasket between the crankcase and the engine oil return pipe to the turbocharger.
1. Tighten the bolts securing the engine oil return pipe from the turbocharger, crankcase side, to the specified torque.
| Fastening | Component | dia | Value (daNm) | |
|---|---|---|---|---|
| 1 | Bolt | OIL RETURN PIPE FROM TURBO | M6 | (Turbocharger/ngine crankcase side) 0.8 - 1.0 |
2. Connect the air delivery pipe between the turbocharger and heat exchanger (2a) complete with gasket (2b), turbocharger side, and secure with bolts (2c).
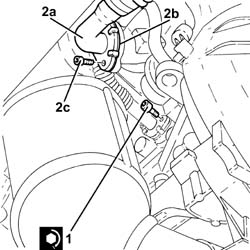
1. Tighten the nuts fixing the turbocharger to the exhaust manifold to the recommended torque.
| Fastening | Component | dia | Value (daNm) | |
|---|---|---|---|---|
| 1 | Nut | TURBOCHARGER | M8 | (Exhaust manifold side) 2.3 - 2.8 |
Tighten the bolt securing the timing belt fixed pad to the cylinder head.
Tighten the bolt securing the water/exhaust gas heat exchanger for the EGR to the crankcase.
Connect the coolant outlet and inlet pipes to the climate control system heater and tighten the collars.
Connect the condensed engine oil recovery pipe, oil vapour separator side, and tighten the collar.
Position the pipe carrying engine oil to the turbocharger in its housing and secure it tightening connectors to the recommended torque.
Replace the copper washers on the connectors.
| Fastening | Component | dia | Value (daNm) | |
|---|---|---|---|---|
| Connector | OIL DELIVERY PIPE TO TURBO | M10 | (Turbocharger/oil filter mount side) 1.1 - 1.3 |
Reposition the pipe carrying coolant to the engine oil heat exchanger complete with gasket, then tighten the collar and bolts.
Tighten the bolt securing the pipe carrying coolant to the engine oil heat exchanger to the crankcase.
Refit the exhaust manifold heat shield with the engine lift bracket and secure with the nuts.
Place the engine oil dipstick pipe back in its housing and fasten it with the bolt.
Connect the pipe carrying coolant to the climate control system heater, on the EGR system exhaust gas/water heat changer side and tighten the collar.
Connect the pipe from the heat exchanger to the air capacity chamber, chamber side, and tighten the band.
Refit the air intake pipe to the turbocharger and tighten the collar.
Connect the oil vapour recirculation hose to the rigid pipe and tighten the collar.
Connect the upper coolant input sleeve to the radiator, thermostat side, and tighten the band.
Carry out
Op. 1016B10 SINGLE CAMSHAFT HOUSING - REPLACE GASKET.
Carry out
Op. 1060G90 SYSTEM CABLE LOOM - R.R..
Carry out
Op. 5530B52 BATTERY SUPPORT/DRIP TRAY - R.R..
Carry out
Refill the engine cooling system
Op. 0010T20 ENGINE COOLANT - CHANGE.
Carry out.
Carry out
Op. 7055B54 PROTECTION/GUARD UNDER ENGINE - R.R..
Carry out
Op. 4450B04 RIGHT FRONT WHEEL - R.R..
Refill the air conditioning refrigerant circuit
Op. 0010T84 COOLANT FOR AIR CONDITIONING SYSTEM - DEHYDRATE AND RECHARGE.
Remove the vehicle from the lift.
Removing
Position the vehicle on a lift.
Op. 5530B52 BATTERY SUPPORT/DRIP TRAY - R.R.
Op. 1048A10 AIR FILTER ASSEMBLY - R.R.
Op. 4450B04 RIGHT FRONT WHEEL - R.R.
Op. 7055B54 PROTECTION/GUARD UNDER ENGINE - R.R.
Op. 1016A22 CAM COVER WITH FUEL DUCT - R + R AND REPLACE GASKET
Have a suitable container for collecting the coolant ready.
1. Disconnect the lower engine pipe from the radiator (1a), from the thermostat (1b) and from the connector (1c) on the rigid section of the pump water filler pipe.
2. Remove the lower pipe from the engine compartment.
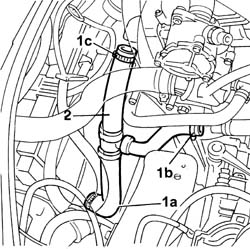
1. Disconnect the upper engine pipe from the radiator (1a) and from the thermostat (1b).
2. Remove the upper pipe from the engine compartment.
Then remove the container used for collecting the engine coolant.
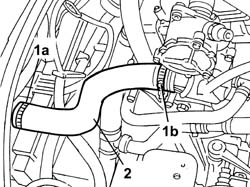
1. Disconnect the pipe (1a) and the heater unit water supply and return pipe (1b) from the thermostat.
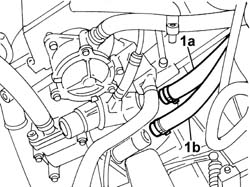
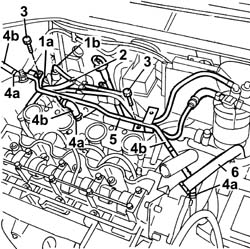
1. Disconnect the two fuel supply and return pipes (1a) and (1b) from the injection pump.
2. Also disconnect the recirculation pipe from the return pipe.
3. Undo the retaining bolts.
4. Loosen the bands (4a) and disconnect the flexible pipes (4b) from the thermostat and from the intake manifold.
5. Remove the rigid pipe.
6. Disconnect the vacuum pipe for the brake servo.
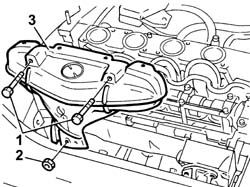
1. Undo the upper retaining bolts.
2. Undo the centre fixing nut.
3. Remove the exhaust manifold heat shield.
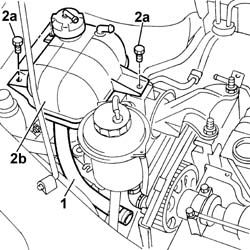
1. Disconnect the coolant reservoir pipe from the connector on the rigid pipe supplying water to the pump.
2. Undo the fixing bolts (2a) and remove the engine coolant reservoir (2b).
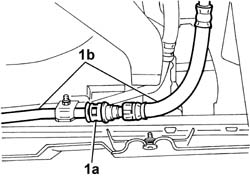
Have a suitable container for collecting the power steering system fluid ready.
1. Disconnect the rapid connector (1a) and separate the two oil pipes (1b) and drain the fluid into the special container.
After having completely drained the power steering system fluid, reconnect the rapid connector.
Lower the vehicle.
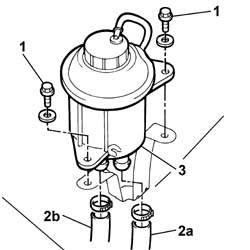
1. Undo the bolts fixing the power assisted steering fluid pump reservoir.
2. Disconnect the two pipes (2a) and (2b).
3. Remove the power steering pump fluid reservoir.
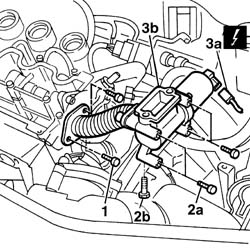
1. Undo the bolts fixing the EGR valve gas supply pipe from the exhaust manifold.
2. Undo the bolts (2a) fixing the EGR valve to the rigid coolant pipe and the bolt (2b) to the rigid pipe to the heat exchanger.
3. Disconnect the electrical connection (3a) and remove the EGR valve (3b) complete with exhaust gas supply pipe for the actual valve.
| Description | Connector | |
|---|---|---|
| 3a | EGR solenoid valve | See L30 EGR SOLENOID VALVE ( ENGINE ) |
1. Undo the connector (1a) and disconnect the heat exchanger water return pipe from the rigid pipe (1b).
2. Undo the bolts fixing the rigid pipe to the cylinder head.
3. Undo the bolts (3a) fixing the rigid pipe to the bracket (3b) on the thermostat.
4. Remove the rigid water intake pipe to the pump.
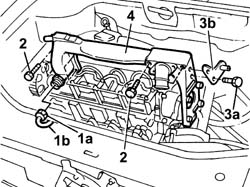
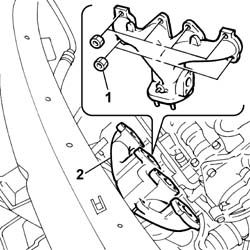
1. Undo the retaining nuts.
2. Separate the exhaust manifold from the studs on the cylinder head.
Op. 1092G10 SINGLE ENGINE BELT - R.R.
Op. 1092A10 CRANKSHAFT PULLEY - R + R
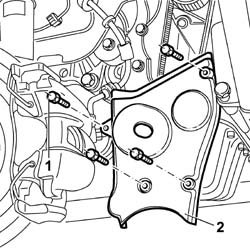
1. Undo the retaining bolts.
2. Remove the lower part of the timing belt guard.
Lower the vehicle.
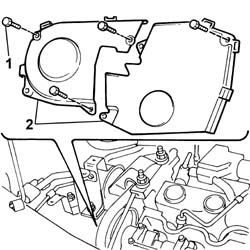
1. Undo the retaining bolts.
2. Remove the timing belt upper guards.
If the vehicle is equipped with air conditioning, release the wiring for the compressor electromagnet coupling before removing the two guards.
Place a hydraulic jack under the engine to support it.
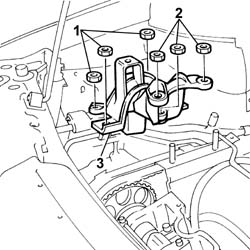
1. Undo the three nuts securing the support to the bodyshell.
2. Undo the two nuts securing the support to the engine.
3. Remove the timing side engine support.
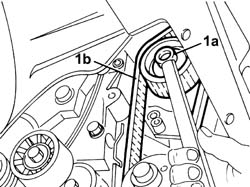
1. Loosen the fixing nut (1a), loosen the timing belt (1b) tension and remove it.
Refit the timing side rigid support locking the fixing nuts without tightening them to torque.
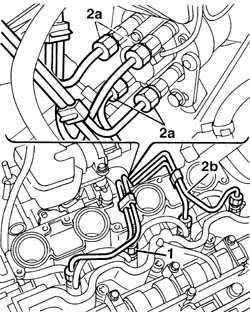
1. Undo the connectors for the rigid supply pipes to the injectors.
2. Undo the connectors (2a) on the injection pump for the rigid supply pipes, then remove the injector rigid supply pipes (2b).
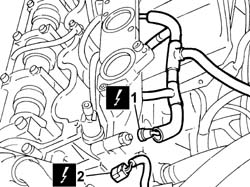
1. Disconnect the electrical connections for the spark plugs.
2. Disconnect the electrical connection for the engine coolant temperature sensor from the thermostat.
| Description | Connector | |
|---|---|---|
| 1 | Heater plugs | See A040 HEATER PLUGS |
| Description | Connector | |
|---|---|---|
| 2 | I.E. engine temperature sensor | See K45 COOLANT TEMPERATURE SENDER UNIT ( ENGINE ) |
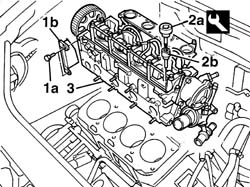
1. Undo the fixing bolts (1a) and remove the side guard (1b) for the timing belt.
2. Using the spanner (2a) undo the bolts (2b) fixing the cylinder head to the cylinder block.
| Description | Code | |
|---|---|---|
| 2a | Spanner | 1.852.154.000 |
3. Raise the cylinder head and remove it from the engine compartment.
If necessary, place the cylinder head in the vice and dismantle it.
Remove the seal.
Refitting
Fit a new cylinder head gasket on the cylinder block taking care to ensure that it is the same size as the one removed.
The cylinder head gasket is ASTADUR type.
The material from which the gasket is made undergoes a polymerization process during the operation of the engine so that it becomes considerably harder during usage.
In order for the polymerization process to take place the gasket must be kept in its sealed nylon container and only taken out just before fitting to prevent getting oil on it.
Position the cylinder head on the cylinder block/crankcase.
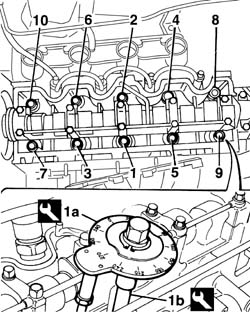
1. Tighten the bolts fixing the cylinder head to the cylinder block to a pre-torque of 2 daNm following the order illustrated in the diagram and use tools (1a) and (1b) for the angular tightening.
| Fastening | Component | dia | Value (daNm) | |
|---|---|---|---|---|
| Bolt | CYLINDER HEAD | M12 | 6.5 + 90° + 90° + 90° |
| Description | Code | |
|---|---|---|
| 1a | Spanner | 1.852.154.000 |
| Description | Code | |
|---|---|---|
| 1b | Torque wrench | 1.860.942.000 |
Fit the timing belt side guard.
Connect the electrical connections for the spark plugs.
Connect the electrical connection for the engine coolant temperature sensor to the thermostat.
| Description | Connector | |
|---|---|---|
| Heater plugs | See A040 HEATER PLUGS |
| Description | Connector | |
|---|---|---|
| I.E. engine temperature sensor | See K45 COOLANT TEMPERATURE SENDER UNIT ( ENGINE ) |
Fit the rigid fuel supply pipes and tighten the connectors on the pump and on the injectors to torque.
| Fastening | Component | dia | Value (daNm) | |
|---|---|---|---|---|
| Connector | INJECTOR FUEL DELIVERY PIPES DIESEL | M12 x 1.5 | 2.5 |
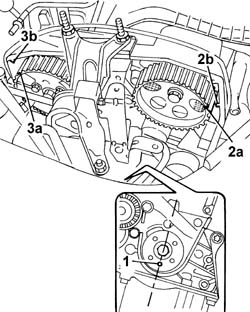
1. Position the engine at TDC for cylinder no. 1 (approximate TDC), checking that the locating dowel for the pump on the crankshaft is on the engine axis and facing downwards.
Provisionally fit the cover on the tappets without securing it.
2. Position the camshaft pulley so that the reference (2a) on it is aligned with the reference (2b) on the tappet cover.
3. Position the injection pump drive pulley so that the reference (3a) on it is aligned with the reference (3b) on the pump support.
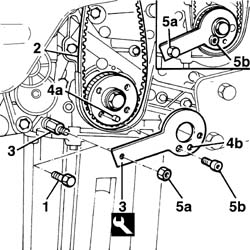
1. Remove the engine oil pump fixing bolt.
2. Fit the timing belt on the crankshaft gear.
3. Fit the pin for the tool for positioning the engine at T.D.C.
4. Rotate the crankshaft using small movements to allow the pulley locating dowel (4a) to enter the opening in the tool (4b).
| Description | Code | |
|---|---|---|
| 3 | Template | 1.860.905.000 |
5. Lock the tool in position using a nut (5a) and service bolt (5b).
Place a hydraulic jack under the engine to support it.
Undo the three nuts securing the support to the bodyshell.
Undo the two nuts securing the support to the engine.
Remove the timing side engine support.
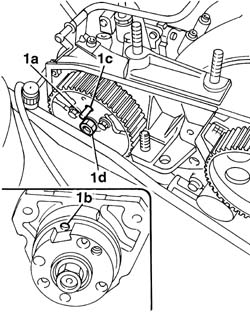
1. Check that the bolts fixing the injection pump pulley are slack, insert a cylindrical shaped centering pin (1a) with a 6 mm outer diameter of an appropriate length that allows it to be inserted about 40 mm into the opening (1b) in the pump shaft through the slot (1c) in the pulley. If the pin is not fully inserted, rotate the injection pump shaft by adjusting the nut (1d) until the openings are aligned.
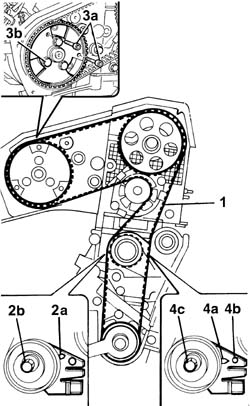
1. Complete the fitting of the timing belt following the order illustrated.
When fitting the belt, check that the alignments for the timing pulley and the injection pump pulley with the references are maintained.
Fit the timing side engine support tightening the fixing nuts on the bodyshell and on the engine to torque.
| Fastening | Component | dia | Value (daNm) | |
|---|---|---|---|---|
| Nut | RIGID ENGINE MOUNT, TIMING SIDE | M10 X 1.25 | (Bodyshell side) 4.3 |
| Fastening | Component | dia | Value (daNm) | |
|---|---|---|---|---|
| Nut | RIGID ENGINE MOUNT, TIMING SIDE | M10 X 1.25 | (Engine side) 5 |
2. Adjusting the semi-automatic tensioning device, place the tensioner pointer (2a) in the maximum tension position, then lock the fixing nut (2b).
3. Lock the rotation of the injection pump pulley inserting two M6 service bolts (3a) in the openings in the actual pulley which should correspond to the threaded openings in the pump mounting (correct timing). Tighten the bolts (3b) fixing the injection pump pulley to torque.
| Fastening | Component | dia | Value (daNm) | |
|---|---|---|---|---|
| Bolt | INJECTION PUMP TOOTHED DRIVE PULLEY | M8 | 2.5 |
Do not use the centering pin to lock the rotation of the injection pump pulley because the injection pump shaft could be ruined.
Remove the two service bolts fitted for locking the injection pump pulley.
Remove the centering pin from the injection pump.
Remove the tool for T.D.C.
| Description | Code | |
|---|---|---|
| Template | 1.860.905.000 |
Rotate the crankshaft throught two revolutions in its normal direction of rotation.
4. Loosen the nut fixing the tensioner and, working carefully, position the tensioner (4a) reference in line with the reference opening (4b), then tighten the nut (4c) fixing the belt tensioner to torque.
| Fastening | Component | dia | Value (daNm) | |
|---|---|---|---|---|
| 4c | Nut | MOBILE TIMING TENSIONER | M8 | 2.5 |
Rorate the crankshaft again through two revolutions in its normal direction of rotation.
Reposition the tool for measuring T.D.C. for cylinder no. 1 and check that the centering pin is inserted (about 40 mm) in the opening in the injection pump.
Fit the timing belt upper guards.
Raise the vehicle.
Fit the lower part of the timing belt guard.
Op. 1092A10 CRANKSHAFT PULLEY - R + R
Op. 1092G10 SINGLE ENGINE BELT - R.R.
Fit the exhaust manifold fitting it on the studs on the cylinder head.
Tighten the upper nuts fixing the exhaust manifold.
| Fastening | Component | dia | Value (daNm) | |
|---|---|---|---|---|
| Nut | EXHAUST MANIFOLD/S | M8 | (Cylinder head side) 2.5 |
Fit the rigid inlet water pipe on the pump.
Tighten the bolts fixing the rigid pipe to the cylinder head to torque.
| Fastening | Component | dia | Value (daNm) | |
|---|---|---|---|---|
| Bolt | COOLANT PUMP RIGID INLET PIPE | M6 | 0.9 |
Tighten the connector for the water return pipe to the heat exchanger.
Tighten the bolts fixing the rigid pipe on the bracket on the thermostat.
Fit the EGR valve complete with exhaust gas supply pipe.
Connect the electrical connection for the EGR solenoid valve.
| Description | Connector | |
|---|---|---|
| EGR solenoid valve | See L30 EGR SOLENOID VALVE ( ENGINE ) |
Tighten the bolts fixing the EGR valve to the cylinder head.
Tighten the bolts fixing the EGR valve gas supply pipe to the exhaust manifold to torque.
| Fastening | Component | dia | Value (daNm) | |
|---|---|---|---|---|
| Bolt | PIPE TO EGR VALVE | M8 | 2.5 |
Fit the power steering pump fluid reservoir.
Disconnect the two pipes and tighten the bolts fixing the reservoir to the mounting.
Fasten the power steering fluid pipe to the bodyshell.
Fit the engine coolant reservoir and tighten the fixing bolts.
Connect the coolant reservoir pipe from the connector on the rigid pipe supplying water to the pump.
Fit the exhaust manifold heat shield.
Tighten the bolts and the nut fixing the shield.
Fit the rigid recirculation pipe and tighten the fixing bolts.
Connect the flexible pipes to the rigid water recirculation pipe.
Connect the vacuum pipe for the brake servo.
Connect the two fuel supply and return pipes to the injection pump.
Connect the recirculation pipe to the fuel return pipe.
Connect the two heater coolant supply and return pipes to the thermostat.
Fit the upper engine pipe and connect the ends to the radiator and to the thermostat.
Fit the lower pipe in the engine compartment.
Connect the lower engine pipe to the radiator, to the thermostat and to the connector on the rigid section of the pump water filler pipe.
Top up the power steering system fluid level.
| Type | Component | Description | Qty. | |
|---|---|---|---|---|
| Oil [l] | POWER ASSISTED STEERING CIRCUIT | TUTELA GI/A |
Op. 5530B52 BATTERY SUPPORT/DRIP TRAY - R.R.
Op. 1048A10 AIR FILTER ASSEMBLY - R.R.
Op. 4450B04 RIGHT FRONT WHEEL - R.R.
Op. 1016A22 CAM COVER WITH FUEL DUCT - R + R AND REPLACE GASKET
Op. 0010T20 ENGINE COOLANT - CHANGE
Op. 7055B54 PROTECTION/GUARD UNDER ENGINE - R.R.
Remove the vehicle from the lift.
Removing
Position the vehicle on a lift.
Proceed with the removal
Op. 1044B10 FUEL FILTER ASSEMBLY - R + R OR REPLACE.
Proceed with the removal
Proceed with the removal
Op. 5530B52 BATTERY SUPPORT/DRIP TRAY - R.R..
Proceed with the removal
Op. 1060G50 THROTTLE BODY - R.R..
Proceed with the removal
Op. 1080C24 E.G.R. SYSTEM SOLENOID - R + R.
Proceed with the removal
Op. 1060F50 FUEL RETURN MANIFOLD - R R.
Proceed with the removal
Op. 1060G70 VACUUM RESEVOIR - R.R..
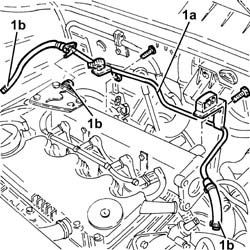
1. Remove the engine coolant supply reservoir coolant return pipe (1a) after having disconnect the pipes (1b) and undone the fastenings.
1. Disconnect the electrical connections from the heater plugs.
| Description | Connector | |
|---|---|---|
| 1 | Heater plugs | See A040 HEATER PLUGS |
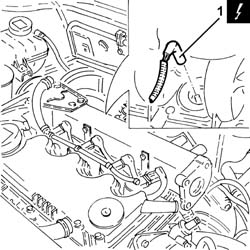
1. Disconnect the electrical connections from the injectors and move the electrical wiring sideways.
| Description | Connector | |
|---|---|---|
| 1 | Injector | See N070 INJECTOR |
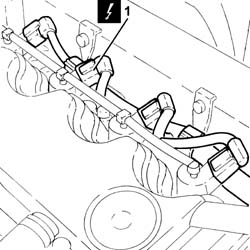
1. Undo the connector for the pipe from the pressure pump to the fuel manifold (1a), fuel manifold side using the tool (1b).
| Description | Code | |
|---|---|---|
| 1b | Spanner | 1.870.671.000 |
2. Undo the connector for the pipe from the pressure pump to the single fuel manifold, pump side using a spanner.
3. Remove the pipe from the pressure pump to the fuel manifold.
When refitting, use a new pipe from the pressure pump to the fuel manifold.
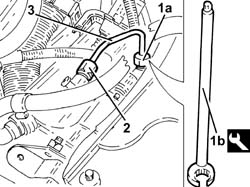
1. Disconnect the electrical connection from the cam angle sensor.
| Description | Connector | |
|---|---|---|
| 1 | Timing sensor | See K47 TIMING SENSOR ( ENGINE ) |
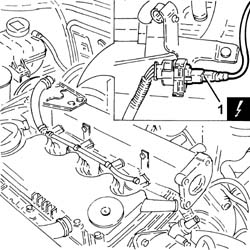
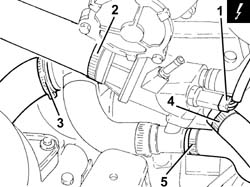
1. Disconnect the electrical connection from the engine coolant temperature sensor.
| Description | Connector | |
|---|---|---|
| 1 | Information not yet available |
2. Loosen the band and disconnect the upper coolant inlet hose to the radiator, thermostat side.
Collect the coolant that comes out in a suitable container.
3. Loosen the band and disconnect the lower coolant inlet hose from the radiator, water pump rigid coolant inlet pipe side.
4. Loosen the band and disconnect the coolant delivery pipe to the climate control system heater from the thermostat.
5. Loosen the band and disconnect the climate control system heater outlet pipe from the thermostat T connector.
Proceed with the removal
Op. 1072C44 EXHAUST MANIFOLD HEAT SHIELD R+R.
Proceed with the removal
Op. 7055B54 PROTECTION/GUARD UNDER ENGINE - R.R..
Proceed with the removal
Op. 1064A19 TURBOCHARGER ASSEMBLY - EXHAUST MANIFOLD - HOSE CONNECTED TO EXHAUST PIPE - R.R..
Proceed with the removal (right side).
Proceed with the removal
Op. 1092G10 SINGLE ENGINE BELT - R.R..
Proceed with the removal
Op. 1092A10 CRANKSHAFT PULLEY - R + R.
Proceed with the removal
Op. 1008a46 TIMING SIDE POWER UNIT RIGID SUPPORT - R.R..
Proceed with the removal
Op. 1032D12 TIMING SYSTEM PROTECTIVE COVER(S) - R + R.
Proceed with the removal
Op. 1032B10 TOOTHED TIMING BELT - R + R FOR TIMING ADJUSTMENT OR REPLACEMENT.
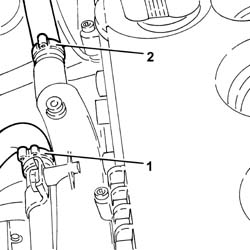
1. Loosen the band and disconnect the flexible coolant supply pipe to the engine oil heat exchanger, rigid pipe side.
2. Loosen the band and disconnect the coolant outlet pipe from the engine oil heat exchanger on the water pump rigid inlet pipe side.
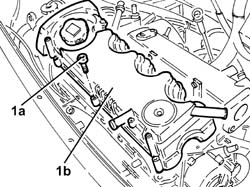
1. Undo the bolts (1a) and remove the cam cover (1b) complete with gasket.
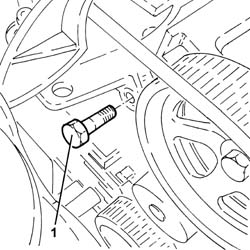
1. Undo the bolt fixing the pressure pump mounting to the cylinder head.
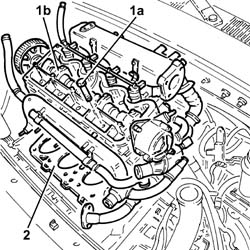
1. Undo the bolts (1a) and remove the cylinder head (1b).
The cylinder head fixing bolts cannot be reused more than four times as they are permanently lengthened each time they are tightened.
2. Remove the cylinder head gasket.
Refitting
Fit a new cylinder head gasket taking care to ensure that it is the same size as the one removed.
Place the cylinder head in position.
1. Tighten the bolts (1a) securing the cylinder head to the cylinder block to the recommended torque following the order illustrated and using the angular tightening tool (1b).
The cylinder head fixing bolts cannot be reused more than four times as they are permanently lengthened each time they are tightened.
| Fastening | Component | dia | Value (daNm) | |
|---|---|---|---|---|
| 1a | Bolt | CYLINDER HEAD | M12 | (Engine crankcase side) 6.5 + 90° + 90° + 90° |
The tightening to 6.5 daNm is performed in as follows: - tighten all the bolts to a torque of 2.0 daNm; - increase the torque to 4.5 daNm.
| Description | Code | |
|---|---|---|
| 1b | Torque wrench | 1.860.942.000 |
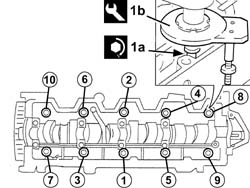
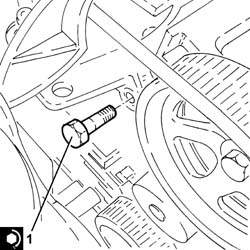
1. Tighten the bolt fixing the pressure pump mounting to the cylinder head to the recommended torque.
| Fastening | Component | dia | Value (daNm) | |
|---|---|---|---|---|
| 1 | Bolt | INJECTION PRESSURE PUMP MOUNT | M8 | (Cylinder head side) 2.3 - 2.8 |
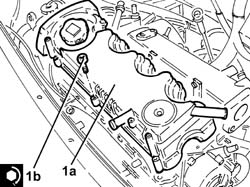
1. Place the cam cover (1a), complete with gasket, back in its housing and secure it tightening the bolts (1b) to the recommended torque.
| Fastening | Component | dia | Value (daNm) | |
|---|---|---|---|---|
| 1b | Bolt | CAM COVER | M6 | (Cylinder head side) 0.9 - 1.1 |
Connect the coolant outlet pipe from the climate control system heater, on the side of the rigid pipe carrying coolant into the coolant pump and tighten the collar.
Connect the flexible coolant supply pipe to the engine oil heat exchanger, rigid pipe side and tighten the band.
Proceed with the refitting
Op. 1032B10 TOOTHED TIMING BELT - R + R FOR TIMING ADJUSTMENT OR REPLACEMENT.
Proceed with the refitting
Op. 1032D12 TIMING SYSTEM PROTECTIVE COVER(S) - R + R.
Proceed with the refitting
Op. 1008a46 TIMING SIDE POWER UNIT RIGID SUPPORT - R.R..
Proceed with the refitting
Op. 1092A10 CRANKSHAFT PULLEY - R + R.
Proceed with the refitting
Op. 1092G10 SINGLE ENGINE BELT - R.R..
Proceed with the refitting (right side).
Proceed with the refitting
Op. 1064A19 TURBOCHARGER ASSEMBLY - EXHAUST MANIFOLD - HOSE CONNECTED TO EXHAUST PIPE - R.R..
Proceed with the refitting
Op. 7055B54 PROTECTION/GUARD UNDER ENGINE - R.R..
Proceed with the refitting
Op. 1072C44 EXHAUST MANIFOLD HEAT SHIELD R+R.
Connect the climate control system heater outlet pipe to the thermostat T connector and tighten the band.
Connect the coolant delivery pipe to the climate control system heater to the thermostat and tighten the band.
Connect the lower coolant inlet hose from the radiator, water pump rigid coolant inlet pipe side and tighten the band.
Connect the radiator upper coolant inlet hose to the thermostat and tighten the band.
Connect the electrical connection to the engine coolant temperature sensor.
Connect the electrical connection for the cam angle sensor.
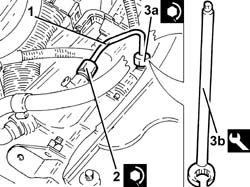
1. Place a new pipe from the pressure pump to the single fuel manifold in its housing and secure it using the connectors without tightening them.
2. Tighten the connector for the pipe from the pressure pump to the fuel manifold, pressure pump side using a spanner to the recommended torque.
| Fastening | Component | dia | Value (daNm) | |
|---|---|---|---|---|
| 2 | Connector | PRESSURE PUMP LINE TO FUEL MANIFOLD | M12 | (Pressure pump side) 2.2 - 2.4 |
3. Tighten the connector for the pipe from the pressure pump to the fuel manifold (3a), fuel manifold side using the tool (1b) to the recommended torque.
| Fastening | Component | dia | Value (daNm) | |
|---|---|---|---|---|
| 3a | Connector | PRESSURE PUMP LINE TO FUEL MANIFOLD | M14 | (Fuel manifold side) 2.2 - 2.4 |
| Description | Code | |
|---|---|---|
| 3b | Spanner | 1.870.671.000 |
Refit the electrical wiring and connect the electrical connections to the heater plugs.
Connect the electrical connections to the injectors.
Place the coolant return pipe to the engine coolant reservoir in position and secure it using the bolts and connect the pipes.
Proceed with the refitting
Op. 1060G70 VACUUM RESEVOIR - R.R..
Proceed with the refitting
Op. 1060F50 FUEL RETURN MANIFOLD - R R.
Proceed with the refitting
Op. 1080C24 E.G.R. SYSTEM SOLENOID - R + R.
Proceed with the refitting
Op. 1060G50 THROTTLE BODY - R.R..
Proceed with the refitting
Op. 5530B52 BATTERY SUPPORT/DRIP TRAY - R.R..
Proceed with the refitting
Proceed with the refitting
Op. 1044B10 FUEL FILTER ASSEMBLY - R + R OR REPLACE.
Refill the engine cooling system
Op. 0010T20 ENGINE COOLANT - CHANGE.
Remove the vehicle from the lift.
Removing
If the cylinder head is replaced, run the following self-learing procedure.
Start up the engine without pressing the accelerator pedal with an engine temperature greater than or equal to 20 °C and idle the engine for 10 seconds
Op. 1048A10 AIR FILTER ASSEMBLY - R.R.
Op. 1056B82 INJECTION/IGNITION SYSTEM E.C.U. (ONE) - R + R
Op. 1056B87 IGNITION/INJECTION SYSTEM CONTROL UNIT SUPPORT - R.R.
Op. 5510C14 IGNITION COIL/S - R+R
Op. 7055B54 PROTECTION/GUARD UNDER ENGINE - R.R.
Op. 7055B91 RIGHT FRONT WHEEL ARCH LINER - R.R.
Op. 1032D26 TIMING SYSTEM FRONT PROTECTIVE COVER (UPPER PART) - R.R.
Op. 1072C44 EXHAUST MANIFOLD HEAT SHIELD R+R
Op. 1072C16 EXHAUST MANIFOLD WITH CATALYTIC CONVERTER - R R
Op. 0010T20 ENGINE COOLANT - CHANGE
Op. 1092C10 POWER STEERING AND/OR SELF-LEVELLING SUSPENSION PUMP DRIVE BELT - R + R
Op. 1092B60 ALTERNATOR DRIVE BELT - R + R
Op. 1092A10 CRANKSHAFT PULLEY - R + R
Op. 1032D27 TIMING SYSTEM FRONT PROTECTIVE COVER (LOWER PART) - R.R.
Op. 1008B10 FLEXIBLE MOUNTING FOR POWER UNIT FRONT SUPPORT (TIMING SIDE) - REPLACE
Op. 1008A46 TIMING SIDE POWER UNIT RIGID SUPPORT -R.R.
Op. 1032B10 TOOTHED TIMING BELT - R + R FOR TIMING ADJUSTMENT OR REPLACEMENT
Op. 1016A20 SINGLE TAPPET COVER -R.R AND REPLACE GASKET
- Position an arm lift underneath the engine.
1. Disconnect the check valve from the brake servo.
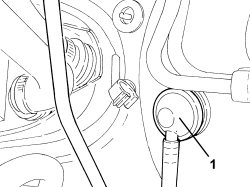
1. Disconnect the electrical connection for the absolute pressure sensor.
| Description | Connector | |
|---|---|---|
| 1 | Absolute pressure sensor | See K048 ABSOLUTE PRESSURE SENSOR |
2. Disconnect the electrical connection for the air temperature/pressure sensor.
| Description | Connector | |
|---|---|---|
| 2 | Air pressure - temperature sensor | See K44 AIR PRESSURE/TEMPERATURE SENSOR |
3. Disconnect the intermediate rapid connector for the fuel vapour pipe.
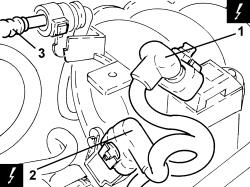
1. Disconnect the injector wiring junction.
| Description | Connector | |
|---|---|---|
| 1 | Injector coupling | See D081 INJECTOR COUPLING |
2. Disconnect the electrical connection for the throttle casing.
| Description | Connector | |
|---|---|---|
| 2 | Integrated throttle casing actuator | See N075 THROTTLE BODY ACTUATOR |
3. Connect the electrical connection to the fuel vapour solenoid valve.
| Description | Connector | |
|---|---|---|
| 3 | Fuel vapour recovery solenoid valve | See L010 FUEL VAPOUR RECOVERY SOLENOID |
4. Disconnect the fuel pipe rapid connector.
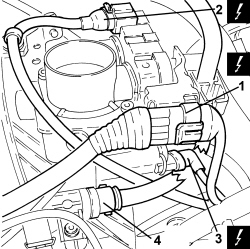
1. Disconnect the electrical connection for the air temperature sensor.
| Description | Connector | |
|---|---|---|
| 1 | Engine coolant temperature sensor/sender unit | See K036 ENGINE COOLANT TEMPERATURE SENSOR/SENDER UNIT |
2. Loosen collar (2a) and disconnect the water delivery sleeve to radiator (2b).
3. Loosen collar (3a) and disconnect the water delivery sleeve to heater (3b).
4. Disconnect the degassing pipe rapid connector.
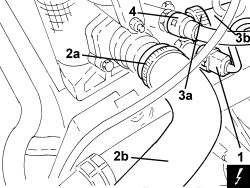
1. Undo the bolts (1a) and remove the cylinder head assembly (1b).
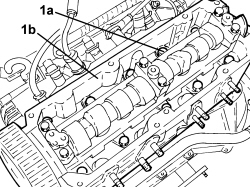
- Remove the cylinder head gasket.
1. Position the cylinder head in the vice using the tool.
| Description | Code | Function | |
|---|---|---|---|
| 1 | Support | 1.860.470.000 | Head overhaul |
2. Undo the nuts (2a), bolt (2b) and remove the intake manifold (2c).
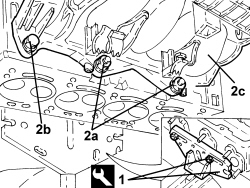
- To finish removing the heat levelling components, refer to
Op. 1016E10 SINGLE CYLINDER HEAD, REMOVED - OVERHAUL
Refitting
- Clean the contact surfaces between the cylinder head and engine block.
- Position the cylinder head gasket on the cylinder block/crankcase.
1. Fit the cylinder head and tighten the fixing bolts to the recommended torque.
| Value daNm | Fastening | Component | dia | |
|---|---|---|---|---|
| 2.9 ÷ 3.1 + 90° + 90° +/- 3° | Bolt | Cylinder head | M9 |
Follow the order illustrated below for the tightening of the cylinder head bolts.
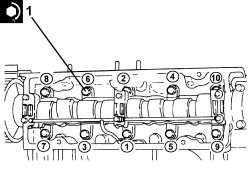
- Replace the intake manifold in its housing and secure it by tightening the nuts and bolt to the recommended torque.
| Value daNm | Fastening | Component | dia | |
|---|---|---|---|---|
| 2.3 ÷ 2.8 | Nut | Intake manifold | M8 |
| Value daNm | Fastening | Component | dia | |
|---|---|---|---|---|
| 2.3 ÷ 2.8 | Bolt | Intake manifold | M8 |
- Connect the degassing pipe rapid connector.
- Connect the water supply pipe to the heater.
- Connect the water supply pipe to the radiator.
- Connect the electrical connection for the coolant temperature sensor.
- Connect the fuel pipe rapid connector.
- Connect the electrical connection to the fuel vapour solenoid valve.
- Connect the electrical connection for the throttle casing.
- Connect the injector wiring junction.
- Connect the intermediate rapid connector for the fuel vapour pipe.
- Connect the electrical connection for the air temperature/pressure sensor.
- Connect the electrical connection for the absolute pressure sensor.
- Connect the check valve from the brake servo.
- Remove the hydraulic jack from underneath the engine.
Op. 1016A20 SINGLE TAPPET COVER -R.R AND REPLACE GASKET
Op. 1032B10 TOOTHED TIMING BELT - R + R FOR TIMING ADJUSTMENT OR REPLACEMENT
Op. 1008A46 TIMING SIDE POWER UNIT RIGID SUPPORT -R.R.
Op. 1008B10 FLEXIBLE MOUNTING FOR POWER UNIT FRONT SUPPORT (TIMING SIDE) - REPLACE
Op. 1032D27 TIMING SYSTEM FRONT PROTECTIVE COVER (LOWER PART) - R.R.
Op. 1092A10 CRANKSHAFT PULLEY - R + R
Op. 1092B60 ALTERNATOR DRIVE BELT - R + R
Op. 1092C10 POWER STEERING AND/OR SELF-LEVELLING SUSPENSION PUMP DRIVE BELT - R + R
Op. 1072C16 EXHAUST MANIFOLD WITH CATALYTIC CONVERTER - R R
Op. 1072C44 EXHAUST MANIFOLD HEAT SHIELD R+R
Op. 1032D26 TIMING SYSTEM FRONT PROTECTIVE COVER (UPPER PART) - R.R.
Op. 7055B91 RIGHT FRONT WHEEL ARCH LINER - R.R.
Op. 7055B54 PROTECTION/GUARD UNDER ENGINE - R.R.
Op. 5510C14 IGNITION COIL/S - R+R
Op. 1056B87 IGNITION/INJECTION SYSTEM CONTROL UNIT SUPPORT - R.R.
Op. 1056B82 INJECTION/IGNITION SYSTEM E.C.U. (ONE) - R + R
Parts & tools for this job For 2000 Fiat Doblò
- PARTEngine gasket setSearch: Fiat Doblò 2000 engine gasket set
- TOOLTorque wrenchSearch: 3/8 inch torque wrench
- TOOLFeeler gauge setSearch: feeler gauge set
Links open Amazon search results in a new tab. As an Amazon Associate I earn from qualifying purchases.