
THERMOSTAT
- Make
- Land Rover
- Model
- Range Rover Classic
- Section
- REPAIR › THERMOSTAT
Tdi
1
REPAIR
VISCOUS COUPLING, FAN BLADES, PULLEY AND
FAN COWL
Service repair no - 26.25.03/05
Viscous coupling
- Remove 1 to 3
Fan blades
- Remove 1 to 4
Fan cowl
- Remove 1 to 3
Fan pulley
- Remove 1 to 6
Remove
WARNING: Disconnect battery negative
terminal to prevent engine being started
before removing or adjusting drive belt.
1. Slacken nut securing viscous coupling/fan blade
assembly to pulley.
NOTE: Nut securing viscous unit to pulley
has a left hand thread. Release by turning
clockwise when viewed from front of
viscous unit.
2. Drop viscous unit and fan assembly into bottom
of cowling
3. Remove two fixings clips from top of cowling and
lift cowling complete with viscous unit and fan
out of lower mountings.
4. Remove fan blades from viscous coupling if
necessary.
5. Remove serpentine drive belt and, if fitted, air
conditioning compressor belt.
6. Remove pulley fixings, remove pulley.
NOTE: The serpentine belt is removed by
using a hexagonal socket and tommy bar
on the auto-tensioning pulley nut. Whilst
tensioning the device the belt can be removed.
7. Reverse removal procedure. Ensure fan blades
are fitted correctly. Fan is marked ’front’ and
should be fitted with word ’front’ closest to
radiator. Tighten to
30 Nm.
8. Refit drive belt.
See ENGINE, Repair, Drive
Belt
THERMOSTAT
Service repair no - 26.45.01
Remove
1. Partially drain cooling system, until coolant level
is below thermostat housing.
2. Disconnect hose from thermostat housing.
3. Disconnect electrical connections to water
temperature switch.
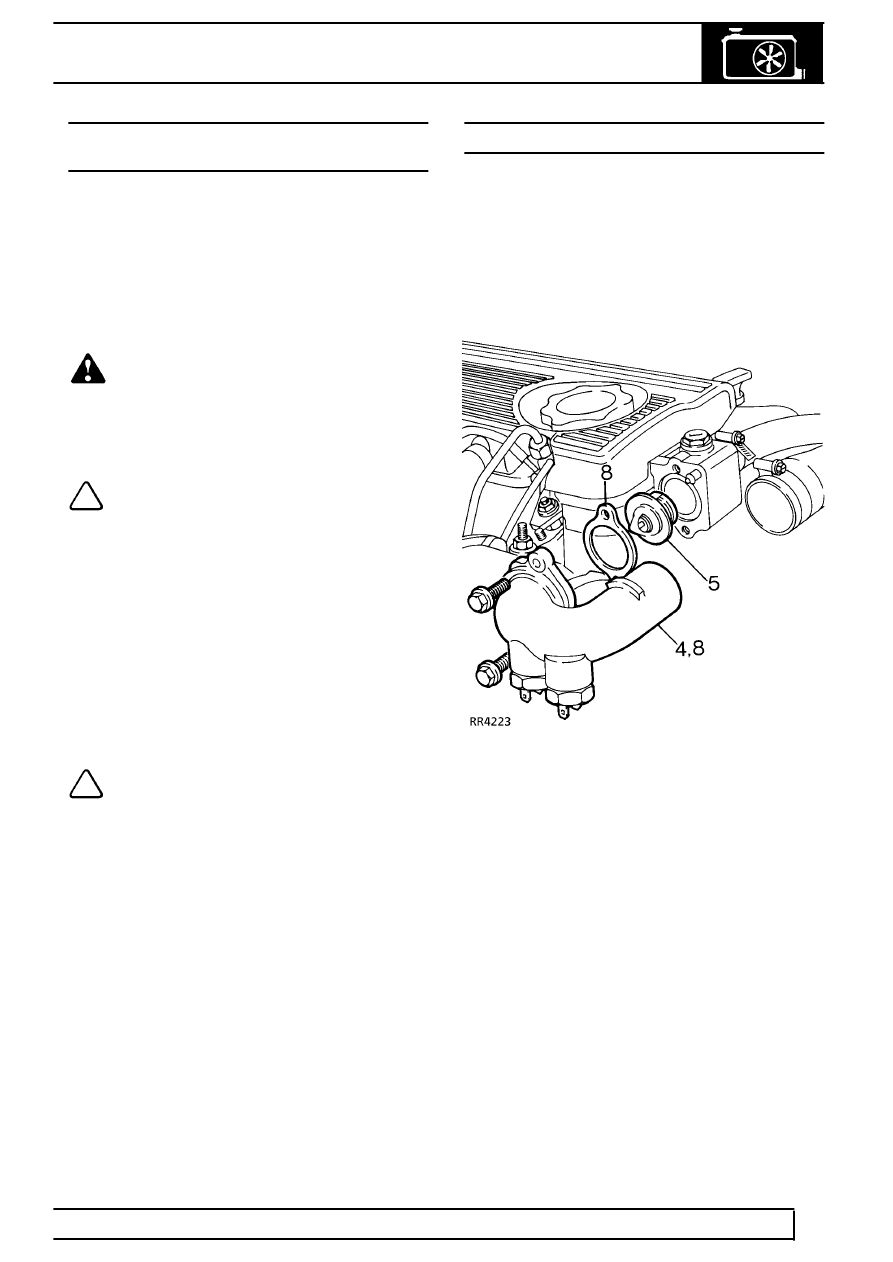
4. Remove outlet elbow.
5. Withdraw thermostat.
Test
6. Note rating of thermostat is 88˚C. Place
thermostat in a container half full of water. Heat
water, observe temperature at which thermostat
begins to open. Thermostat is satisfactory if its
open between 85˚C and 89˚C.
Refit
7. Insert thermostat with jiggle pin/vent hole upper
most (12 o’clock position) .
8. Fit the outlet elbow and new joint washer.
Tighten to
28 Nm.
9. Reverse removal procedure. 1 to 3.
10. Check for coolant leaks around all connections
and joint faces.
Parts & tools for this job For Land Rover Range Rover
- FLUIDCoolantSearch: Land Rover coolant antifreeze
- PARTThermostatSearch: Land Rover Range Rover thermostat
- TOOLCooling system pressure testerSearch: cooling system pressure tester
Links open Amazon search results in a new tab. As an Amazon Associate I earn from qualifying purchases.