
CONDENSER FANS AND MOTORS
- Make
- Land Rover
- Model
- Range Rover Classic
- Section
- REPAIR › CONDENSER FANS AND MOTORS
AIR CONDITIONING
7
REPAIR
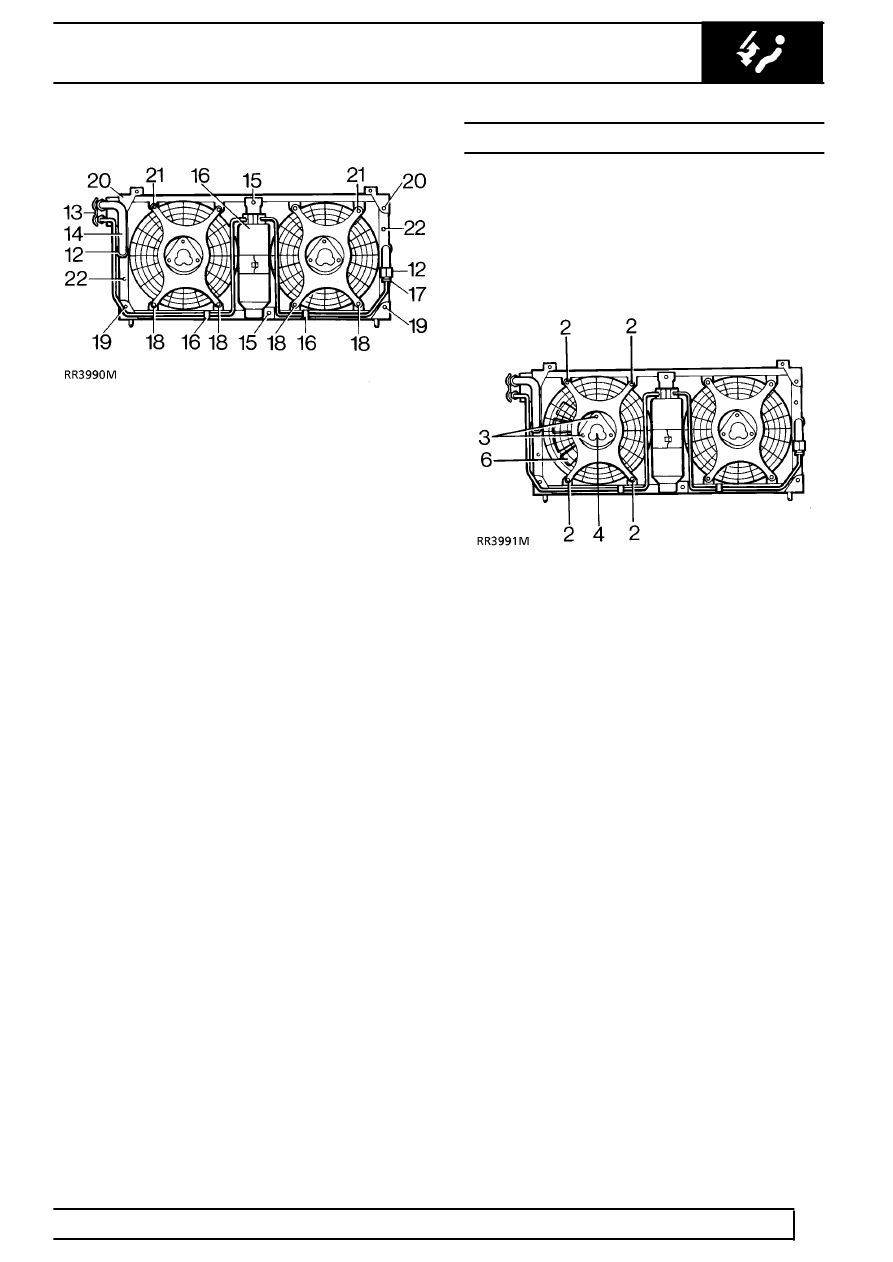
12. Disconnect receiver/drier pipes at condenser
unions.
13. Remove retaining bracket from side pipe.
14. Remove LH pipe from condenser and discard ’O’
ring.
15. Remove 2 screws securing receiver/drier
bracket.
16. Release pipes from lower clips and remove
receiver/drier assembly.
17. Remove ’O’ ring from RH pipe.
18. Remove 2 screws securing lower end of each
fan motor.
19. Remove 2 bolts and remove condenser lower
mounting bracket.
20. Remove 2 bolts and securing condenser upper
mounting bracket.
21. Remove upper mounting bracket and fan motor
assembly.
22. Remove 2 screws securing each side mounting
bracket and remove the brackets.
23. Transfer parts removed to new condenser.
24. Add 40 ml of refrigerant oil to new compressor to
compensate for oil loss.
Refit
25. Reverse removal procedure. 3 to 11.
26. Evacuate and recharge air conditioning system.
See Adjustment, Refrigerant Recovery
Recycling Recharging
27. Carry out leak test on disturbed joints.
See
Adjustment, Leak Test System
28. Check air conditioning operation by carrying out
a System Test.
See Adjustment, System Test
CONDENSER FANS AND MOTORS
Service repair no - 82.15.01 - Motor
Service repair no - 82.15.03 - Fan
Remove
1. Remove condenser assembly.
See Condenser
2. Remove 4 bolts securing fan cowl to condenser.
3. Remove 3 bolts securing fan motor to cowl.
4. Remove fan motor assembly.
5. Remove 3 screws securing fan blades to motor.
6. Remove fan blades.
Refit
7. Reverse removal procedure. Ensuring that wiring
is clipped and no fouling of fan blade can occur.
Parts & tools for this job For Land Rover Range Rover
- TOOLA/C manifold gauge setSearch: AC manifold gauge set
- TOOLUV leak detection kitSearch: AC UV leak detection kit
- PARTCabin filterSearch: Land Rover Range Rover cabin filter
Links open Amazon search results in a new tab. As an Amazon Associate I earn from qualifying purchases.