
Pressure reducing valve (page 2 of 2)
- Make
- Mini
- Model
- Mini Workshop Manual
- Year
- 1996–2000
- Section
- Repairs
BrakesPressure reducing valve · page 2 of 2
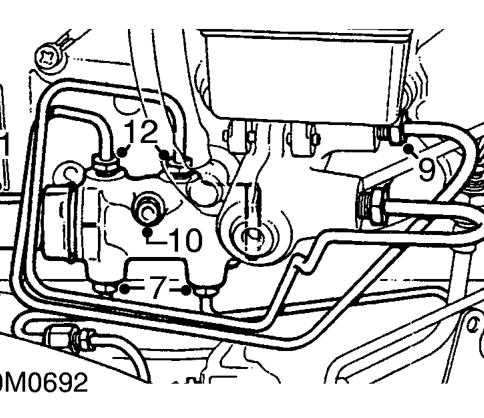
- Loosen unions and disconnect lower brake pipes from valve
CAUTION: Plug the connections.
- Position cloth under master cylinder to absorb spilled fluid.
- Loosen unions and disconnect brake pipes from master cylinder.
CAUTION: Plug the connections.
- Remove bolt securing valve to body.
- Remove valve and pipes as an assembly.
- Loosen unions and remove pipes from pressure reducing valve.
Refit
- Remove blanking plugs from new valve.
- Clean master cylinder brake pipe and pressure reducing valve unions.
- Fit pipes to valve and tighten unions. 14 Nm.
- Position valve and pipe assembly to body, fit bolt and tighten to 17 Nm.
- Remove plugs from master cylinder.
- Clean master cylinder and brake pipe unions.
- Connect pipes to master cylinder and tighten unions to 14 Nm.
- Connect brake pipes to valve and tighten unions to 14 Nm.
- Remove cloth positioned to absorb fluid.
- Locate ECM mounting bracket on body, fit bolt and tighten to 10 Nm.
- Secure clip on main harness to ECM mounting bracket.
- Secure engine compartment fuse box to ECM mounting bracket.
- Fit ECM. See ENGINE MANAGEMENT SYSTEM - MEMS, Repairs.
- Bleed brakes. See Adjustments.
Parts & tools for this job For 1996 Mini Mini
- PARTEngine gasket setSearch: Mini Mini 1996 engine gasket set
- TOOLTorque wrenchSearch: 3/8 inch torque wrench
- TOOLFeeler gauge setSearch: feeler gauge set
Links open Amazon search results in a new tab. As an Amazon Associate I earn from qualifying purchases.